
Abstract
Cytological preparations from cell nuclei are required to count the number of chromosomes (including determining ploidy or aneuploidy), to investigate their morphology and organization. The results are valuable for genetic and evolutionary studies, and in breeding programs to understand species relationships, polyploidy, and potential introgression of chromosomes in hybrids between different species. Preparation of good chromosome spreads with well-separated metaphase chromosomes is the foundation of cytogenetic research including chromosomal mapping based on FISH (fluorescence in situ hybridization). FISH combined with specific locus probes correlated with molecular markers to specific chromosomes for integrating physical and linkage maps as well as studying the genetic evolution of allopolyploidization, has rarely been applied in Coffea spp. despite being a global high-value crop. Cytogenetic studies of Coffea are limited by the small size and similar morphology of the chromosomes, but FISH can help to map sequences to chromosome arms and identify individual chromosomes. This chapter presents protocols for germinating seeds and growing coffee plants involving pre-treatment and fixation of root-tips where the meristems of actively growing roots have many divisions. Mitotic metaphase chromosome preparation on microscope slides is described, as well as preparing probes of 5S and 18S rDNA to be used for FISH. The FISH experiments involve a two-step protocol with pre-treatments and setting up the hybridization on day 1 and the detection of probe sites on day 2 after overnight hybridization. A final section gives advice about visualization using a fluorescent microscope and capturing images.
You have full access to this open access chapter, Download chapter PDF
Keywords
1 Introduction
The vast majority of commercial coffee comes from two closely related species, Coffea canephora and Coffea arabica (Melese and Kolech 2021). C. canephora (known as robusta; 35% of world production) is diploid with two sets of chromosomes, while C. arabica (65% of production) is tetraploid, with four chromosome sets from two ancestral species (see other chapters in this volume). Thus, the genome of C. arabica has four sets of chromosomes (2n = 4x = 44), and four copies of most genes (compared to the two in C. canephora (2n = 2x = 22) (see Hamon et al. 2009). At meiosis, the tetraploid C. arabica behaves as a diploid and chromosomes pair and recombine. The genus Coffea includes in total over 90 species, with wild species of coffee including both diploids and polyploids (see Lashermes et al. 1997; Melese and Kolech 2021). The use of this germplasm through hybridization can increase the genetic base of the crop, and may be used to transfer useful genes from wild relatives into a crop variety.
The study of chromosome numbers in an accession of a species is important to give the ploidy-level (Tomaszewska et al. 2021). Identification of individual chromosomes by morphological analysis or by in situ hybridization with DNA probes, can be used to link the genetic map to physical chromosomes (Paesold et al. 2012), and track chromosomes in breeding programmes involving hybridization and recombination (eg, in cereals, Patokar et al. 2016 or Ali et al. 2016). In crosses involving wide species or polyploid species, cytogenetic study of the chromosome numbers and morphology is particularly valuable to define which crosses may be most easy to make, and to determine new combinations of chromosomes in hybrids and backcross derivatives. In some cases, recombination between chromosomes of different species is required to introgress useful agronomic characteristics without undesirable characters. Aneuploidy, involving the loss or gain of one or more chromosomes (e.g., Niemelä et al. 2012 in Brassica; Tomaszewska et al. 2023 in Urochloa), is found occasionally, along with other types of chromosome rearrangements such as inversions, deletions or translocations (eg, Forsström et al. 2002; Liu et al. 2019; Tomaszewska and Kosina 2021), particularly in irradiated material and after some tissue culture protocols.
The key method for molecular cytogenetics is fluorescent in situ hybridization (FISH) that allows visualizing the location of DNA sequences to be determined along chromosomes, providing cytogenetic maps of chromosomes (Schwarzacher 2003; Heslop-Harrison and Schwarzacher 2011; Bačovský et al. 2018). Many repetitive sequences can be used to provide chromosomal landmarks to identify chromosomes, show aspects of genome organization and evolution, and track chromosome presence or rearrangement through evolution and crossing programmes. High-resolution FISH mapping on mitotic chromosomes is a powerful technique to help integrate physical and genetic maps and also to evaluate genome assembly quality (Szinay et al. 2008). Although now less used than in the past, chromosome banding can also offer chromosome differentiation and identification (e.g. Schwarzacher 2003, Kumar et al. 2021 and in coffee Pierozzi et al. 1999). Meiotic analysis can show the pairing of chromosomes and reveals any translocations between chromosomes, either during evolution or following breakage and rejoining (e.g. Lashermes et al. 2000).
Preparation of high quality metaphase, with well-spread chromosomes free of cytoplasm and other cellular material, containing high number of divisions, is a prerequisite for cytogenetic studies such as chromosome counting, morphological analysis and mapping, chromosome banding procedures, and in situ hybridization. In this chapter, we describe the basic methods of chromosome preparations and fluorescent in situ hybridization (FISH) in coffee species, including protocols to obtain root tips with abundant metaphases from seedlings, root tip sampling and fixation, mitotic chromosome spread preparation and the basic steps of FISH for repetitive DNA using rDNA probes. Schwarzacher and Heslop-Harrison (2000) and Schwarzacher (2016) give more details about chromosome preparation and in situ hybridization for many species.
Cytogenetic maps provide an efficient tool for gene localization, validation of contig order from sequence analysis, characterization of gene regions or physical genetic distances, and the presence of chromosomal rearrangements such as inversions or translocations (Heslop-Harrison and Schwarzacher 2011). In the protocol below, we show the use of the repetitive rDNA as probes to identify coffee chromosomes carrying the 35S/45S and 5S rDNA loci, which provide robust and useful landmarks on chromosomes (e.g., Široký et al. 2001; Ali et al. 2016; and for coffee Hamon et al. 2009). Many other repetitive probes can be used to provide landmarks. Generally, short lengths of probes from single-copy genes or groups of genes (single-copy FISH) do not work reliably in plants. In most cases, repetitive sequences—simple sequence repeats, tandem repeats from satellite DNA, or rDNA genes are used as probes to provide chromosomal landmarks (e.g. Liu et al 2019; Agrawal et al. 2020; Rathore et al. 2022). Large insert clones, in particular BACs, or large pools of synthetic oligonucleotide probes (typically 20,000 bp or more) may also be used (see Niemelä et al. 2012; Zaki et al. 2021), particularly when any repetitive sequences within the probes have been removed. Mitotic metaphase chromosome FISH can locate probes with a longitudinal resolution of about 2–20 Mb. Meiotic chromosome preparations can also be used, and in some circumstances may be readily available. In particular, pachytene chromosomes from meiotic prophase may give resolution of in situ signal of 50–100 kb (e.g. Szinay et al 2008, Mandáková et al. 2019). Other systems with statistical analysis of hybridization sites within interphase nuclei, stretched chromosomes (digested with proteinase K), and fibre FISH to DNA fibres from the nucleus extended to nearly their full molecular length can be used to give higher resolution of a few kb (see Schwarzacher and Heslop-Harrison 2000).
The application of FISH to coffee mitotic chromosomes has provided opportunities for identifying chromosomes and mapping genes and sequences of interest in several Coffea species. On several cultivated and wild species of coffee, mitotic chromosomes, as well as meiotic pachytene have been used to map using repetitive sequences of 45S rDNA and 5S rDNA or BACs linked to resistance genes as probes for in situ hybridization (Lombello and Pinto-Maglio 2004a, b, c; Pinto-Maglio 2006; Herrera et al. 2007; Hamon et al. 2009; Iacia and Pinto-Maglio 2013). Coffee mitotic chromosomes in metaphase are small (1–3 µm) and have similar morphologies, making their individual identification difficult (Krug 1934, 1937; Mendes 1957). On these small chromosomes, the exact location of a small repetitive sequence by in situ hybridization is also difficult to determine (Lombello and Pinto-Maglio 2003; Herrera et al. 2007), although the repetitive probes and BACs can identify clearly chromosome arms and domains such as terminal, intercalary or centromeric.
Most chromosome analyses rely on mitotic metaphases, so dividing tissue is essential and is best obtained from healthy, disease free, and rapidly growing plants (Schwarzacher and Heslop-Harrison 2000; Schwarzacher 2016). Among plant tissues containing actively dividing cells, root-tip meristems are one of the most commonly used, but other plant tissues such as meristematic cells from young shoots, leaves or emerging buds as well as hairy root cell culture lines or liquid tissue culture cells (Anamthawat-Jónsson and Thórsson 2003; Bačovský et al. 2018). Calli or protoplasts (Nishibayashi et al. 1989) from tissue culture can be also used for chromosome preparation but it is difficult to obtain many metaphases, and to spread chromosomes sufficiently that they can be counted. The best source to obtain fresh coffee root tips for chromosome preparation is from seedlings or young plants. When growing tropical species in temperate climates, it is important to understand temperature and light requirements and we give suggestions to achieve best results.
Although several methods for chromosome preparation are available, we recommend to use the squashing method for coffee. Mitotic chromosomes are released with cells from fixed rapidly dividing root tips, and spread onto a microscopic slide into a single layer by gentle pressure on the digested tissue through squashing. Classically, this preparation method was used in combination with acetocarmine staining to analyse the number and shape of metaphase chromosomes. Not discussed below, but preparations for chromosome counting can be made by acid digestion of root-tips, staining with Feulgen’s reagent, before spreading of cells and chromosomes on a microscope slide. The squashing method does not require costly equipment and usually gives high quality metaphase spreads. The protocols for labelling probes for rDNA is based on PCR amplification and the two step FISH experiments follow our previous published protocols (Schwarzacher and Heslop-Harrison 2000) and although modifications and optimizations for coffee chromosomes are included below.
2 Materials
It is assumed that a well-equipped laboratory with molecular biology and microscopy facilities and consumables are available; these include microcentrifuge (Eppendorf) tubes, automatic pipettes, tips, micro centrifuge, balance, stirrer and mixer. Only more specialized or essential equipment is described in the following list of materials.
2.1 Seed Germination and Plant Cultivation
-
1.
Plant material: Coffee seeds or young plants growing in pots. Here, we used, diploid coffee (2n = 2x = 22) including C. canophera ‘Roburst’ and tetraploid C. arabica (2n = 4x = 44) cultivars.
-
2.
Trays and plant pots (8–20 cm diameter depending on size of plants).
-
3.
Nutrient potting soil and fine sand mixtures as required.
-
4.
Sand bed: fill small trays with about 8 cm deep sand.
-
5.
Plastic bags (new or recycled as long as they are clean and disease free).
-
6.
Plastic film.
-
7.
Water (see Note 1).
-
8.
Appropriately shaded greenhouse or growth chamber at 25–28 °C and 14 h day/10 h night light cycle.
2.2 Fresh Root Sampling and Fixation
-
1.
α-bromo-naphthalene (saturated 0.05% aqueous solution): prepare by mixing a few drops of α-bromo-naphthalene liquid in 500 ml distilled water, shake vigorously to make a saturated solution and allow to settle (a small amount of the α-bromo-naphthalene should remain at the bottom of the vessel). Keep at room temperature up to six months (see Note 2).
-
2.
Fixative: prepare fresh for each experiment by mixing 96 or 100% (v/v) ethanol and glacial acetic acid 3:1; do not keep fixative for more than 30 mins before use.
-
3.
Small tubes with tight caps (e.g. microcentrifuge tubes, Bijou tubes or freezer vials; should hold about 2–10 ml).
-
4.
Fine forceps and scissors.
2.3 Chromosome Preparation
-
1.
Enzyme buffer (10 mM, pH 4.6): for a 100 mM stock solution, mix 100 mM citric acid and 100 mM tri-sodium citrate in a ratio of 2:3 and autoclave (once opened can be stored at 4 °C for a few days to 2 weeks). Before use dilute buffer with distilled water to 10 mM.
-
2.
Enzyme solution: 20 U/ml cellulase (e.g. Sigma C1184), 10 U/ml ‘Onozuka’ RS cellulase and 20 U/ml pectinase (e.g. Sigma P4716 from Aspergillus niger; solution in 40% glycerol) in 10 mM enzyme buffer. Store in 2–5 ml aliquots at − 20 °C. The enzyme solution can be re-used a few times (see Note 3).
-
3.
0.01 M HCl.
-
4.
60% (v/v) acetic acid.
-
5.
Dry ice or liquid nitrogen (see Note 4).
-
6.
Fine forceps, razor blades and dissecting needles.
-
7.
Microscope glass slides: specified for microscopy, pre-cleaned and if available specially treated for better adhesion (e.g. Thermofisher, UK, Superfrost or Superfrost plus; Citotest, PR China) (see Note 5).
-
8.
Coverslips: 18 × 18 mm No. 1 (see Note 6).
-
9.
Petri dishes (9 cm diameter or smaller).
-
10.
Filter paper (approx. 9 cm diameter).
-
11.
Autoclave or masking tape.
-
12.
Diamond pen to scratch glass.
-
13.
Plastic slide box holding 20 or 50 slides.
-
14.
Dissecting microscope.
-
15.
Phase contrast microscope.
-
16.
Spirit lamp (alcohol) for flaming.
2.4 Probe Labelling
-
1.
DNA template PCR amplification of probe DNA. Here we give the rDNA probes that we used on coffee chromosomes, but can also be used on any plant species.
-
a.
5S rDNA: DNA of clone containing the 5S rDNA repeat, pTa794 from wheat, Triticum aestivum (Gerlach and Dyer 1980), insert length 410 bp.
-
b.
18S-5.8S-26S rDNA (35S or 45S rDNA): total genomic DNA of wheat or rice for amplification (coffee DNA would probably work too).
-
a.
-
2.
Primers for PCR amplification of probe DNA
-
a.
For clones M13 sequencing primers; eg. M13 forward (GTA AAA CGA CGG CCA GT) and M13 reverse (GGA AAC AGC TAT GAC CAT G); this will amplify the insert plus about 30–50 bp on each side depending on the cloning site.
-
b.
35S/45S rDNA: Primers based on 18S rDNA sequence of rice (Chang et al. 2010) rice_18S_P1 forward (CGA ACT GTG AAA CTG CGA ATG GC) and rice_18S_P2 reverse (TAG GAG CGA CGG GCG GTG TG); the product will be about 2.7 kb depending on species of the template DNA. (see Note 7).
-
a.
-
3.
Standard PCR reagents, nucleotides and TAQ polymerase.
-
4.
Gel electrophoresis system, agarose, running buffer, DNA ladder and loading buffer.
-
5.
Labelling kit: based on random priming or nick translation (e.g. Invitrogen, Roche).
-
6.
Labelled nucleotides if they are not included in the labelling kit: digoxigenin-11-dUTP and/or biotin-16-dUTP (e.g. Roche or other suppliers).
-
7.
Purification tubes to clean PCR product or labelled probe to remove unincorporated nucleotides, unwanted enzymes, and salts (see Note 8).
2.5 FISH Day 1: Pre-treatments and Hybridization
-
1.
20X SSC (Sodium citrate buffer): 3 M NaCl and 0.3 M sodium citrate, adjust to pH 7, and autoclave before storage at room temperature or in small aliquots at − 20 °C. Before use dilute with distilled water to 2X SSC.
-
2.
RNase solution: 100 μg/ml in 2X SSC; prepare 250 µl per slide from a 10 mg/ml stock solution of DNAse-free RNAse in 10 mM Tris–HCl, pH 8; store small aliquots at − 20 °C.
-
3.
0.01 M HCl
-
4.
Pepsin solution (optional, see Note 9): 1–10 μg/ml in 0.01 M HCl; prepare from a 1 mg/ml (ca. 4000 U/mg) stock solution; store stock solution in aliquots at − 20 °C.
-
5.
4% paraformaldehyde solution: ready made in PBS (e.g. Thermo Scientific) (see Note 10).
-
6.
Acetic acid 100% (v/v).
-
7.
Ethanol series: 96% (v/v), 85% (v/v) and 70% (v/v) in water
-
8.
Hybridization mixture (see Table 1); all solutions can be stored in 0.5–1 ml aliquots at − 20 °C if not indicated otherwise. Before use, slowly defrost ingredients and keep on ice.
-
a.
Formamide (molecular grade).
-
b.
Dextran sulfate: 50% (w/v) solution in water, heat to dissolve and sterilize by forcing through a 0.22 μm filter.
-
c.
SDS solution: 10% (w/v) sodium dodecyl sulfate (also called sodium lauryl sulfate) in water, filter sterilize; store at room temperature.
-
d.
Salmon sperm DNA: 4 μg/μl sonicated or autoclaved DNA (also suitable are herring sperm or E. coli DNAs).
-
e.
20X SSC (sterile): see above Sect. 2.1.
-
f.
Optional EDTA (Ethylene-diamine-tetra-acetic acid): 100 mM, pH 8.
-
g.
Probe DNA from protocol 3.4.
-
h.
Molecular grade distilled water.
-
a.
-
9.
Micro-centrifuge tubes (1.5 and 0.2 ml).
-
10.
Plastic coverslips: 25 × 25 mm pieces from autoclavable plastic bags.
-
11.
Plastic or glass Coplin jars holding eight slides and 80–100 ml solution.
-
12.
Humid chamber; a plastic or metal box with preferably curved lid to avoid condensation to drop on the slides; line with filter paper or tissue and moisten with water or 2X SSC.
-
13.
Hybridization oven or platform (optional) (see Note 11).
-
14.
Shaking platform (optional).
-
15.
37 °C incubator.
-
16.
Water bath or PCR machine.
2.6 FISH Day 2: Detection of Hybridization Sites and Mounting of Slides
-
1.
Post-hybridization wash solution: dilute from 20X SSC to 2X SSC and 0.1X SSC as required.
-
2.
Detection buffer: 4X SSC containing 0.2% (v/v) Tween-20.
-
3.
Blocking solution: 5% BSA (Bovine serum albumin, heat shock fraction, pH7): 5% (w/v) in detection buffer. Prepare about 1 ml for 8 slides; weigh out approximate amount of BSA in a weighing boat or small tube and add corresponding volume of detection buffer (200 µl for each 0.01 g BSA).
-
4.
Detection solution: dilute antibodies about 1:200–1:500 in blocking solution (final concentration is 1–6 µg protein /ml); if two labels are used, antibodies can be combined; prepare 50 µl per slide. For the detection of biotin and digoxigenin we recommend to use the following detection reagents:
-
a.
streptavidin (e.g. Alexa Fluor 594 conjugated; 1mg dilute with distilled water to 200 µg/ml; Molecular Probes, Invitrogen).
-
b.
anti-digoxigen antibody (e.g. FITC conjugated FAB fragment, 200 µg/ml; Roche).
-
a.
-
5.
DAPI antifade solution: mix 5 µl of DAPI stock (100 µg/ml in water) and 245 µl of antifade solution (Vectashield or Citifluor) (see Note 12).
-
6.
Filter paper.
-
7.
Large coverslips (No. 0, 24 × 30 or 40 mm) (see Note 6).
-
8.
Plastic coverslips: 25 × 25 mm pieces from autoclavable plastic bags.
-
9.
Coplin jars: holding eight slides and 80–100 ml solution.
-
10.
Humid chamber, see 2.6.12.
-
11.
37 °C incubator.
-
12.
45 °C water bath.
-
13.
Shaking platform or water bath.
2.7 Microscopy and Image Analysis
-
1.
Epifluorescent microscope with multiple wavelength light illumination, appropriate filter blocks for the fluorochromes to be imaged (see Table 2), 20, 40 and 100X lenses suitable for UV fluorescence and digital high resolution low light sensitive B&W or colour camera (see Note 13).
-
2.
Immersion oil suitable for UV fluorescence microscopy (e.g. Nikon Immersion Oil F or Zeiss immersion oil 518F).
-
3.
Image analyzing program, e.g. Adobe Photoshop, ImageJ (formerly NIH image; https://imagej.nih.gov/ij/) or microscope software (e.g. Nikon NIS).
3 Methods
3.1 Seed Germination and Plant Cultivation
Coffee seeds are able to germinate with water when isolated from the yellowish-green fruits at around 225d after anthesis (Eira et al. 2006; Bytof et al. 2007). Coffee embryos are very sensitive to low temperature and are damaged when seeds are kept at temperatures below 25 °C. However, seed storage for medium periods of a few weeks to months at 25 °C is possible if environmental relative humidity is maintained around 50%, while for conservation at freezing temperatures, a lower moisture content of coffee seeds and hermetic conditions are required (Eira et al. 1999, 2006; Patui et al. 2014).
Once seeds have germinated and seedlings are transferred to soil, favorable temperatures and high air humidity near saturation are the most important conditions required for good growth. C. arabica is well adapted to cooler temperatures with the optimum growth at mean annual temperature in natural conditions ranging from 18 to 22 °C, while C. canephora is better adapted to higher temperatures, with the optimum growth at annual mean temperature ranging from 22 to 30 °C (Pohlan and Janssens 2010).
In a greenhouse (warm tropical or temperate conditions, 25–28°C, 14h day) or growth chamber, the following method yields coffee plants for molecular biology and cytology experiments and analysis. In order to maintain high humidity of 80–90% needed for good growth, individual plants are covered with plastic bags.
-
1.
Fresh seeds are best collected as ripe berries from disease-free plants, growing areas or plantations; pulp them and, after removing the mucilage by fermentation and washing in water, dry the seeds in the shade.
-
2.
Germinate fresh seeds, less than 2 months old, as they tend to lose viability thereafter (see Note 14).
Use either of the following methods in the green house or growth chamber.
-
a.
Spread the seeds on a sand bed and cover with a layer of sand (about 2 cm). Water well and cover with a plastic film/bag or moist organic materials. Keep covered and moist until the radicles emerge and the seedlings reach 10–20 cm height.
-
b.
Pre-germinate the seeds layered between moist gauze. As soon as the radicles emerge, transfer to pots or trays with a soil and sand mixture and cover with plastic film or bag. Keep covered until seedlings reach 20–40 cm.
-
a.
-
3.
Transfer plants to individual 15 cm diameter pots with 8:2 soil sand mixture and cover with plastic bags to keep moist at 80–90% humidity.
-
4.
Keep C. arabica at around 25 °C, and C. canephora at about 28 °C, at 14 h day length with natural or artificial light avoiding exposure to direct sun light).
-
5.
Grow plants for several days to weeks until roots develop and reach the side of the pots (see Note 15). For growth of root tips with many divisions, make sure the soil is not too wet and waterlogged, but does not dry out either.
3.2 Fresh Root Sampling and Fixation
In order to maximise the number of metaphases, the best period to sample fresh root tips is 4–4.5 h after sunrise or lights coming on. Only collect from healthy and well growing plants and only take roots with white ends indicative of new growth (Fig. 1). Steps are carried out at room temperature unless otherwise stated; use about 3X as much solution as plant material and make sure that roots are well covered by each solution.

Coffee seedlings and fresh roots, a seedlings in good health have many freshly growing roots to sample. b The arrows and the circles mark the fresh roots which are the best choices for chromosome preparation. The sampled roots should be less than 1 cm suitable for the small tubes
-
1.
Forceps and scissors should be washed in distilled water before sampling (see Note 16).
-
2.
Carefully remove plants from the pot and collect roots from the edge or by rinsing away soil (Fig. 1).
-
3.
Cut roots about 1–2 cm from the tip with a clean forceps or scissors and immediately transfer to a small tube with 1.5–2 ml α-bromo-naphthalene solution.
-
4.
Incubate at room temperature for 2 h, followed with 4 °C for another 2 h.
-
5.
Quickly blot roots dry on a filter paper and transfer roots to freshly prepared fixative.
-
6.
Keep at room temperature for 2 h and then transfer to 4 °C for a minimum of 2 days. For long term storage of several months keep fixed roots at − 20 °C (see Note 17).
-
7.
Fixed root-tips can be transported between laboratories and are ‘dead’ so there is no risk of transfer of pathogens. To obtain optimum chromosome preparations, they should be transported under cold conditions.
3.3 Chromosome Preparation
Having good preparations with plenty well spread metaphase chromosomes that are free of cytoplasm is the most crucial prerequisite of successful chromosome banding or in situ hybridization. Here we describe the method using proteolytic enzymes including pectinase and cellulase to remove cell walls and squashing dissected meristematic tissue in acetic acid between glass slide and cover slip. The method is modified from Schwarzacher et al. (1980) and Schwarzacher and Heslop-Harrison (2000). Steps are carried out at room temperature in a Petri dish if not otherwise stated.
-
1.
Wash fixed root tips in distilled water in a Petri dish for 30 min.
-
2.
Remove any dirt from the root, discard and cut away any unwanted material. Roots should just be 0.5–1 cm long and should have a clear white tip.
-
3.
Incubate root tips in 0.01 M HCl for 10 min.
-
4.
Wash the root tips in 1X enzyme buffer 3 times for 5 min each.
-
5.
Place the root tips one by one on a clean slide, place in a Petri dish and fix with tape (Fig. 2).
Fig. 2 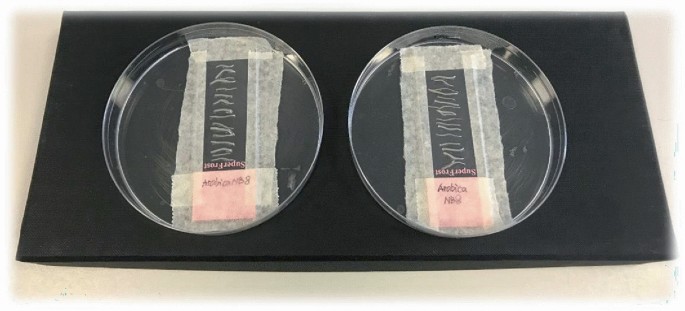
Enzyme treatment of the root tips
Fig. 3 
Example of roots with pointed root caps and meristematic cells just behind. Cutting away non-dividing tissue is essential for preparations with high metaphase index
-
6.
Apply enzyme solution unto the root tips, 150–200 µl for 10 root tips, close the Petri dish and incubate at 37 °C for 35 min.
-
7.
Remove the enzyme solution using a pipette, and then wash the root tips with enzyme buffer 3 times for 5 min (see Note 18).
-
8.
Put a drop of water on the treated root tips to keep moist. (see Note 14).
-
9.
Make sure that root tips are kept moist and do not dry out during the following steps of chromosome preparation.
-
10.
Dissect the root meristem (Fig. 3).
-
a.
Put a drop of 60% acetic acid on a clean slide and then place one or two treated root tips in it. Leave for 1–3 min.
-
b.
Under a dissection microscope, separate the root cap (<0.1 cm) from the root tip using a clean needle or forceps and discard.
-
c.
Dissect the root meristem that contains the dividing cells in the acetic acid and separate individual cells by tapping or squeezing with a fine forceps; remove non-meristematic tissues and mix cells evenly.
-
a.
-
11.
Place a small cover slip on the preparation. Cover one corner with a tissue or filter paper and hold with one finger to prevent sliding. Then vertically squeeze the slide gently using another finger. Tap the slide vertically with an eraser or needle until bubbles disappear between the cover slip and the slide.
-
12.
Put the slide with the cover slip in a folded filter paper and press with the thumb or palm of your hand on the coverslip area; in order to avoid shearing of cells and chromosomes slowly and carefully increase the pressure.
-
13.
Check the slide under phase-contrast microscopy to assess morphology and number of metaphase and chromosomes. Metaphases should be frequent (about 5–10% of cells) and metaphase chromosomes should be free of cytoplasm and dirt, well spread and with little overlaps, but should not be distorted (Fig. 4). Chromosomes and nuclei appear light grey with little contrast when flat and squashed well, but are either black or very bright if not squashed enough.
-
14.
If necessary to clear cytoplasm or spread chromosomes more, a drop of acetic acid can be applied to the edge of the cover slip and the slide heated for a few seconds (not higher than 60 °C) with an alcohol flame and squashed again.
-
15.
When preparations are satisfactory, freeze slide on dry ice for 5–10 min or dip into liquid nitrogen for a few seconds; then remove the cover slip with a razor blade and let the slide air dry.
-
16.
Store slides with chromosomes in the dark at 4 °C in a small plastic slide box. For long term storage, keep at − 20 °C.


Examples of the chromosomes under phase contrast microscope. Arrows mark several typical features of the chromosome preparation. a Nuclei are at good density; arrow1 shows the chromosomes from a single cell, but not well spreads. b Cells are too dense and nuclei overlap; arrow2 shows pro-metaphase chromosomes, that are not well spread. Arrow3 shows metaphase chromosomes, but they are squashed to hard, so some chromosomes are distorted or destroyed. c Well separated cells and metaphase chromosomes. Arrows 4 and 5 are good examples of metaphase chromosome preparation, well spreads and very little cytoplasm. The round opaque object is the nucleolus
3.4 Probe Labelling
An important factor for the success of FISH experiments is the choice of probes. The amount of target sequences are critical and low copy sequences present at less than 10–15 kb at one site within the chromosomes are not suitable whereas repetitive sequences in large arrays such as the rDNAs or tandem repeats are ideal targets. Template DNAs to be used for generating probes can be inserts of clones, PCR products or total genomic DNA. Probes after labelling should be 100–300 bp long to allow for sufficient penetration to the DNA within the chromosomes, but shorter probes of 30–100 bp are also suitable, while probes longer than 500 bp are not recommended. Many different labelling kits are available commercially and use DNA polymerases in random priming or nick-translation that automatically generate probes of suitable lengths from larger templates. However, template DNAs longer than 2 kb do not label efficiently and will need cutting with enzymes, sonication or heat (Schwarzacher and Heslop-Harrison 2000; Salvo-Garrido et al. 2001).
Either labelled dUTP or dCTP are used and dependent on the labelled attached different ratios to unlabelled dTTP or dCTP nucleotides are recommended to allow efficient incorporation by the DNA polymerase. Manufacturers give detailed instructions of the procedure and recommendation for amounts of reagents to be used, but we have found that often the amount of expensive labelled nucleotides can be reduced when they are fresh and have not undergone several freeze-thaw cycles. We recommend to use biotin and digoxigenin as labels and here we give the rDNA probes that we used on coffee chromosomes (Fig. 5), but they can also be used on any plant species. Similarly, any cloned DNA or amplified PCR product that represents the repeats to be visualized in the species of interest are also suitable.

Fluorescent in situ hybridization of a root tip metaphase of C. arabica (2n = 4x − 44). a The chromosomes are stained with DAPI (a) showing centromeres as small gaps or slightly brighter bands (b). Overlay of DAPI image with 18S rDNA signal in green (c) and 5S rDNA signal in red (d). One pair of chromosomes has a major 5S rDNA site near the centromere and a terminal 18S rDNA site of the small chromosome arm. Additionally, there is one pair of minor 18S rDNA sites (arrows) and one pair of minor 5S rDNA sites (arrowhead). Bar = 5 µm
-
1.
Amplify the probe DNA by PCR.
-
a.
For 5S rDNA: use miniprep DNA of clone pTa794 with M13 primers to amplify the insert by PCR using an annealing temperature of 56 °C. Expected product insert size plus about 80 bp (Fig. 6).
Fig. 6 
PCR amplification of pTa794 insert using M13 primers. The image shows the following lanes from left to right: 100 bp ladder (with 100, 200, 300, 400, 500, 600, 700, 800, 900 bp, 1, 1.25, 1.5 and 2 kb band), 3 PCR replicas of the same miniprep DNA, empty lane, 3 PCR replicas of a different miniprep DNA, 100 bp ladder. The correct product is a very strong band at about 500 bp as the primers used are outside the cloning site and add 81 bp to the insert length of 410 bp. Some background smear and bands are also visible. It is therefore best to cut the band and purify before labelling
-
b.
For 35S/45S rDNA: use total genomic DNA from wheat or rice with the rice_18S primers to amplify the 18S rDNA sequence by PCR using an annealing temperature of 68 °C.
-
a.
-
2.
Check the PCR product on a 1.2% agarose gel.
-
a.
If there is a single sharp band of the expected size, then the entire PCR product can be used for labelling after purification.
-
b.
If there are several bands, or a smear, then cut out the band of the expected size, extract DNA from the band and purify.
-
a.
-
3.
Label probe DNA following the instructions of the labelling kit.
-
4.
Clean the labelled probe using purification tubes (see Note 8) and resuspend in 20–30 µl distilled water.
-
5.
Store probes at − 20 °C until use avoiding freeze thaw cycles (see Note 19).

3.5 FISH Day 1: Pre-treatment and Hybridization
For in situ hybridization, the protocol of Schwarzacher et al. 1989 and Schwarzacher and Heslop-Harrison (2000) is used with some adaptations to coffee chromosomes reported by Pinto-Maglio (2006) and several optimizations proposed here. Steps are carried out at room temperature unless otherwise indicated. Washing steps and incubation in buffers are carried out in Coplin jars (holding 8 slides and 80–100 ml solution); specific reagents are applied in small volumes of 200–300 µl per slide and covered with a plastic cover slip and incubated in a humid chamber.
-
1.
Take slides from protocol 3.3. (Step 15), warm to room temperature if they were kept in the fridge or freezer for storage and check again for quality. Mark the area of chromosome preparation with a diamond pen and number slides for easy identification during the following steps.
-
2.
Post-fixation of slides.
-
a.
Incubate slides in fixative (ethanol/acetic acid 3:1) for 10–30 min.
-
b.
Wash with 100% ethanol 2 times for 5 min each.
-
c.
Air-dry.
-
a.
-
3.
RNase treatment.
-
a.
Apply 200 µl RNase solution to each slide and cover with a plastic cover slip.
-
b.
Incubate for 1 h at 37 °C in a humid chamber.
-
c.
Wash 2 times in 2X SSC for 5 min each.
-
a.
-
4.
Pepsin treatment (optional; slides that are not used for this step should be kept in 2X SSC at room temperature).
-
a.
Incubate slides in 0.01 M HCl for 2 min.
-
b.
Shake of excess solution and apply 200 µl Pepsin solution to each slide and cover with a plastic cover slip.
-
c.
Incubate at 37 °C for 10 min in a humid chamber.
-
d.
Rinse in distilled water for 1 min.
-
e.
Wash in 2X SSC for 5 min.
-
a.
-
5.
Post-fixation with paraformaldehyde.
-
a.
In the fume hood, incubate slides in 4% paraformaldehyde solution for 10 min.
-
b.
Wash in 2X SSC for 5 min.
-
a.
-
6.
Dehydrate slides through an ethanol series and air dry.
-
7.
Prepare hybridization mixture.
-
a.
Decide on probes (from Protocol 3.4) and amounts to be used, normally the final concentration of the probes should be 1–3 ng/µl in a hybridization mixture (see Table 1). Each slide can be probed with two different probes (e.g. 5S and 35/45S rDNA), but each probe needs to be labelled with a different hapten (e.g. biotin and digoxigenin) so it can be detected with a different antibody linked to a different fluorochrome (see Protocol 3.6 and Fig. 5).
-
b.
Calculate and make master mix for all slides plus one following Table 1. Mix well and keep on ice.
-
c.
Prepare the hybridization mixture for each slide in a separate tube by adding master mix, probe and water following Table 1. Mix gently but thoroughly.
-
d.
Denature hybridization mixtures at 75 °C for 10 min and stabilize on ice for 10 min.
-
a.
-
8.
Hybridization.
-
a.
Apply hybridization mixture on each slide and cover with a plastic coverslip.
-
b.
Denature chromosomes and hybridization mixture in hybridization oven. This step is critical, and time and temperature will need adjusting even if the same species or variety is used. It is influenced by n the way chromosome preparations are made, how plants were grown, how old fixations were when used for preparation and how long slides were stored before FISH. As a guide, use 72–75 °C for 5–8 min.
-
c.
Hybridize slides in the hybridization oven or a humid chamber at 37 °C overnight (about 16 h).
-
a.
3.6 FISH Day 2: Detection of Hybridization Sites and Mounting of Slides
Original methods for FISH used 20 or 50% formamide for washing steps (Schwarzacher and Heslop-Harrison 2000), but to avoid using this toxic chemical, we now routinely use low salt conditions for stringency washes as this also reduces the background created by formamide. Take care that the slides do not dry out during all steps of the protocol. Washes are carried out in a shaking waterbath if available, otherwise gentle shaking by hand is recommended once every 30–60 s. We describe here the use of two probes labelled with digoxigenin and biotin and they must be detected with two different colours, we recommend to use FITC for digoxigenin detection and Alexa594 for biotin detection (see Sect. 2.6 step 4), but other fluorochromes can be used too (Schwarzacher and Heslop-Harrison 2000). For visualization of chromosomes, slides are stained with DAPI (4’, 6-diamino-2-phenylindole) and mounted in antifade solution.
-
1.
Post-hybridization washes.
-
a.
Prepare post-hybridization wash solutions and heat in 45 °C waterbath.
-
b.
Collect slides from hybridization oven, carefully examine for bubbles, extra water or dried out patches and note down if there are any irregularities.
-
c.
Put slides from hybridization in 2X SSC at 35–40 °C to float off coverslips.
-
d.
Wash slides in 2X SSC at 42 °C for 2 min.
-
e.
Wash twice in 0.1X SSC at 40–45 °C for 5 min; record temperature.
-
f.
Wash in 2X SSC for 5 min. Allow to cool to room temperature.
-
a.
-
2.
Detection.
-
a.
Transfer slides to detection buffer
-
b.
Shake of excess solution and apply 200 µl of blocking solution to each slide and cover with a plastic cover slip. Incubate at RT or 37 °C for 10 min.
-
c.
Remove coverslip, drain slides and apply 40–50 µl of appropriate detection solution to each slide (see Sect. 2.6 and Table 2).
-
d.
Replace the coverslip and incubate at 37 °C for 1 h.
-
e.
Wash slides in detection buffer at 40–42 °C 3 times for 5 min each.
-
a.
-
3.
Drain slides and add one drop (20–30 µl) of DAPI anti-fade solution.
-
4.
Put a large cover slip on each slide, cover with a tissue-paper and squash gently but firmly.
-
5.
Keep slides in dark at 4 °C until observations (see Note 20).
3.7 Microscopy and Image Analysis
For visualization of probe hybridization and chromosome staining, an epi-fluorescence microscope equipped with suitable filters for the fluorochromes used in the detection step. A selection of filters are given in Table 2. Apart from a 20 or 40X lens for scanning the slides, you will need a top of the range 63 or 100X lens for image capture that all need to be specified for UV fluorescence. Also make sure you use immersion oil that is specified for fluorescence analysis (see Notes 21 and 22). The microscope should be located on a stable surface in a completely dark room with a comfortable adjustable chair and ideally a small lamp with a dimmer switch, so operation for several hours is possible.
-
1.
Before you start, make sure that the system is set up correctly, the illumination lamp is centered, and no stray light can enter the lenses. Digital camera systems are now universal to capture images, and indeed allow capture of weak signal that is not visible to the eye, but no matter how expensive, they cannot make up for deficiencies in the set-up of the microscope.
-
2.
Familiarize yourself with the camera control programme, the illumination and various microscope buttons and levers so you are able to operate the system in the dark and quickly as fluorochromes and FISH signals may be very weak and fade rapidly even when viewed with good antifade mountants.
-
3.
Scan slide under DAPI with a low power lens. This will not fade your FISH signal, but close lamp shutter when not viewing mainly to avoid destruction of microscope lenses and filters by UV light.
-
4.
When you find suitable nuclei or a metaphase, change the filter to green or red fluorescence for the FISH signal and then change to the 100X lens. This avoids fading the signal with UV, but might make refocusing difficult. Only view DAPI when absolutely essential and then keep time to a minimum.
-
5.
Capture the image by sequential exposure with the different filter sets. Start with the FISH signal; the focus of the red and green fluorescence is interchangeable so use the stronger image for focusing. Generally, take the red or weaker image first, but it is advisable to do a few the other way round (see Note 23). Capture the DAPI image last, making sure that you focused the image again.
-
6.
Save raw images before image adjustment are carried out.
-
7.
To overlay the individual images and for image analysis, use either the built-in camera or microscope software or export as ‘tif’ files to use with Adobe Photoshop or NIH Image. Use only those features that are applied to all pixels of the image. Do not save with lossy formats such as JPG. Figure 5 gives some examples of coffee chromosomes after hybridization with 5S and 18S rDNA.
4 Notes
-
1.
We recommend using bottled drinking water for seed germination and root growth as it is not contaminated with chlorine, heavy metal ions, or other water purification media or toxins. Distilled water can be used, but it is less favorable as it does not contain some salts or minerals.
-
2.
Alternate arresting agents for many plant species is 2 mM 8-Hydroxyquionoline, incubate at temperature of plant growth for 30–90 min and then at 4 °C for 1–2 h or overnight.
-
3.
Concentrations of enzymes might need adjusting if a new batch or different sources of enzymes are used. Addition of pectolyase (0.1–1% solution) or viscozyme (0.1–0.5%) can be considered. Enzyme mixtures can be reused several times: after use, centrifuge in a micro-centrifuge, transfer the supernatant to a new tube, mark for reuse and freeze (not recommended for screening lines of similar material since cells may remain in the solution). Increase digestion time slightly after each round of use.
-
4.
If dry ice or liquid nitrogen are not available, slides can be frozen on a metal plate in a − 80 °C freezer.
-
5.
If pre-treated slides are not available scrub slides in detergent and incubate in 96% ethanol with a few drops of HCl for better adhesion of cells and chromosomes.
-
6.
Use a small coverslip (e.g. 18 × 18 mm, medium thick, No. 1) for making preparations (Sect. 3.3), and as best nuclei and metaphases are often near the periphery of the preparation use larger coverslips (e.g. 24 × 30 or 40 mm; thin No. 0 is essential for oil immersion microscopy) for mounting and observation (Sect. 3.6).
-
7.
The primers were originally designed to rice but do work with wheat DNA as template; if genomic DNA from other species is used, primers might not bind well and no, or only weak amplification might result. Then the primers will need re-designing using sequence information from your or a related species. Once a probe has been made, we found that due to high similarity of all 18S sequences, FISH is successful in most cases.
-
8.
If purifications columns are not available, ethanol precipitation using sodium acetate or lithium chloride can be used (see standard molecular biology protocols).
-
9.
Pepsin is an endopeptidase that breaks down proteins and can be used to remove cytoplasm if chromosomes are not free and clearly visible. Pepsin is most active at low pH and therefore is made up in HCl. Adjust concentration and time according to amount of cytoplasm present.
-
10.
If readymade paraformaldehyde solution is not available this can be made from powder; in the fume hood add 4 g paraformaldehyde to 80 ml water. Heat to 60 °C for 10 min, add a few drops of 4 M NaOH to clear the solution. Cool down to room temperature. Adjust pH to 7 with H2SO4. Make up to final volume of 100 ml with water. n.b. One drop of NaOH leaves the solution at approximately the correct pH.
-
11.
If a hybridization platform is not available a humid chamber can be used either floating in a water bath or placed in an incubator.
-
12.
If commercial antifade solution is not available, glycerine can be mixed with 4X SSC 1:1.
-
13.
Top of the range fluorescence microscopes with more or less automation are available from the Leitz, Nikon, Olympus and Zeiss. We have used them all and recommend choosing the manufacturer that gives you a good prize, has a competent salesman and offers a reliable after sale service. We prefer to spend our money on lenses and filter sets rather than automation. For years, mercury vapour lamps were used for illumination, but recently powerful LED lamps have become available and are easy to use, low in energy consumption and safe.
-
14.
If seeds are old or do not germinate, try to increase the germination rate by treating seeds in a water bath at 38 °C.
-
15.
To stimulate root growth from older coffee plants, repot in the same or larger pot with 3 cm new soil at the bottom.
-
16.
Fixatives or toxic chemicals on glassware, tubes or tools used for root collection, on your hands or in the atmosphere greatly reduce metaphase index. Hence it is important to have clean tools and containers with airtight lids. Collect roots for pre-treatment first, before handling fixative.
-
17.
Fixed material can be stored for several weeks to months before making chromosome preparations as long as it does not get warm. But even when stored cold, roots tend to get hard, and it becomes difficult to remove cytoplasm. Storing or shipping ready-made chromosome slide preparations (Sect. 3.5) may sometimes be the better option when FISH has to be done later or in another remote lab.
-
18.
Roots can be kept at 4 °C for up to 24 h if making chromosome preparations is not possible in the same day.
-
19.
Incorporation of label into the probe DNA can be checked with a simple test blot. Pipet a small drop on a Southern hybridization membrane and follow protocols for colorimetric detection of biotin and digoxigenin labelled DNA using alkaline phosphatase linked antibodies (see e.g. Roche diagnostics, Eisel et al. 2008);
-
20.
For long-term storage or transport, cover slips can be sealed with gum or nail varnish.
-
21.
The optics and immersion oil used for visualization must be specified for fluorescent applications including UV. Immersion oil must be kept in the dark at room temperature: heating in the sun in a salesman’s car, mixing oils, or absorption of water will make oils auto-fluorescent or UV opaque.
-
22.
https://www.olympus-lifescience.com/en/microscope-resource/primer/techniques/fluorescence/filters/ or https://www.nikon.com/products/microscope-solutions/explore/microscope-abc/learn-more-microscope/filters/index.htm or https://www.semrock.com/introduction-to-fluorescence-filters.aspx)
-
23.
Microscope filter sets are highly specific, but due to the broad spectrum of excitation and emission of fluorochromes, it is unavoidable that bleed-through of signal occurs particularly when one probe is very strong. Particularly after excitation with the correct wavelength bleed through can be stronger, hence photographing colours in reverse order can help identifying problems.
Table 1 FISH hybridization mixture Table 2 Common fluorochromes and microscope filter sets used for FISH analysis. When using DAPI and two FISH probes, images can be conveniently displayed in RGB mode with each captured image in a separate channel. All microscope and filter manufacturers have useful descriptions, graphics and often active visualizations of filter/fluorochrome combinations (see Note 22)
References
Agrawal N, Gupta M, Banga SS, Heslop-Harrison JS (2020) Identification of chromosomes and chromosome rearrangements in crop Brassicas and Raphanus sativus: a cytogenetic toolkit using synthesized massive oligonucleotide libraries. Front Plant Sci 11:598039. https://doi.org/10.3389/fpls.2020.598039
Ali N, Heslop-Harrison JP, Ahmad H, Graybosch RA, Hein GL, Schwarzacher T (2016) Introgression of chromosome segments from multiple alien species in wheat breeding lines with wheat streak mosaic virus resistance. Heredity 117(2):114–123
Anamthawat-Jónsson K, Thórsson AT (2003) Natural hybridisation in birch: triploid hybrids between Betula nana and B. pubescens. Plant Cell Tissue Organ Cult 75(2):99–107
Bačovský V, Hobza R, Vyskot B (2018) Technical review: cytogenetic tools for studying mitotic chromosome. In: Plant chromatin dynamics. Humana Press, New York, pp 509–535
Bytof G, Knopp SE, Kramer D et al (2007) Transient occurrence of seed germination processes during coffee post-harvest treatment. Ann Bot 100(1):61–66
Chang K-D, Fang S-A, Chang F-C, Chung M-C (2010) Chromosomal conservation and sequence diversity of ribosomal RNA genes of two distant Oryza species. Genomics 96:181–190
Eira MTS, Silva EA, De Castro RD et al (2006) Coffee seed physiology. Braz J Plant Physiol 18(1):149–163
Eira MTS, Walters C, Caldas LS (1999) Water sorption properties in Coffea spp. seeds and embryos. Seed Sci Res 9(4):321–330
Eisel D, Seth O, Grünewald-Janho S, Kruchen B (2008) DIG application manual for non-radioactive in situ hybridization, 4th edn. Roche Diagnostics GmbH, Mannheim
Forsström PO, Merker A, Schwarzacher T (2002) Characterisation of mildew resistant wheat-rye substitution lines and identification of an inverted chromosome by fluorescent in situ hybridisation. Heredity 88(5):349–355
Gerlach WL, Dyer TA (1980) Sequence organization of the repeating units in the nucleus of wheat which contain 5S rRNA genes. Nucleic Acids Res 8:4851–4865
Hamon P, Siljak-Yakovlev S, Srisuwan S, Robin O, Poncet V, Hamon S, De Kochko A (2009) Physical mapping of rDNA and heterochromatin in chromosomes of 16 Coffea species: a revised view of species differentiation. Chromosome Res 17(3):291–304
Herrera JC, D’Hont A, Lashermes P (2007) Use of fluorescence in situ hybridization as a tool for introgression analysis and chromosome identification in coffee (Coffea arabica L.). Genome 50(7):619–626
Heslop-Harrison JS, Schwarzacher T (2011) Organization of the plant genome in chromosomes. Plant J 66:18–33
Iacia AAS, Pinto-Maglio CAF (2013) Mapping pachytene chromosomes of coffee using a modified protocol for fluorescence in situ hybridization. AoB Plants 2013:5
Krug CA (1934) Contribuição para o estudo da citologia do gênero Coffea. Boletim Técnico 11:1–10. Instituto Agronômico, Campinas
Krug CA (1937) Observaçõe scitológicas em Coffea. III. Boletim Técnico 37:1–19. InstitutoAgronômico, Campinas
Kumar S, Kiso A, Kithan NA (2021) Chromosome banding and mechanism of chromosome aberrations. In: Larramendy ML, Soloneski S (eds) Cytogenetics-classical and molecular strategies for analysing heredity material. IntechOpen, London, pp 45–60
Lashermes P, Combes MC, Trouslot P, Charrier A (1997) Phylogenetic relationships of coffee-tree species (Coffea L.) as inferred from ITS sequences of nuclear ribosomal DNA. Theor Appl Genet 94(6–7):947–55
Lashermes P, Paczek V, Trouslot P, Combes MC, Couturon E, Charrier A (2000) Brief communication. Single-locus inheritance in the allotetraploid Coffea arabica L. and interspecific hybrid C. arabica X C. canephora. J Hered 91(1):81–5
Liu Q, Li X, Zhou X, Li M, Zhang F, Schwarzacher T, Heslop-Harrison JS (2019) The repetitive DNA landscape in Avena (Poaceae): chromosome and genome evolution defined by major repeat classes in whole-genome sequence reads. BMC Plant Biol 19:226
Lombello RA, Pinto-Maglio CAF (2003) Cytogenetic studies in Psilanthuse bracteolatus Hiern., a wild diploid coffee species. Cytologia 68(4):425–429
Lombello RA, Pinto-Maglio CAF (2004a) Cytogenetic studies in Coffea L. and Psilanthus Hook.f. using CMA/DAPI and FISH. Cytologia 69(1):85–91
Lombello RA, Pinto-Maglio CAF (2004b) Heterochromatin and rDNA sites in Coffea L. chromosomes revealed by FISH and CMA/DAPI. I: C. humilis, C. kapakata, C. sp. Moloundou and C. stenophylla. Caryologia 57(1):11–17
Lombello RA, Pinto-Maglio CAF (2004c) Heterochromatin and rDNA sites in Coffea L. chromosomes revealed by FISH and CMA/DAPI II: C. canephora cv. Apoatã, C. salvatrix and C. sessiliflora. Caryologia 57(2):138–143
Mandáková T, Pouch M, Brock JR, Al-Shehbaz IA, Lysak MA (2019) Origin and evolution of diploid and allopolyploid camelina genomes was accompanied by chromosome shattering. Plant Cell 31:2596–2612
Melese YY, Kolech SA (2021) Coffee (Coffea arabica L.): methods, objectives, and future strategies of breeding in Ethiopia. Sustainability 13(19):10814
Mendes AJT (1957) Citologia das espécies de Coffea: sua importância para o melhoramento do cafeeiro. In: Instituto Agronômico. I Curso de Cafeicultura, 3rd edn. IAC, Campinas, pp 37–45
Niemelä T, Seppänen M, Badakshi F, Rokka VM, Heslop-Harrison JP (2012) Size and location of radish chromosome regions carrying the fertility restorer Rfk1 gene in spring turnip rape. Chromosome Res 20(3):353–361
Nishibayashi S, Hayashi Y, Kyozuka J et al. (1989) Chromosome variations in protoplast-derived calli and in plants regenerated from the calli of cultivated rice (Oryza sativa L.). Japan J Genet 64(5):355–361
Paesold S, Borchardt D, Schmidt T, Dechyeva D (2012) A sugar beet (Beta vulgaris L.) reference FISH karyotype for chromosome and chromosome-arm identification, integration of genetic linkage groups and analysis of major repeat family distribution. Plant J 72(4):600–611
Patokar C, Sepsi A, Schwarzacher T, Kishii M, Heslop-Harrison JS (2016) Molecular cytogenetic characterization of novel wheat-Thinopyrum bessarabicum recombinant lines carrying intercalary translocations. Chromosoma 125(1):163–172
Patui S, Clincon L, Peresson C et al (2014) Lipase activity and antioxidant capacity in coffee (Coffea arabica L.) seeds during germination. Plant Sci 219:19–25
Pierozzi NI, Pinto-Maglio CA, Cruz ND (1999) Characterization of somatic chromosomes of two diploid species of Coffea L. with acetic orcein and C-band techniques. Caryologia 52(1–2):1–8
Pinto-Maglio CAF (2006) Cytogenetics of coffee. Braz J Plant Physiol 18(1):37–44
Pohlan HAJ, Janssens MJ (2010) Growth and production of coffee. Soils Plant Growth Crop Prod 3:101
Rathore P, Schwarzacher T, Heslop-Harrison JS, Bhat V, Tomaszewska P (2022) The repetitive DNA sequence landscape and DNA methylation in chromosomes of an apomictic tropical forage grass, Cenchrus ciliaris. Front Plant Sci
Salvo-Garrido H, Travella S, Schwarzacher T, Harwood WA, Snape JW (2001) An efficient method for the physical mapping of transgenes in barley using in situ hybridization. Genome 44:104–110
Schwarzacher T (2016) Preparation and fluorescent analysis of plant metaphase chromosomes. In: Caillaud M-C (ed) Plant cell division: methods and protocols, methods in molecular biology, vol 1370, pp 87–103
Schwarzacher T, Heslop-Harrison JS (2000) Practical in situ hybridization. Bios Scientific, Oxford, pp 203. ISBN: 9781859961384
Schwarzacher T (2003) DNA, chromosomes, and in situ hybridization. Genome 46(6):953–962
Schwarzacher T, Ambros P, Schweizer D (1980) Application of Giemsa banding to orchid karyotype analysis. Plant Syst Evol 134:293–297
Schwarzacher T, Leitch AR, Bennett MD, Heslop-Harrison JS (1989) In situ localization of parental genomes in a wide hybrid. Ann Bot 64:315–324
Široký J, Lysák MA, Doležel J et al (2001) Heterogeneity of rDNA distribution and genome size in Silene spp. Chromosome Res 9(5):387–393
Szinay D, Chang SB, Khrustaleva L, Peters S, Schijlen E, Bai Y, Stiekema WJ, Van Ham RCHJ, de Jong H, Klein Lankhorst RM (2008) High-resolution chromosome mapping of BACs using multi-colour FISH and pooled-BAC FISH as a backbone for sequencing tomato chromosome 6. Plant J 56:627–637
Tomaszewska P, Pellny TK, Hernández LM, Mitchell RAC, Castiblanco V, De Vega JJ, Schwarzacher T, Heslop-Harrison JS (2021) Flow cytometry-based determination of ploidy from dried leaf specimens in genomically complex collections of the tropical forage grass Urochloa s.l. Genes 12:957
Tomaszewska P, Vorontsova MS, Renvoize SA, Ficinski SZ, Tohme J, Schwarzacher T, Castiblanco V, de Vega JJ, Mitchell RAC, Heslop-Harrison JS (2023) Complex polyploid and hybrid species in an apomictic and sexual tropical forage grass group: genomic composition and evolution in Urochloa (Brachiaria) species. Ann Bot. https://doi.org/10.1093/aob/mcab147
Tomaszewska P, Kosina R (2021) Cytogenetic events in the endosperm of amphiploid Avena magna × A. longiglumis. J Plant Res 134:1047–1060
Zaki NM, Schwarzacher T, Singh R, Madon M, Wischmeyer C, Hanim Mohd Nor N, Zulkifli MA, Heslop-Harrison JS (2021) Chromosome identification in oil palm (Elaeis guineensis) using in situ hybridization with massive pools of single copy oligonucleotides and transferability across Arecaceae species. Chromosome Res 29:373–390
Acknowledgements
The work was carried out in the framework of the IAEA Coordinated Research Programme CRP22005 “Efficient Screening Techniques to Identify Mutants with Disease Resistance for Coffee and Banana”. P.T. has received support from the European Union’s Horizon 2020 research and innovation programme under the Marie Sklodowska-Curie grant agreements No 844564 and No 101006417 for analysis of polyploid chromosomal evolution. We thank John Bailey and Adel Sepsi for sharing useful information about some of the reagents and details described in the protocols.
Author information
Authors and Affiliations
Corresponding authors
Editor information
Editors and Affiliations
Rights and permissions
Open Access This chapter is licensed under the terms of the Creative Commons Attribution 4.0 International License (http://creativecommons.org/licenses/by/4.0/), which permits use, sharing, adaptation, distribution and reproduction in any medium or format, as long as you give appropriate credit to the original author(s) and the source, provide a link to the Creative Commons license and indicate if changes were made.
The images or other third party material in this chapter are included in the chapter's Creative Commons license, unless indicated otherwise in a credit line to the material. If material is not included in the chapter's Creative Commons license and your intended use is not permitted by statutory regulation or exceeds the permitted use, you will need to obtain permission directly from the copyright holder.
Copyright information
© 2023 The Author(s)
About this chapter

Cite this chapter
Li, L. et al. (2023). Protocols for Chromosome Preparations: Molecular Cytogenetics and Studying Genome Organization in Coffee. In: Ingelbrecht, I.L., Silva, M.d.C.L.d., Jankowicz-Cieslak, J. (eds) Mutation Breeding in Coffee with Special Reference to Leaf Rust. Springer, Berlin, Heidelberg. https://doi.org/10.1007/978-3-662-67273-0_21
Download citation
DOI: https://doi.org/10.1007/978-3-662-67273-0_21
Published:
Publisher Name: Springer, Berlin, Heidelberg
Print ISBN: 978-3-662-67272-3
Online ISBN: 978-3-662-67273-0
eBook Packages: Biomedical and Life SciencesBiomedical and Life Sciences (R0)