
Abstract
The value of seed depends on its quality. Hence, evaluation of seed quality is of critical value in any seed production system. It is, therefore, desired that seed quality is tested for all essential parameters, following the standard procedures and performing the tests in such a manner that the results are consistent and are reproducible, within the permissible limits of tolerance. As the submitted sample is only a minute fraction of the whole seed lot, reproducibility and reliability of results will greatly depend on the precision of sampling. Hence, the accuracy in sampling and precision in testing the vital parameters of seed quality form the essential components of quality assurance process. Though the seed testing procedures are essentially based on the ISTA Rules, each country may modify these to suit its requirement, crop- and variety-specific characteristics, and the available resources without compromising on the accuracy in seed quality evaluation. The essential components of seed quality and standard procedures to evaluate the same are discussed.
You have full access to this open access chapter, Download chapter PDF
Keywords
1 Introduction
Seed production is a complex process that requires best agronomic practices, technical competence of the seed grower, regular supervision and rigorous monitoring of the seed crop following the crop-specific norms, and care to avoid admixtures and impurity during harvesting and processing. The seed thus produced, therefore, needs to be tested reliably and precisely for all such components that determine its planting value upon sowing.
Seed quality is determined or influenced by many components (Fougereux 2000). They are as follows:
-
Genetic quality—the seed should be true to its type because the genetic potential of a superior genotype can only be realized from a uniform, homogeneous population.
-
Physiological quality—high germination and vigour ensure successful seedling emergence and crop establishment in the field.
-
Physical quality—good-quality seed that is free from contamination by other crop seeds; inert matter; common, noxious, or parasitic weed seeds; mechanical damage; discolouration; and undersize and underweight seeds results in good agronomic performance.
-
Seed health status—the absence of infection/infestation with seed-borne pests (fungi, bacteria, viruses, nematodes, insects, etc.) helps in getting a healthy crop.
Therefore, to ensure seed quality, a set of procedures are followed to test its various components, which aims to achieve ‘uniformity in seed quality evaluation worldwide’. The International Seed Testing Association (ISTA) develops, adopts, and publishes internationally agreed standard procedures (Rules) for sampling and testing the quality of seeds with the vision of attaining uniformity in seed testing internationally. This basic objective is apparent in the ISTA’s monogram which depicts a balance with the motto ‘Uniformity in Seed Testing’. Adoption of these procedures for sampling and testing promotes a uniform application of these for the evaluation of seed quality moving in international trade. Hence, the national seed quality assurance system in most countries adopts ISTA procedures for seed sampling and testing, with little or no change. All the procedures discussed here are, therefore, based on ISTA procedures.
2 Seed Sampling
An accurately performed seed testing is of little value unless the actual sample examined is a true representative of the seed lot as a whole. As per ISTA (2022), the objective of seed sampling is to obtain a truly representative sample of a size suitable for tests, in which the probability of constituents being present is similar to that of the seed lot. The probability of a constituent being present is determined only by its level of occurrence in the seed lot. Homogeneity of the seed lot is of great significance in ensuring uniform distribution of the constituents, thereby resulting in true representative samples. Therefore, achieving and maintaining seed lot homogeneity is an important step in seed lot handling.
Seed lot—The term seed lot represents/refers to the quantity of seeds, which is physically identifiable. For seed quality testing, the maximum size of a lot will be 10 tonnes (10,000 kg) for small seeds, e.g. rapeseed mustard; 20 tonnes (20,000 kg) to 30 tonnes (30,000 kg) for medium seeds, e.g. wheat, barley, and paddy; and 40 tonnes for bigger/bold seeds, e.g. maize. The importance of sampling can be recognized from the fact that a seed lot of 10,000 kg of a small-seeded species, e.g. Lolium multiflorum, with a thousand seed weight of ~2.0 g may contain 5,000,000,000 seeds, out of which, as per OECD seed schemes, only 60 g or 30,000 seeds are examined for other seed counts (1:167,000); 6 g or 3000 seeds are examined for purity analysis (1:1670,000); and only 400 seeds are examined for germination testing (1:12,500,000). Therefore, the objective of sampling should be to minimize the chances of error to the best extent possible and to draw a sample that is a true representative of the lot. In cases of doubt, a heterogeneity test is to be performed.
Primary sample—It refers to a small portion taken from the seed lot during one single sampling action.
Composite sample—The primary samples drawn from different points are combined to form a composite sample of the lot. This sample is generally much larger than the size actually required for analysis and forms the base for submitted sample.
Submitted sample—This is the sample submitted to the seed testing laboratory and is derived from the composite sample by reducing it to the size prescribed. The size of this sample is specific to each crop.
Duplicate sample—An identical sample, as the submitted sample, obtained from the same composite sample and marked as ‘duplicate sample’; usually retained in the location where the lot was sampled.
Working sample—This is the whole of the submitted sample or sample derived from the submitted sample that is used for analysis in the seed testing laboratory. The size of this sample is specific to each crop. Minimum weights of working samples are based on the principle that a working sample for purity analysis by weight basis should be of such that it contains at least 2500 seeds; and for the analysis by count of weed seeds and other crops seeds by number, it should be about ten times the weight of the working sample for verifying physical purity by weight. However, in both cases, the maximum weight of the sample will not be more than 1000 g.
2.1 Seed Sampling Procedure
-
Under the seed law enforcement programmes, only trained and experienced officials are authorized to undertake sampling and, after giving prior notice, should draw three representative samples:
-
One sample to be delivered to the person from whom it has been taken.
-
Second sample to be sent for analysis to the notified/authorized/accredited seed testing lab (STL).
-
The third sample to be retained for any legal proceedings.
-
-
Samples are drawn using (a) triers, (b) pneumatic seed samplers, or (c) automatic seed samplers or simply with hands.
-
In most countries following the ISTA procedures, seeds are sampled from unopened containers or the seed stream, either before or when it enters the containers. The seed lot must be so arranged that each part of the seed lot is conveniently accessible. All the primary samples drawn randomly from the seed lot should approximately be of equal size (Tables 1 and 2). Seed mat/seed tape sampling should be done by taking packets or pieces. All sampling apparatus must be kept clean to avoid cross-contamination (ISTA 2022).
-
If the primary samples appear to be uniform, they are combined to form the composite sample. If found to be obviously heterogenous, sampling must be refused or stopped. The seed lot has to be made homogenous by reprocessing so that the constituents get uniformly distributed with in the lot.
-
The composite sample may be submitted directly to the STL for the test to be conducted if it is of appropriate size or if it is difficult to mix and reduce the composite sample properly under warehouse conditions.
-
To prevent any damage during transit and handling, submitted samples must be packed properly. Samples submitted for moisture testing must be packed with care in moisture-impervious containers.
3 Seed Testing
3.1 Physical Purity
An important criterion for quality seed is to be free from undesirable substances. Purity is an expression of how ‘clean’ the seed lot is, which not only improves the marketability but also gives better planting value to the cultivator. It refers to the different components of purity, viz. pure seeds, other crop seeds, weed seeds [both normal and objectionable/obnoxious], other distinguishable varieties/variants, and inert matter.
3.1.1 Components of Physical Purity Analysis
-
1.
Pure seed: Refers to:
-
(a)
Seeds of the kind/species stated by the sender or found to be predominant in the sample; it includes intact seeds of the stated species as well as dead, shrivelled, diseased, immature, and pre-germinated seeds.
-
(b)
Achenes and similar fruits, such as samara with or without perianth, regardless of whether they contain a true seed unless it is apparent that no seed is contained.
-
(c)
Fractions of broken seeds, achenes, mechanically/insect damaged seeds, etc., which are more than half of the original size.
-
(a)
-
2.
Other crop seeds: Refer to seeds of plants that are of crops, other than the main crop.
-
3.
Inert matter: Includes seed units and all other matter (including dust, soil particles, plant parts pieces, etc.) and structures not defined as pure seed, weed seed, or other crop seed.
-
4.
Weed seeds: Seeds of a species that are recognized as weeds by law/general usage.
-
5.
Other distinguishable varieties/variant: Seeds of the main crop species, which could be distinguishable as other variant (ODV).
3.1.2 Objectives of Physical Purity Analysis
-
To determine the percentage composition of the components by weight of the sample being tested and by inference to know the composition of the seed lot.
-
To identify seeds of various species and inert particles in the sample.
3.1.3 Procedure of the Purity Test
Purity analysis will be performed on the working sample. The working sample shall be of a weight estimated to contain at least 2500 seed units or not less than the weight indicated by the national rules or ISTA Rules.
-
1.
Before starting the separation, clean the working board and purity dishes, and examine the working sample to decide about the use of any particular aid such as a sieves or blower for making the separation.
-
2.
After preliminary separation with the aid of blower or sieves, place and spread the retained or heavier portion on the purity work board. With the help of a forceps or spatula, drag the working sample into a thin row of seeds, and examine each particle individually. The criteria used are the external appearance of the seed in terms of size, shape, gloss, colour, structure, surface texture, etc. and/or appearance under transmitter light.
-
3.
Impurities such as other crop seeds, weed seeds, and inert matter are removed and placed separately in purity dishes, leaving only the pure seed on the purity board.
-
4.
Seeds enclosed in fruits, other than those that do not fit in the definition of pure seeds, should be separated, and the detached empty fruit/appendages are classified as inert matter.
-
5.
Pure seeds should be collected in the sample pan, place lighter portion on the work board, and examine under magnification for further separating into the respective classes (weed seed, other crop seed, and inert matter). After separation, identify the weed seed and other crop seed to the best extent possible, and record their names on the analysis card. The kind of inert matter present in the sample should also be identified and recorded. The weight of each component, viz. pure seed, weed seed, other crop seed, and inert matter, should be recorded in grams to the number of decimal places as given below, and ODVs are counted and reported in number per kg in analysis card:
Weight of the working sample (g)
No. of decimal places for recording the weight of each component
Example
1
2
3
Less than 1
4
5.6789
1–9.990
3
56.789
10–99.99
2
567.89
100–999.99
1
5678.9
1000
0
5678
-
6.
During purity analysis, each ‘pure’ seed fraction from the working sample is separated from the inert matter and other seeds. Purity (%) is calculated as shown below:
$$ \%\kern0.5em \mathrm{purity}\kern0.5em \mathrm{component}=\frac{\mathrm{Weight}\kern0.5em \mathrm{of}\kern0.5em \mathrm{the}\kern0.5em \mathrm{purity}\kern0.5em \mathrm{component}}{\mathrm{Total}\kern0.5em \mathrm{weight}\kern0.5em \mathrm{of}\kern0.5em \mathrm{the}\kern0.5em \mathrm{working}\kern0.5em \mathrm{sample}}\times 100 $$Different components are separated and weighed; and their percentage by weight is calculated and reported.
-
7.
As per the Indian system of certification, the ODVs should be separated, counted, and recorded as number/kg.
3.1.4 Reporting of Results
The results of the purity analysis should be recorded and reported as percentages by weight up to a single decimal point. The percentages of all components should add up to 100%. Components less than 0.05% are reported as ‘trace’. If the result for a particular component is nil, that must be reported as 0.0. The results should be reported in the analysis certificate in the space provided for the particular components. Some components such as the seeds of noxious weeds, seeds infected with designated seed-borne diseases, etc. are also to be reported by number. In some national seed rules, e.g. India, the number of ODVs per kg is to be reported separately in some crops, e.g. paddy, soybean, etc.
3.1.5 Advanced Equipment for Seed Purity Testing
Ergonomic Vision System for Purity Testing—Purity analysis is a tedious and time-consuming activity requiring long hours of accurate examination of the seed samples and differentiating each fraction precisely. Purity separations have traditionally been performed using diaphanoscopes and wooden work boards equipped with a drawer or pan in front and armrests on either side. Now some ergonomically designed purity apparatus such as ERGO has been developed that helps in purity analysis by reducing physical drudgery. Such purity testing boards enable analysts to work comfortably increasing the accuracy and productivity. The basic station is supplied with a contoured front, independently adjustable rest for both right and left arms, easy access to controls, two storage drawers, white laminated plywood work surface, substantial plywood base with rigid stainless risers, and non-slip, vibration damping, closed-cell rubber base pad (Fig. 1).

ERGO Vision System for purity testing (Source: seedburo.com)
Videometer: As the purity analysis relies solely on the inferences made based on visual examination and identification, some seed equipment manufacturers have come out with purity instruments using imaging and AI. Imaging techniques, NIR spectroscopy, or precise remote sensors could be combined with conventional methods for better results. A combination of spectral imaging, thermal imaging, fluorescence imaging, X-ray imaging, and magnetic resonance imaging offers reliable alternatives to the traditional methods (Li et al. 2014). One such instrument, Videometer (Fig. 2, (Source: https://analytik.co.uk/)), could be used in purity analysis to find out ODVs (Wilkes et al. 2016), inert matter, and weed seeds (Fig. 3).

Videometer

Example of images generated using the Videometer Lab 2 system for (a) 100% T. durum wheat grains; (b) 100% T. aestivum wheat grains; and (c) 10% adulteration of T. durum wheat grains with T. aestivum wheat grains
These instruments show the potential to improve seed purity analysis by increasing the accuracy and reducing the examination time and drudgery, but are yet to be validated and recommended by ISTA.
4 Seed Moisture Determination
The moisture content, which is the amount of water in the seed and is usually expressed in percentage on a wet weight basis, is associated with almost every aspect of seeds and their physiological functions, including maturity, longevity and vigour, and injury due to heat, insects, and pathogens (Elias et al. 2012).
Factors that influence the determination of moisture content during seed quality analysis are (a) seed constituents, particularly volatile components; (b) seed size, which mainly affects the speed of moisture exchange; and (c) seed coat permeability, thickness, and constitution, which might hamper the exchange of moisture. The objective is to measure moisture at the time of sampling in the seed; hence, for moisture testing, seed should be packed in moisture-impervious container. Care should be taken while testing to see that seed does not absorb or exude moisture.
4.1 Methods of Moisture Determination
The principle used in moisture determination is to ensure the removal of seed moisture as much as possible giving no scope for oxidation, the loss of other volatile substances, or decomposition. Tang et al. (2000) determined the moisture of corn seed using three methods. Out of DICKEY-John moisture meter, microwave (intact seed as well as ground seeds), and oven-drying (intact seed as well as ground seeds) methods, the oven-drying method using ground seed at 130 °C for 4 h was the most accurate, whereas the DICKEY-John moisture meter readings were more inconsistent. The microwave (intact) method showed a more variable relationship (lower r2 values) between weight loss and seed moisture, whereas the microwave (ground) method revealed that it can provide a fast (∼60 min) estimate for accurately measuring high-moisture corn seed.
Two types of methods can be employed to determine seed moisture. These are:
Destructive/hot air oven method
-
Low constant temperature method (103 °C for 17 h).
-
High constant temperature method (130 °C for 2–3 h).
Non-destructive/quick method
-
Moisture meters are based on indirect quantification of water content, commonly based on electrical resistance/conductance of the moisture available in the seed.
4.1.1 Destructive/Hot Air Oven Method
The procedure recommended by the ISTA is followed by most seed testing labs globally. The seed moisture is removed by drying the seed sample at a specified temperature for a specified duration depending upon the crop (Table 3). The instruments required are:
-
Constant temperature electrical oven.
-
Analytical balance.
-
Grinder.
-
Weighing bottles.
The oven must be electrically heated and should be capable of being maintained in such a way that the temperature of the oven set at 103/130 °C is regained in less than 30 min of opening the door and placing samples inside. The temperature inside should be uniform and not fluctuate during operation. The balance must be capable to weigh with an accuracy of at least ±0.001 g. The containers/weighing bottles should be made of glass or non-corrosive metal to give a mass per unit area of not more than 0.3 g/cm2. Wire sieves with meshes of 0.50, 1.00, 2.00, and 4.00 mm and a desiccator are also required (Fig. 4).

Instruments for seed moisture determination (Source: A- theinstrumentguru.com/moisture-measurement; B- directindustry.com)
Procedure
-
The submitted sample shall be accepted for moisture determination only if it is sealed in a vapour-proof container with minimum air space. Two replicates/duplicates or two independently drawn working samples should be used for moisture estimations. The samples are weighed based on the diameter of the containers used; if the diameter is >5 cm and <8 cm, then a 4.5 ± 0.5 g sample would be taken, whereas, if the diameter is >8 cm, then 10.0 ± 1.0 g sample is used.
-
Grinding: Large seeds and seeds with seed coats that impede water loss from the seeds must be ground before drying unless their high oil content makes them difficult to grind or (particularly in seed such as Linum with oil of a high iodine number) liable to gain in weight through oxidation of the ground material. If grinding is not possible, splitting/cutting is also permitted as per the ISTA Rules. For the species which require fine grinding, at least 50% of the ground material should pass through the sieve of 0.50 mm, and not more than 10% should remain on meshes of 1.0 mm. For species requiring coarse grinding, at least 50% of the ground material should pass through the sieve of 4.0 mm, and not more than 55% should pass through a sieve of 2.0 mm. The grinding process must not exceed more than 2 min.
-
Pre-drying: In species where grinding is required and moisture is high (see Table 3), pre-drying is recommended.
-
Containers are weighed with their lids before (M1) and after filling (M2) with the prescribed quantity of seed. After weighing, containers are covered with the lids to prevent loss of sample or possible contamination. Ovens can be preheated and set at the desired temperature, or the drying period is set to begin at the time the oven reaches the required temperature.
-
The container and its cover are weighed before and after seed filling. During drying in the oven, the lid is removed to facilitate moisture exit. After the prescribed period of drying, in a desiccator, the container is covered and placed to cool at ambient temperature. The container with its cover and contents is weighed after cooling (M3).
4.1.2 Calculation and Expression of Results
The moisture content as percentage by weight is calculated to three decimal places by using the formula below:
where:
-
M1 = weight of the container and its lid in grams to a minimum of three decimals.
-
M2 = weight of the container, its lid, and seeds before drying (in grams to a minimum of three decimals).
-
M3 = weight of the container, its lid, and seeds after drying in (grams to a minimum of three decimals).
The moisture content is calculated from the results obtained for the first (pre-drying) and second stages of the procedure if the material is pre-dried. The moisture lost in the first stage S1, and the moisture lost in the second stage S2, each is calculated as above and expressed as a percentage, then the original/actual moisture content is calculated by using the formula
The result is the arithmetic mean of the replicate/duplicate seed moisture content for a given seed sample. As per the ISTA Rules, the maximum difference of 0.2% is accepted between the two replicates. If the difference between two replicates exceeds 0.2%, the seed moisture determination has to be repeated. As it is difficult to meet the replicate difference of seed moisture up to 0.2% in tree or shrub species, the maximal limit of 0.3–2.5% is accepted between two replicates for seed moisture in these species.
4.1.3 Determination of Moisture Content by Non-destructive/Quick Method
These estimations are not accurate, but convenient and quick in use. These are frequently used in seed processing plants, stores, etc. for on-the-spot information. These deduce the seed water content by measuring other physical parameters like electrical resistance or electrical conductivity of the moisture present in the seed. These values are transformed into seed moisture content with the help of species-specific charts, calibrated against the standard air-oven method or basic reference method. Some of the moisture meters in use are capacitance meters and conductance meters. All moisture meters need to be periodically calibrated and cross-checked before use with the values obtained by the oven-drying method for the specific species.
4.2 Reporting of Results
The seed moisture content test should be reported in the analysis certificate/report to the nearest 0.1% as per the ISTA Rules, which are followed by most countries. If the seed moisture content is determined using any moisture meter, the brand name and type of the equipment have to be mentioned on the analysis certificate, along with the range for which the moisture meter is calibrated.
The standard procedures of seed moisture determination for some important field crops and vegetables as recommended by ISTA (2019) and followed in most countries are presented in Table 3.
5 Germination
Germination is the sum of physiological processes culminating in the emergence of the embryo from its enclosing coverings, including the endosperm, perisperm, testa, or pericarp (Bewley et al. 2013). The metabolic processes in the non-dormant and viable seed are activated with the absorption of water, subsequently leading to expansion of the embryo and protrusion of the radicle. Seed germination is a complex process that involves several biochemical, physiological, and morphological changes (see chapter “Seed Dormancy and Regulation of Germination” for more details). Three conditions must be fulfilled for germination to be initiated. These are as follows: a) the seed should be viable, i.e. the embryo should be alive and have the capacity to germinate; b) the seed must be non-dormant; and c) favourable conditions in terms of moisture, temperature, air (O2), and light [in some species] must be available in required amounts. When the above conditions are met, the quiescent embryo resumes growth, commencing the process of germination. The activation of metabolic machinery of seed embryos is the first and foremost step initiating the seed germination process. However, from the seed technology perspective, the development of healthy and normal seedlings is critical, in determining the planting value of a seed lot.
5.1 Seed Germination Stages
The process of germination involves several successive and overlapping events. These are i) imbibition/absorption of water; ii) cell enlargement and cell division initiation; iii) enhanced enzymatic activity; iv) food translocation from cotyledons/endosperm to the growing embryo; v) increase in respiration and assimilation; vi) increase in cell division and enlargement; and vii) cell differentiation into tissue and organs resulting into a seedling.
5.2 Types of Seed Germination
Radicle emerges from the base of the embryo axis and is the growing point of the root, and the plumule, the growing point of shoot, is at the upper end of the embryo axis, above the cotyledons. Above the cotyledons, a section of seedling stem is called the epicotyl and below the cotyledons is called the hypocotyl. In cultivated plants, two types of germination are commonly found, viz. epigeal and hypogeal germination.
5.2.1 Epigeal Germination
Germination in dicots in which the cotyledons emerge above the soil surface. Here, the cotyledons rise above the ground surface due to the elongation of the hypocotyl; it is called epigeous or epigeal germination (Fig. 5). This type of germination is very common in beans, gourds, castor, tamarind, onion, etc.

Epigeal germination of beans seed (Source: https://www.vedantu.com/)
5.2.2 Hypogeal Germination
Seed germination in dicots where the cotyledons remain below the soil surface. Here, the epicotyl elongates, and the hypocotyl does not raise the cotyledons above the ground, which is called hypogeous or hypogeal germination (Fig. 6). It is commonly seen in mango, custard apple, pea, gram, lotus, maize, etc.

Hypogeal germination of pea seed (Source: https://www.vedantu.com/)
5.3 Germination Testing
The main objective of seed germination testing in laboratory is to evaluate the seed quality and to predict the seedling performance in the field. The ultimate aim of testing the germination in the seed testing laboratory is to determine the planting value of the seed sample and by inference the quality of the seed lot. Germination tests shall be conducted with the pure seed fraction. A minimum of 400 seeds are required in 4 replicates of 100 seeds each or 8 replicates of 50 seeds each or 16 replicates of 25 seeds each depending on the size of the seed and size of the containers of the substrata. The test is conducted under optimum conditions of moisture, prescribed temperature, suitable substratum, and light, if necessary. Pre-treatment to the seed, mostly to release some degree of dormancy, is given for those crops as recommended by ISTA.
5.3.1 Essential Equipment Required to Conduct Germination Test
-
(a)
Seed Germinator
Seed germinators are useful for germination tests for maintaining the specific conditions of temperature, relative humidity, aeration, and light. The seed germinators are generally of two types: (1) cabinet germinator (single and double chamber) and (2) walk-in germinator. Like all seed testing equipment, it must be calibrated regularly to ensure that the temperatures are precisely maintained.
The cabinet-type seed germinators are preferred in a laboratory where a comparatively smaller number of samples of different kinds of seeds, requiring different conditions, are being tested at a time. The number of germinators required by the seed testing laboratory will depend mainly on the number of seed samples and the species being analysed. Whereas, laboratories that handle a large number of seed samples and maintain fewer (two to three) sets of temperature conditions, the walk-in germinators are preferred. For conducting germination tests in sand media, occupying more space, such germinators are more useful.
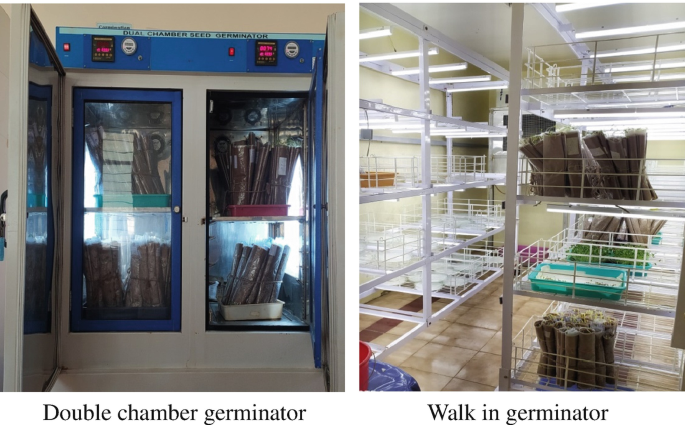
Source: Dr. S. R. Prasad, STR unit, NSP, UAS, Bangalore. Unpublished
-
(b)
Counting Devices
As germination tests are conducted on a fixed number of seeds per replication (e.g. 25, 50, 100), counting devices are used for quick and precise drawing of seeds. The counting devices include the automatic seed counter, seed counting boards, and vacuum seed counter. These devices not only increase the efficiency of testing by minimizing the time spent on counting and planting/putting the seeds but also provide proper spacing of the seed on the germination substratum. Counting boards are suitable for medium- and bold-sized seeds, while a vacuum counter can be used for small-sized seeds. In the absence of counting devices, the work may be accomplished manually.
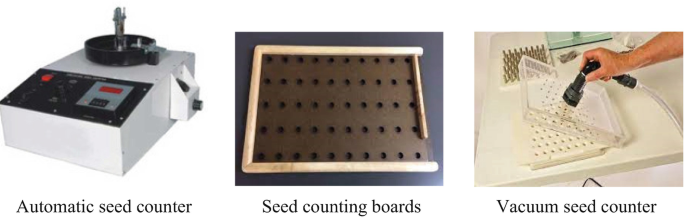
Source: Dr. S. R. Prasad, STR unit, NSP, UAS, Bangalore. Unpublished


New computer-based devices are being developed for accurate visualization of germinating seeds and rapid evaluation of the germination ability of a seed lot using X-ray techniques, nuclear magnetic resonance (NMR), micro-imaging, multispectral analysis, image analysis, etc. These techniques include capturing seed digital images and their processing; discerning and measuring shape, size, and colour components; and establishing their modification and connectivity over germination time. If such techniques are employed, periodical cross-check with the traditional method is worth. However, these techniques are yet to be validated, and though many seed companies use such methods for their internal quality control, these are not yet accepted for official quality assurance and certification purposes.
5.3.2 Substrate/Media for Seed Germination
The basic supplies required for conducting germination tests include germination paper (Crepe Kraft paper or towel paper, sunlit filter paper, and blotter paper) and sand. In some cases, soil may be used in place of sand.
-
(a)
Paper
In case of tests which require top-of-paper (TP), between-paper (BP), or pleated-paper (PP) methods, paper is used as the substratum. Paper towel method (rolled towel test—BP method) is commonly used for seeds of medium and bold sized, whereas the pleated-paper method is more common in the case of small seeds. Germination paper must be cellulosic with excellent moisture absorption/retention capacities and capillary rise potential [i.e. −30 mm/min], have neutral pH and good bursting strength [i.e. 2.0 kg/cm2], and must be free from phytotoxicity. The paper substratum used once in the germination test is not reusable. Organic substrates and fibres such as peat, coconut, or wood fibres, with a recommended size of less than 5 mm, can also be used as germination media for certain spp. (see the ISTA Rules for details).
-
(b)
Sand Substratum
Sand as the substrate for germination has the advantage of being reusable and less expensive. Especially in the case of seed lots that are heavily treated with chemicals, the results obtained in sand media are more accurate and reproducible compared to ‘roll towel’ tests. The sand (normally quartz/white sand is used) should be uniform and free from very large and small particles. It should be free from toxic substances, and the pH should be within the range of 6.0–7.5. To achieve this, the sand is washed, sterilized, and graded with a sieve size of 0.8 mm diameter (upper sieve) and 0.05 mm diameter (bottom sieve). Only the sand retained on the bottom sieve should be used.
Testing of Substratum: Before accepting the supplies in the laboratory, the germination paper substratum should be tested for various properties, viz. phytotoxicity, capillary rise, moisture-holding capacity, pH, and bursting strength. Periodic checks of the quality of the germination medium should also be conducted. To assess the phytotoxicity of the substrate, bioassay method can be adopted by germinating seeds of brassica, onion, chillies, or berseem which are relatively more sensitive to toxic substances resulting in seedling abnormalities.
5.3.3 Germination Test Conditions
-
(a)
Moisture and aeration: The moisture requirements of the seed will vary according to its kind. Small-seeded species with thin seed coats require less water than the large-seeded species, with thick seed coats. Throughout the germination period, the substratum must be kept moist. However, care needs to be taken that the substratum should not be too wet as excessive moisture restricts aeration and may cause rotting of the seedlings or the development of watery seedlings.
-
(b)
Temperature: The temperature required for germination is specific to the kind of crop or species. This varies with the age of seeds and within the species. The prescribed temperatures provided in the Rules for Seed Testing (ISTA 2022) for agricultural and horticultural seed germination can be broadly classified into two groups:
-
Constant temperatures (specific temperature during the entire germination period).
-
Alternate temperatures (in some crops, seeds are maintained at lower temperatures for 12 h [during 6 pm to 6 am] and at higher temperatures for 12 h [from 6 am to 6 pm]).
-
-
(c)
Light: Seeds of most species can germinate in both light and darkness, but it is always better to illuminate the tests for the proper growth of the seedlings. For the germination of seeds that require light, cool fluorescent light is illuminated for at least 8 h in every 24 h cycle.
Due to physiological dormancy, hard seededness [mechanical/physical dormancy], or the presence of inhibitory substances, several hard seeds or fresh (ungerminated) seeds may remain at the end of the germination test. In such cases, retesting may be done with one or a combination of dormancy-breaking treatments. Dormancy-breaking treatments, e.g. mechanical scarification—scrubbing, KNO3, GA3, etc., may be applied as pre-germination treatments or used during germination.
5.3.4 Evaluation of Germination Test
The evaluation of the germination tests needs to be done on the day of the final count, which varies according to the kind of seed. Of course, if/when needed, ‘first count’ can be taken before the ‘final count’ on the day specified for ‘first count’. This helps not only in concluding the test ahead of the ‘final count day’ but also in providing an idea of the ‘vigour status’ of the seed. The vigorous seeds will show up as normal seedlings in the first count itself. The seed analyst may terminate the germination test before the prescribed final count day or extend the test beyond the period, depending on the actual seedling growth. Usually, the first and second counts are taken in the case of top-of-paper (TP) and between-paper (BP) media. Only normal and dead seeds (which are a source of infection) are removed and recorded at the first and subsequent counts. While evaluating the germination test, the seedlings and seeds are categorized into normal seedlings, abnormal seedlings, dead seeds, fresh-ungerminated seeds, and hard seeds. In some species, it may also be necessary to remove the seed coat and separate the cotyledons to examine the plumule where essential structures are still enclosed at the end of the test (Table 4).
-
(a)
Normal Seedlings: Though in a strict botanical context a sprouted seed is considered to have germinated, for seed testing, germination (%) is calculated based on normal seedlings only. To achieve uniformity in evaluating normal seedlings, one of the following definitions must be followed:
-
Seedlings that show the capacity to develop into a normal plant when grown in good-quality soil and under favourable conditions of water supply, temperature, and light.
-
Seedlings that possess all the essential structures mentioned below when tested on artificial substrata:
-
A well-developed root system (including a primary root) except in the case of plants (e.g. in species of Gramineae) which normally produce seminal roots, of which there still are at least two.
-
A well-developed and intact hypocotyl with no damage to the conducting tissues.
-
An intact plumule with a well-developed green leaf, which is within or emerging through the coleoptile or an intact epicotyl with a normal plumular bud.
-
In monocotyledons, one cotyledon for seedlings and in dicotyledons two cotyledons for seedlings.
-
-
Seedlings with slight defects provided they show an overall vigorous and balanced development of other essential structures as mentioned below:
-
Seedlings of crops such as Pisum, Vicia, Phaseolus, Lupinus, Vigna, Glycine, Gossypium, Zea, and all species of Cucurbitaceae, with primary root damage, but with several sufficient length and vigorous secondary roots to support the seedlings in soil.
-
Superficial damage to the seedlings or hypocotyl, epicotyl, or cotyledons decay limited to one area and no effect to the conducting tissues.
-
Dicotyledons seedlings with only one cotyledon.
-
-
Epigeal germination in seedlings of tree species when the radicle is four times the length of the seed provided all structures that have developed appear normal.
-
Seedlings damaged by bacteria or fungi, but only when it is apparent that the seed parent is not the source of infection and it can be determined that all the essential structures were present.
-
-
(b)
Abnormal Seedlings: The seedlings, when grown in good-quality soil and under favourable conditions of water supply, temperature, and light, which do not exhibit the capacity for continued development into normal plants are abnormal seedlings.
Abnormal seedlings with the following defects shall be classified as follows:
-
Damaged seedlings: Damaged seedlings are those with no cotyledons; seedlings with constrictions, splits, cracks, or lesions that affect the conducting tissues of the epicotyl, hypocotyl, or root; and species where primary root is an essential structure but without a primary root, except for Pisum, Vicia, Lupinus, Vigna, Glycine, Arachis, Gossypium, Zea, and all species of Cucurbitaceae, where several vigorous secondary roots have developed to support the seedlings in soil.
-
Deformed seedlings: Seedlings where essential structures are weak or with ill-balanced development such as spirally twisted or stunted plumules, hypocotyls, or epicotyls; swollen shoots and stunted roots; split plumules or coleoptiles without a green leaf; watery and glassy seedlings; or no further development after the emergence of the cotyledons.
-
Decayed seedlings: Any of the essential structures of the seedlings, so diseased or decayed that normal development is prevented, except when there is clear evidence to show that the cause of infection is not the seed itself.
-
-
(c)
Hard Seeds: Seeds that remain hard at the end of the test period because they have not absorbed water due to an impermeable seed coat, e.g. Leguminosae, Malvaceae [Gossypium and Hibiscus], etc.
-
(d)
Fresh-Ungerminated Seeds: Seeds which neither are hard nor have germinated but remain clean and firm and apparently viable at the end of the test period.
-
(e)
Dead Seeds: Seeds which at the end of the test period are neither hard nor fresh and not have produced any part of a seedling. They are collapsed, and milky paste comes out when pressed at the end of the test.
5.3.5 Evaluation of Seedlings
Seedling evaluation and separating normal seedlings from the abnormal ones in all economically important plant species are performed as per the ISTA Rules. For a detailed description of normal and abnormal seedlings of important plant species, see ISTA Handbook on Seedling Evaluation (2018).
Representative examples of epigeal and hypogeal germination in monocot and dicot seeds (as per ISTA) are described here.
-
1.
Monocotyledons with epigeal germination: Representative genus: Allium (Fig. 7).
Normal and abnormal seedling differentiation
Normal seedlings
Abnormal seedlings
All essential structures of the seedling present as a whole
The seedling is called abnormal if:
The primary root should be intact and show only the acceptable defects like:
1. Deformed and fractured
1. Necrotic or discoloured spots
2. From the seed coat, the cotyledon is released before the primary root
2. Healed splits and cracks
3. Consists of fused twin seedlings
3. Superficial splits and cracks
4. The seedling is white or yellow and is glassy and spindly
The shoot system should be intact with a definite ‘knee’ and show only acceptable defects like:
If the primary root is stunted, is retarded, is missing, is broken, is split from the tip, is trapped in the seed coat, shows negative geotropism, is constricted, is spindly, is glassy, and as a result of primary infection is decayed
1. Discoloured or necrotic spots
If the cotyledon is short and thick, is broken, is bent over or forming a loop, is forming a spiral, does not show a definite ‘knee’, is constricted, is spindly glassy, and as a result of primary infection is decayed
2. Loose twists
-
2.
Dicotyledons with epigeal germination: Representative genus: Phaseolus except P. coccineus (Fig. 8).
Normal and abnormal seedling differentiation
Normal seedlings
Abnormal seedlings
The primary root should be intact and show only acceptable defects like:
The seedling is categorized as abnormal if:
1. Necrotic or discoloured spots
1. Deformed and fractured
2. Healed splits and cracks
2. Cotyledons emerging before the primary root
3. Superficial splits and cracks
3. Consists of fused twin seedlings
4. The seedling is white or yellow and is glassy and spindly and as a result of primary infection it is decayed
• In the shoot system, hypocotyl and epicotyl are intact and show acceptable defects like:
If the primary root is stunted, is retarded, is missing, is broken, is split from the tip, is trapped in the seed coat, shows negative geotropism, is constricted, is spindly, is glassy, and as a result of primary infection is decayed
– Necrotic or discoloured spots
– Healed splits and cracks
– Superficial splits and cracks
– Loose twists
• Intact terminal bud
If hypocotyl and epicotyl show the following defects, viz. are short and thick, are cracked deeply, are split right through, are missing, are bent over or forming a loop, are forming a spiral, are tightly twisted, are constricted, are spindly glassy, and as a result of primary infection are decayed
• Intact cotyledons and show acceptable defects, viz.:
– Up to 50% of tissue not functioning normally
– Only one cotyledon intact
– Three cotyledons
The primary leaves should be intact and show acceptable defects like:
1. Up to 50% of tissue not functioning normally
2. Only one intact cotyledon
3. Three primary leaves
4. Normal shape but retarded growth
-
3.
Monocotyledon with hypogeal germination: Representative genus: Oryza (Fig. 9).
Normal and abnormal seedling differentiation
Normal seedlings
Abnormal seedlings
The primary root should be intact and shows acceptable defects like:
Abnormal seedling if:
1. Necrotic or discoloured spots
1. Deformed and fractured
2. Healed splits and cracks
2. Cotyledons emerging before the primary root
3. Superficial splits and cracks
3. Consists of fused twin seedlings
4. The seedling is white or yellow and is glassy and spindly and as a result of primary infection it is decayed
5. Scutellum detached from the endosperm
• In the shoot system, if the mesocotyl is developed, it should be intact and show only acceptable defects like:
If the primary root is stunted, is retarded, is missing, is broken, is split from the tip, is trapped in the seed coat, shows negative geotropism, is constricted, is spindly, is glassy, and as a result of primary infection is decayed
– Discoloured or necrotic spots
– Superficial cracks and splits
– Loose twists
• The coleoptile is intact and shows acceptable defects like:
• The the mesocotyl is defective like cracked or broken, forming a loop or spiral, tightly twisted, and decayed as a result of primary infection
– Discoloured or necrotic spots
– Loose twists
– A split of one third or less from the tip
• The primary leaf is intact and shows acceptable defects like:
• Coleoptile is deformed, broken, or missing, has a damaged or missing tip, and is strongly bent over, forming a loop or spiral, tightly twisted, split for more than one third from the tip, spindly, and decayed as a result of primary infection
– Discoloured or necrotic spots
• The primary leaf is defective if it extends less than half the length of the coleoptile; is missing, shredded, or otherwise deformed; is yellow or white; and is decayed as a result of primary infection
– Slightly retarded growth
-
4.
Dicotyledon with hypogeal germination: Representative genus: Pisum sp. (Fig. 10).
Normal and abnormal seedling differentiation
Normal seedlings
Abnormal seedlings
The primary root should be intact and shows acceptable defects like:
Abnormal seedling if:
1. Necrotic or discoloured spots
1. Deformed and fractured
2. Healed splits and cracks
2. Consists of fused twin seedlings
3. Superficial splits and cracks
3. The seedling is white or yellow and is glassy and spindly and as a result of primary infection it is decayed
• In the shoot system, if cotyledons are intact and show acceptable defects like:
If the primary root is stunted, is retarded, is missing, is broken, is split from the tip, is trapped in the seed coat, shows negative geotropism, is constricted, is spindly, is glassy, and as a result of primary infection is decayed
– Up to 50% of tissue not functioning normally
– Only one intact cotyledon
– Three cotyledons
• The epicotyl is intact and shows acceptable defects like:
• Cotyledons are defective to such an extent that only less than 50% of the original or estimated tissue is functioning normally
– Necrotic or discoloured spots
• Deformed, broken, or missing
– Healed splits and cracks
• Discoloured or necrotic and is decayed as a result of primary infection
– Superficial splits and cracks
• The epicotyl is defective if it is too short, thick, deeply cracked or broken, split right through, missing, bent over or forming a loop or spiral, tightly twisted, constricted, spindly, and as a result of primary infection is decayed
– Loose twists
• The primary leaves are defective to such an extent that only less than 50% of the original leaf area is functioning normally, deformed, damaged, separated or missing, discoloured, necrotic, and as a result of primary infection decayed

Seedlings of onion (Allium sp.). (A, B) Normal seedling (cotyledon bent, long; root well developed). (C) Abnormal seedling (no radicle). (D) Abnormal seedling (cotyledon short, weak). (E) Abnormal seedling (indefinite knee). (F) Abnormal seedling (weak radicle). (Source: https://scholarsjunction.msstate.edu/seedtechpapers/92)

Seedlings of beans (Phaseolus sp.). (A) Normal seedling (epicotyl, hypocotyl, and radicle well developed). (B) Abnormal seedling (bold head, no terminal bud; no primary leaves). (C) Abnormal seedling (terminal bud present but no primary leaves). (D) Abnormal seedling (primary leaves chlorotic, stunted). (E) Normal seedling (one primary leaf present). (F) Abnormal seedling (hypocotyl thickened; no radicle). (G) Abnormal seedling (hypocotyl weak; no radicle). (Source: https://scholarsjunction.msstate.edu/seedtechpapers/92)

Seedlings of paddy (Oryza sativa). (A) Normal seedling (plumule, root well developed). (B) Abnormal seedling (weak plumule and root). (C) Abnormal seedling (no root). (D) Abnormal seedling (only one root). (E) Normal seedling (weak plumule-coleoptile empty). (F) Abnormal seedling (no plumule). (G) Abnormal seedling (weak plumule and root development). (Source: https://scholarsjunction.msstate.edu/seedtechpapers/92)

Seedlings of peas (Pisum sativum). (A) Normal seedling (good epicotyl and radical development). (B) Abnormal seedling (stunted radicle). (C) Abnormal seedling (no radicle development). (D) Abnormal seedling (split, swollen epicotyl). (E) Normal seedling (weak epicotyl and radicle). (F) Abnormal seedling (no epicotyl). (Source: https://scholarsjunction.msstate.edu/seedtechpapers/92)
5.3.6 Calculation and Expression of the Result
Results are expressed as a percentage by number.
When hundred seeds of four replicates of a test are within the maximum tolerated range, the average represents the percentage germination to be reported on the analysis certificate. The average percentage is calculated to the nearest whole number. The total % of all the category of seeds (normal, abnormal, dead hard, fresh-ungerminated) should be 100.
Germination rate may be deduced as the average number of seeds that germinate over the first and final count period.
5.3.7 Retesting
The results of a test are considered unsatisfactory under the following circumstances.
-
1.
Replicates performance is out of tolerance.
-
2.
Results being inaccurate due to wrong evaluation of seedlings or counting or errors in test conditions.
-
3.
Dormancy persistence or phytotoxicity or spread of fungi or bacteria.
In such a situation, the result will not be reported, and a second test will be made by the same method or by an alternative method. The average of the two tests shall be reported.
6 Seed Viability
Seed viability indicates the capacity of a seed to germinate and produce a normal seedling. However, a seed may contain both live and dead tissues and may or may not have the capacity to germinate indicating the viability of the tissues as well as the whole seed (Copeland and McDonald 2001). Hence, the viability test may be performed for rapid assessment to determine the germination potential of the seed lots to emerge under the field condition and also for deciding the marketing and storage by the seed companies.
6.1 Seed Viability Test
Seed viability test is a technique used to determine whether individual seeds within a sample appear to be alive or dead. It reveals the proportion of live seeds in a population to be estimated (Pradhan et al. 2022). Estimating the germination potential of a seed lot by actually germinating the representative sample is often time-consuming, specially in tree seeds. For this reason, a quick viability test is needed.
The objectives of quick viability tests:
-
To determine quickly the viability of seeds in a species that normally germinate slowly or show deep dormancy under normal germination methods.
-
To determine the viability of samples which at the end of the germination test reveal a high percentage of fresh-ungerminated or hard seeds.
6.2 Tetrazolium Test
Tetrazolium test is also known as TZ test, is a reliable and widely used quick test for seed viability, introduced by the German scientist Lakon in 1942. It is based on topographic evaluation of a biochemical test which demonstrates that specific embryo structures have to be alive for the seed to germinate.
Principle and mechanism: The test is established on the fact that all respiring tissues are capable of reducing 2,3,5-triphenyltetrazolium bromide or chloride, a colourless chemical, by H+ transfer reactions catalysed by the dehydrogenase enzyme into a red-coloured compound, formazan (Fig. 11), in darkness. Thus, the non-diffusible formazan stains the living tissues red. Respiring tissues can be found within the embryo; in cotyledons, radicle, and scutellar tissue; in some nutritive endosperm tissues; in female gametophyte tissues in gymnosperms; and in the aleurone cell layer inside the pericarp of grasses (França-Neto and Krzyzanowski 2019). The analyst must have a sound knowledge of the seed structure like the location and shape of the embryo, storage tissue type, properties of the seed coat, etc. for the successful conduct of the test. Thus, the viability pattern of the seed can be estimated by both the staining intensity and the staining pattern to make viability determinations. Once the principle and procedure are established for one species, it is relatively easy to test other species even of unfamiliar ones with necessary modifications (Elias et al. 2012).

Reduction reaction catalysed by enzyme dehydrogenases in live seed tissues in darkness
Merits/advantages of tetrazolium test
-
Alternative to standard germination test.
-
Can determine seed viability before harvesting.
-
Helps evaluate the seed’s physical and physiological condition.
-
Can help detect structural abnormalities and the degree of insect damage and mechanical damage during harvesting and post-harvest handling.
-
The test is simple and requires inexpensive equipment.
-
Determines viability of dormant/hard/fresh-ungerminated seeds.
-
The test is not influenced by environmental factors.
6.2.1 Procedure
Preparation of seed: The TZ test is conducted on the pure seed fraction of the representative sample. Two to four replicates of 100 seeds should be randomly taken for each test as specified by the ISTA (2022). Many species have hard and impermeable seed coats that need some kind of mechanical abrasion for moisture to penetrate the interior tissues of the seed. The seed is, therefore, hydrated to soften the seed coat and activate the dehydrogenase enzyme as the respiration rate increases, which facilitates pink-red staining of the viable tissues. Moistening also facilitates the cutting, piercing, or removal of the seed coat or other structures during preparation for staining. Softening by soaking overnight is followed with exceptions in some species to avoid imbibitional injury to the seeds. Fully imbibed seeds are easily sectioned and uniformly stained. The interpretation of staining patterns on a clean-cut surface of the embryo is more reliable.
Preparation for staining: Fully imbibed seed is cut, pierced, or punctured to remove the seed coat for easy entry and absorption of TZ solution. Preparation of seeds for staining includes:
-
1.
With a razor blade, bisect longitudinally or transversely.
-
2.
Seed coat punctured with a sharp needle.
-
3.
With a razor blade or scalpel, make seed coat incisions.
-
4.
Remove the seed coat.
-
5.
Excise the embryo.
After the seed coat removal, proper sectioning procedures need to be followed for rapid and uniform staining of the seed internal structure. In general, seeds of cereals and large-seeded grasses are sectioned longitudinally, whereas in dicot seeds, the testa is removed exposing the cotyledons for direct contact with TZ solution.
Preparation of staining solution: 0.5–1.0% solution (w/v) of 2,3,5-triphenyltetrazolium bromide or chloride is used for seeds of grasses, legumes, vegetables, flowers, and tree species that are not bisected through the embryo, and 0.1–0.5% solution is used for seeds of grasses and cereals bisected through the embryo. To prepare a 1.0% solution, 1 gram of tetrazolium salt is dissolved in distilled or tap water or phosphate buffer to make 100 ml. The pH of the solution should be around 7.0. The phosphate buffer solution is prepared by mixing 400 ml of solution A (9.078 g of potassium dihydrogen phosphate dissolved in 1000 ml water) and 600 ml of solution B (11.876 g of disodium hydrogen phosphate in 1000 ml water). 1.0% TZ solution of pH 7.0 is obtained by dissolving 10 g of tetrazolium salt in 1 lt of phosphate buffer solution. The TZ solution should be kept only in dark-coloured glass bottles to prevent the effect of light on the solution.
Staining with TZ solution: Place the seeds in the recommended concentration of 2,3,5-triphenyltetrazolium chloride in a Petri plate or beaker in such a manner that all the parts of the seed are in touch with the TZ solution. Temperatures between 25 and 35 °C are generally preferred. The staining time depends on the species—ranging from 4 to 8 h. Usually, the seeds are soaked overnight in darkness. After the staining period, the seeds are removed from the tetrazolium solution and rinsed thoroughly with water. The seeds are then evaluated for staining patterns.
6.2.2 Evaluation of the Staining Pattern
Large seeds can be examined under magnifying lenses, whereas small seeds can be observed under the microscope. Interpretation of the staining pattern requires special attention to the internal seed structures and its capacity to develop a normal root and shoot system. Bisected embryos of the seeds may be examined directly, while others may require a bit of manipulation for a precise evaluation, e.g. from the surrounding seed tissues, the embryo may be removed, opaque seed coats may be removed, or in grasses the outer coverings may be treated with lactic acid [85% V/V]. Evaluation of embryo staining pattern is comparable to that of normal and abnormal seedling in case of germination test. The embryos may show a range of staining patterns, stained completely to completely unstained. The embryos that are stained uniformly are considered viable, while the unstained are non-viable. However, some may be stained partially and partially unstained, pointing that they are neither completely alive nor completely dead, which must be evaluated thoroughly to determine their potential to produce normal seedlings (Fig. 12). A complete examination of seed structures, viz. embryo, radicle, plumule, cotyledons, scutellum, aleurone layer, coleorhiza, and coleoptile, is essential in concluding the result. Usually, endosperm is made up of non-living tissues and hence does not stain.

Tetrazolium staining patterns and their interpretation for Jatropha curcas seeds (Parreño-de Guzman et al. 2011). 1: Germinable—embryo completely stained. 2–4: Germinable—minor unstained areas in plumule. 5: Non-germinable—more than extreme tip of radicle unstained. 6: Non-germinable—more than half of radicle unstained. 7, 8: Non-germinable—whole radicle unstained plus juncture of plumule and radicle axis. 9, 10: Non-germinable—whole radicle and half of plumule unstained. 11: Non-germinable—radicle and more than half of plumule unstained and greenish in colour. 12: Non-germinable—embryo completely unstained
6.2.3 Tetrazolium Testing Method for Various Species
For detailed descriptions and explanations of TZ tests of different plant species, please see the ISTA Handbook on TZ Testing (2003). Following the general principle and procedures of the tetrazolium test, it is not difficult to suitably modify test methods for several familiar species (Elias et al. 2012) (Table 5). With good knowledge of seed anatomy and morphology, tetrazolium testing for unfamiliar species can be developed with guidelines from AOSA and ISTA tetrazolium testing handbooks.
Besides the above-mentioned quality testing, seed health is the other vital parameter of seed quality which has been described in the chapter Seed Health: Testing and Management. Seed vigour, another important attribute of seed quality, is discussed in the chapter Seed Vigour and Invigoration.
References
Bewley JD, Bradford KJ, Hilhorst HWM, Nonogaki H (2013) Germination. In: Seeds. Springer, New York. https://doi.org/10.1007/978-1-4614-4693-4_4
Copeland LO, McDonald MB (2001) Seed viability and viability testing. In: Principles of seed science and technology. Springer, Boston, pp 124–139
Elias SG, Copeland LO, McDonald MB, Baalbaki RZ (2012) Seed testing: principles and practices. Michigan State University Press, East Lansing
Fougereux J (2000) Germination quality and seed certification in grain legume. Special Report. Grain Legumes 27:14–16
França-Neto JB, Krzyzanowski FC (2019) Tetrazolium: an important test for physiological seed quality evaluation. J Seed Sci 41(3):359–366
ISTA (2003) Working sheets on tetrazolium testing. In: Leist N, Krämer S (eds) Agricultural, vegetable and horticultural species, vol I. ISBN: 978-3-906549-40-8
ISTA (2018) In: Don R, Ducournau S (eds) Handbook on seedling evaluation. International Seed Testing Association, Zurich. ISBN 978-3-906549-39-2
ISTA (2019). International rules for seed testing, Full Issue. i–19-8 (300). ISTA, Zurich. https://doi.org/10.15258/istarules.2019
ISTA (2022) International rules for seed testing, chap 2, i–2-44 (52). https://doi.org/10.15258/istarules.2022.02
Li L, Zhang Q, Huang D (2014) A review of imaging techniques for plant phenotyping. Sensors 14:20078–20111
Parreño-de Guzman LE, Zamora OB, Borromeo TH, Sta Cruz PC, Mendoza TC (2011) Seed viability and vigor testing of Jatropha curcas L. Philip J Crop Sci 36(3):10–18
Pradhan N, Fan X, Martini F, Chen H, Liu H, Gao J, Goodale UM (2022) Seed viability testing for research and conservation of epiphytic and terrestrial orchids. Bot Stud 63(1):1–14
Tang S, TeKrony DM, Collins M, McKenna C (2000) Determination of high seed moisture in maize. Seed Technol: 22(1):43–55
Wilkes T, Nixon G, Bushell C, Waltho A, Alroichdi A, Burns M (2016) Feasibility study for applying spectral imaging for wheat grain authenticity testing in pasta. Food Nutr Sci 7:355–361
Author information
Authors and Affiliations
Editor information
Editors and Affiliations
Rights and permissions
Open Access This chapter is licensed under the terms of the Creative Commons Attribution 4.0 International License (http://creativecommons.org/licenses/by/4.0/), which permits use, sharing, adaptation, distribution and reproduction in any medium or format, as long as you give appropriate credit to the original author(s) and the source, provide a link to the Creative Commons license and indicate if changes were made.
The images or other third party material in this chapter are included in the chapter's Creative Commons license, unless indicated otherwise in a credit line to the material. If material is not included in the chapter's Creative Commons license and your intended use is not permitted by statutory regulation or exceeds the permitted use, you will need to obtain permission directly from the copyright holder.
Copyright information
© 2023 The Author(s)
About this chapter

Cite this chapter
Rajendra Prasad, S. (2023). Testing Seed for Quality. In: Dadlani, M., Yadava, D.K. (eds) Seed Science and Technology. Springer, Singapore. https://doi.org/10.1007/978-981-19-5888-5_13
Download citation
DOI: https://doi.org/10.1007/978-981-19-5888-5_13
Published:
Publisher Name: Springer, Singapore
Print ISBN: 978-981-19-5887-8
Online ISBN: 978-981-19-5888-5
eBook Packages: Biomedical and Life SciencesBiomedical and Life Sciences (R0)