Abstract
The internet connected devices are prone to cyber threats. Most of the companies are developing devices with built-in cyber threat protection mechanism or recommending prevention measure. But cyber threat is becoming harder to trace due to the availability of various tools and techniques to bypass the normal prevention measures. A data mining-based intrusion detection system can play a key role to handle such cyberattacks. This paper proposes a threefold approach to analyzing intrusion detection system. In the first phase, experiments have been conducted by applying SVM, Decision Tree, and KNN. In the second phase, Random Forest, and XGBoost are applied as lately they have been showing significant improved performance in supervised learning. Finally, deep learning techniques, namely, Feed Forward, LSTM, and Gated Recurrent Unit neural network are applied to conduct the experiment. Kyoto Honeypot Dataset is used for experimental purpose. The results show a significant improvement in IDS outperforming the state of the arts on this dataset. Such improvement strengthens the applicability proposed model in IDS.
1 Introduction
The rapid development of computational and intelligent devices, smart home appliances, and high-speed internet enables everything to be connected. Educational institutions, business organizations, industries are becoming heavily dependent on technological devices. As a result, there is a tremendous risk of cyberattacks. An effective measure is essential to defend against such attacks. Furthermore, there is a lot of work with different policies to defend threat [1] such as software developments with quality of services, and parallel technologies in Cisco Switches [2], and intrusion detection in computer networks with big data lightweight model [3].
In recent years, data science technique has been adapted to implement effective Intrusion Detection System (IDS). Supervised learning algorithm can help to solve the classification problem of network intrusion detection [4]. There are numerous implementations of machine learning and deep learning-based IDS. Several algorithms have been used to develop IDS, such as Naïve Bayes, Self Organizing Map (SOM) [5], non-dominated genetic algorithm [6], Support Vector Machine (SVM) with Softmax or radial basis function (rbf). Each of these models is different, but their goal is to differentiate the normal traffic from the compromised ones.
Deep learning, on the other hand, has been applied in a wide variety of applications, including audio signal processing [7], image processing [8], speech processing [9], etc. In [10], Kohonen self-organizing map has been applied to detect network intrusion. The authors emphasized that it can automatically categorize the varieties of input during training, then it can fit the new data input to evaluate the performance. A case study on IDS can be found in the literature where authors used rbf Neural Network (NN) [11].
Feature selection is used to extract relevant features that describe the original dataset precisely. It enhances the model performance [12] through the elimination of inessential or noisy features [13] without distortion of original data pattern and without removing essential features. The removal process can be performed manually or with the help of algorithms like univariate feature selection [14], correlation-based feature selection [15], minimum redundancy maximum relevance algorithm (MRMR) [16].
To analyze IDS, this paper selects Kyoto University Honeypot dataset [17] for experimental purposes. Although several experiments are conducted using this dataset, very few of them are based on Long Short-Term (LSTM) Recurrent Neural Network (RNN). Even there is no experiment with boosting technique found in the literature. This paper adopts an approach to combine the machine learning model with several deep learning techniques. After collecting the dataset, a set of preprocessing method is applied to clean the dataset. A subset of features is then selected using a suitable feature selection technique. Various feature selection techniques are applied to understand their effect. After selecting the features, the dataset is balanced and fed to different classifiers to train the model to perform the prediction. The ensemble learning algorithm is implemented along with optimization in Boosting-based classifier. A detailed comparison is made with state-of-the-art to evaluate the strength of the proposed model. In addition, an explainable tool is also applied here as it interprets how the model is making decisions and predictions and executing actions [18].
The rest of the paper is organized as follows. Section 2 critically analyzes state-of-the-art. An overview of the dataset is given in Sect. 3 along with its exploratory analysis. Section 4 presents the overall methodology proposed in this paper and portrays the steps adopted in the experiments. After illustrating the experimental setup in Sect. 5, the obtained results are analyzed, and comparative analysis with the state-of-the-art are performed in Sect. 6. Finally, Sect. 7 summarizes the paper along with outlining the strength and weaknesses of the proposed approach.
2 Literature Review
The authors in [19] experimented on Kyoto 2006+ dataset to build IDS. The authors implemented SVM, Naïve Bayes, Fuzzy C-Means, Radial Basis Function, and ensemble methods. The SVM, KNN, and Ensemble Method accuracies were identified as 94.26, 97.54, and 96.72%, respectively.
The author of [20] proposed GRU SVM and GRU Softmax IDS models on Kyoto 2013 dataset. Softmax activation function works better with multiclass classification. Therefore, GRU SVM outperformed GRU Softmax for binary classification, considering the accuracies as 84.15 and 70.75%, respectively.
Vinayamkumar et al. [21] proposed a deep neural network model, justified the model with various intrusion detection dataset, including Kyoto 2015 dataset. The author developed NN with five layers. The NN accuracy and recall for intrusion detection are 88.5%, with an excellent recall value of 0.964. The author provided a comparative study on KNN, SVM rbf, Random Forest, and Decision Tree, where accuracies and recalls were noted as 85.61 and 90.5%, 89.5 and 99.5%, 88.2 and 96.3%, 88.3 and 88.3%, respectively.
Javaid et al. [22], developed deep learning based self-taught learning for intrusion detection. The authors implemented a sparse autoencoder with softmax activation function, and STL accuracy is 98% in NSL KDD Dataset.
Authors of [4] developed an intrusion detection system by applying four supervised algorithms. The authors generated 75% accuracy and 79% recall in SVM. The model gained 99% accuracy and recall in Random Forest Classifier.
Almseidin et al. [23] developed IDS with Random Forest and Decision Tree and listed accuracies as 93.77 and 92.44%, respectively, on KDD Dataset.
Costa et al. [24] performed nature inspired computing with optimum path forest clustering, SOM, and K-means for developing effective IDS. The authors used KDD Cup and NSL KDD Cup dataset along with more than six datasets for their experimentation and considered purity measures for evaluation metric.
Ring et al. [12], provided a comparative study on the available dataset to build IDS. AWID focused on 802.11 networks, CICIDS2017, DDoS2016, KDD Cup 99, Kent-2016, NSL KDD, SSHCurve and many other dataset repositories. The authors considered some parameters to evaluate each dataset. The parameters are general information, nature of data (format, meta, anonymity), record environment (network system or honeypot system, etc.), evaluation based on predefined split, balance imbalance, labeled or not. In the case of Kyoto Dataset, it is labeled imbalanced, with no predefined splits from real traffic of honeypot system.
3 Dataset Overview
A brief exploratory profile of the Kyoto University Honeypot System 2013 dataset has been discussed in this section.
3.1 Properties of Kyoto Dataset
The property of Kyoto Dataset is described in Table 1. The publicly available dataset comprises both flow-based and packet-based data, which contains normal and attack traffic. Therefore, the nature of the data is mixed type [12]. The dataset is generated from real honeypot traffic and excludes the usage of Servers, Routers, BoTs.
The experimental dataset size is 1.99 GB zipped file. A few days are missing among 365 days of 2013. It stores a continuous time data stream. It has 24 features, among which ten features are taken from the KDD dataset, and 14 features are created by the authors of [25].
3.2 Exploratory Data Analysis (EDA)
In our dataset, among 24 features, 15 features are continuous and quasi continuous, and nine features are categorical. In the preprocessing part, we have performed the necessary computation to give a perfect shape to the data.
As shown in EDA Table 2, after preprocessing, there are eleven numeric, eight Boolean features, and three features marked as either highly correlated or constant.
3.2.1 Features Exploration
The following graphs, created with pandas_profiling, present important insights. The graphs are also elucidated to understand the shape and format of data to gain the best insight.
-
1.
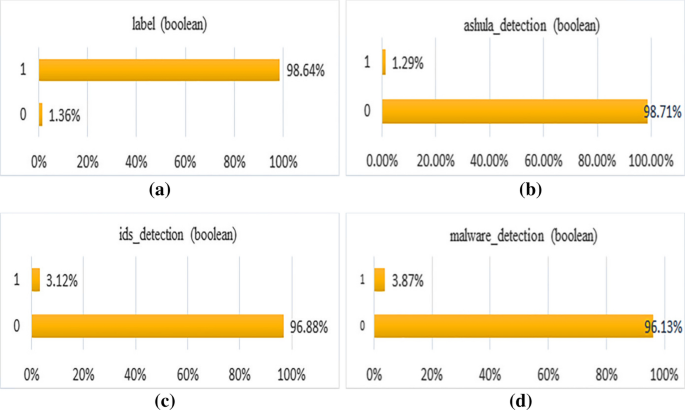
label: It is to mention 0 = Normal, 1 = Attack for label. As shown in Fig. 1a, we observe that 98.64% is Attack. Hence class imbalance insight is observed since only 1.36% of total instances belong to the Normal class.
-
2.
ashula_detection: Whether shellcodes and exploit codes were used in the connection, ‘0’ = used at 98.71% rate, and ‘1’ = not used at 1.29% rate as shown in Fig. 1b.
-
3.
ids_detection: In Fig. 1c, 0 = no alert triggered 96.88% times, and 1 = alert triggered 3.12% for ids detection.
-
4.
malware_detecion: In Fig. 1d, 0= malicious software not observed at 96.13%, 1= malicious software observed at 3.87%.
-
5.
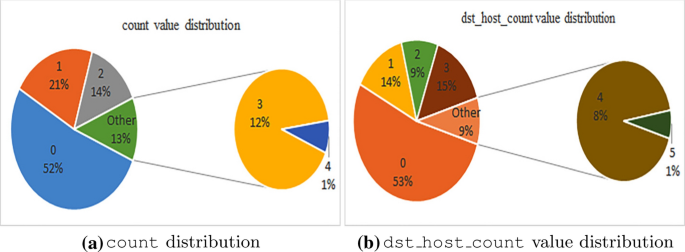
Features with similar distributions: The count feature in Fig. 2a contains values where 52% are 0. And, the dst_host_count also contains distribution of feature in Fig. 2b, having 53% of pie chart are 0.
Similar types chart with different value counts has been observed in our dataset for rest of the features. A detailed description of all features can be found in [17].
4 Proposed Methodological Framework
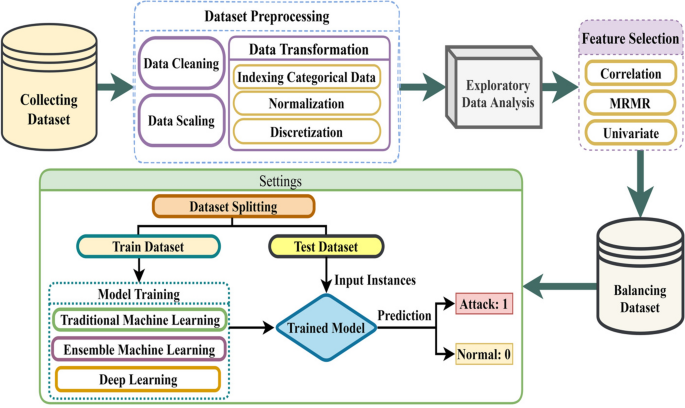
A series of steps have been taken, from dataset cleaning, feature selection, dataset balancing to perform classification, in this work. Figure 3 illustrates the whole workflow of the proposed approach where each step of the workflow is described in the following sections.
4.1 Data Preprocessing
A dataset containing noise, null values, and irregular shape would lead to the fatal performance of model [26]. There is a list of mandatory processes to format the dataset accordingly to overcome and avoid catastrophic performance. As shown in Fig. 3, the procedures are (1) Data Cleaning, (2) Data Scaling, and (3) Data Transformation.
4.1.1 Data Cleaning
The experimental dataset instances are free of NAN values. But there were duplicate instances that were dropped from the dataset. According to the dataset, ids_detection, ashula_detection, and malware_detection contain string and numerical value. String values are assigned integer ‘1’ to rescale features. Otherwise, it is kept as ‘0’. For example, the label contains three types of values, i.e., ‘1’= Normal, ‘\(-1\)’ and ‘\(-2\)’ = Attack. It is required to rescale ‘\(-1\)’ and ‘\(-2\)’ by replacing with ‘1’ (Attack) and rescaling the ‘1’ with ‘0’ (Normal). So now, the label is ‘0’ and ‘1’, indicating ‘Normal’ and ‘Attack’ class, respectively. The start_time feature is a time frame data, so it is also scaled to continuous data.
4.1.2 Categorical Data Label Encoding
Most machine learning and deep learning algorithms accept numerical inputs. That is why categorical data requires to be encoded to numerical inputs to build an efficient model. Label Encoding is a popular encoding technique for converting categorical variables into continuous variables. Label Encoder replaces categories from 0 to n-1 (in terms of our work), where n is the number of variable’s distinct categories, numbers for these cardinalities are assigned arbitrarily. The python sklearn library has a class preprocessing which contains LabelEncoder(). The dataset [17] has nine categorical features. The categorical features are transformed to numerical features through applying LabelEncoder(). Normalization is applied after indexing the categorical data.
4.1.3 Normalization
The raw values of features have a degradation impact on Machine Learning and Deep Learning algorithms. Therefore, normalization is essential to transform the values into scaled values which increase model efficiency as well.
Standardization: In this experiment, first standardization of the dataset is applied to transform continuous and quasi continuous attributes. Python sklearn library has preprocessing class which contains StandardScaler() to convert continuous and quasi continuous features to the continuous features. Standardization can be denoted as \(z = \frac{x-\mu }{\sigma }\), where z = generated value, \(\mu\) = mean, and \(\sigma\) = standard deviation.
Min–Max Normalization: The Min–Max normalization is used to transform data into a range of 0–1. Since minimum and maximum values of features are unknown and the dataset is unbalanced, the process is applied before dataset splitting and after balancing to prevent the biasness caused by outliers of imbalance dataset [26]. The Min–Max normalization can be described mathematically as \(x_{{\mathrm{new}}} = \frac{x - x_{{\mathrm{min}}}}{x_{{\mathrm{max}}} - x_{{\mathrm{min}}}}\), where \(x_{{\mathrm{new}}}\) is transformed value.
4.1.4 Discretization
Non-standard probability distributions, like skewed distribution, exponential distribution, shrink model performance. Binning is one kind of discretization method that can transform data into a discrete probability distribution. Thus, each numerical value is assigned a label maintaining an ordered relationship which will enhance the model performance. Pandas qcut() binning is used for our work, where it returned labeled minimum and maximum values.
4.2 Feature Selection
The src_ip_add and dest_ip_add lack significant insights, since these were processed multiple times to hide the actual addresses due to security concerns [17]. So, these features were removed, keeping 22 features. Furthermore, the pandas_profiling detects two constant features which are also removed from the dataset. The dataset has 20 features, among which label is the target feature. We have performed a threefold feature selection approach to find which algorithm is providing the best outcome.
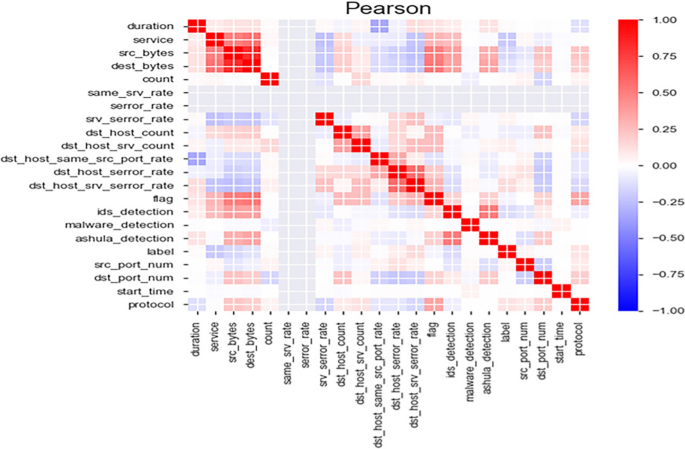
Pearson’s correlation matrix of features from author’s work [27]
Correlation, Univariate, and MRMR methods are initially applied for feature selection. In terms of Univariate Feature Selection and MRMR algorithm, there is just one feature difference compared to Correlation Feature Selection. In correlation matrix dest_bytes is removed, whereas MRMR removed a feature named as dst_host_same_src_port_rate. Univariate feature selection also does a similar type of computation. Since there is no significant difference among the three methods, the features are selected based on the correlation matrix.
In general, features with lower dependency measures are considered independent features. Pearson Correlation coefficient (\(\rho\)) [28] measures the degree of linear correlation between two variables. In our case, two features with \(\rho \ge 0.7\) will be considered as highly dependent features. Therefore, observing from Fig. 4 that dest_bytes is highly correlated with src_bytes where \(\rho =0.8253\). Hence, one of the two features is dropped. Finally, 19 features are selected for the experiment.
4.3 Neural Network Layers
Neural Network has enabled the development of intelligent machines that can learn from the patterns and suggest accordingly. In the following sections, different neural network layers are introduced, which are implemented as the proposed IDS model using Keras.
4.3.1 Dense Layer
The dense layer is a non-linear regular deeply connected layer. The more layers are added to the neural network, the more it will be complex. Thus, it is called the deep neural layer due to the increase of computational complexity with the depth of layers.
4.3.2 Dropout Layer
Dropout layer controls overfitting problem of neural network by preventing co adaptations among nodes of the layers while training the model [29, 30]. How much co adaptations would be controlled is usually defined within the range of 0 and 1. In our case, the dropout parameter is set as 20%.
4.3.3 Batch Normalization Layer
We used this layer while modeling the LSTM and GRU neural network. Neural network model training is a complex task due to changes in distributions of data in each layer. The layer performs normalization to make the network stable. In this way, normalizing the inputs with zero mean and unit standard deviation, the neural network trains and predicts faster [31].
4.4 Feed-Forward Neural Network
In our model, we have used five layers, namely an input layer \(x \in {\mathrm{I\!R}}^d\), \(d \in {\mathbb {N}}\), three hidden layers (h), and one output layer (y) with single node which will provide either 1 or 0 for a vector input. Now, below mathematically observing how it works [32].
Input layer or first layer takes \(x \in {\mathrm{I\!R}}^d\), \(d \in {\mathbb {N}}\) as input. Then, layer passes the data to the next layer, which is first hidden layer \(h^1\) denoted as follows:
where activation function \(\varphi :{\mathrm{I\!R}}\rightarrow {\mathrm{I\!R}}\), \(b=\) bias, \(\omega =\) directed weight, i node number, and superscripts are the layer number, and j is node number of the previous layer. The \(\omega _{i,j}^{(l)} h_j^{(l-1)}\) indicates that the weight of the current layer is getting multiplied by the output of the previous layer. A relevant FFNN IDS model is proposed in the experimental setup section.
4.5 Long Short-Term Memory (LSTM)
Recurrent seems like a recursive function which calls itself frequently. Recurrent in the concept of a neural network is a cyclic approach that implies the same computation is repeated recursively on each element of the dataset. RNN is prone to vanishing and exploding gradient problems. LSTM and GRU are two variant of RNN which solve RNN issues [33]. LSTM contains Input Gate (I), Output Gate (O), and Forget Gate (F). The functionality of these gates of LSTM cell can be denoted mathematically as follows:
Here W, U are weight matrices. According to the author [34] of LSTM, the equations can be described with the states of layers, weights, gates, and candidate layer. Let us assume at time t sec, the memory cell takes \(x_t\), \(H_{t-1}=\) hidden layer output at \(t-1\) sec, \(C_{t-1} =\) memory state of hidden layer at \(t-1\) sec as input. As output, it provides \(H_t\) and \(C_t\).
4.6 Gated Recurrent Unit (GRU)
GRU architecture can be distinguished from LSTM by the number of gating units. GRU has a gating unit that determines when to update and what to forget [35]. In the architecture of GRU RNN, there are four principal components. It is observed that \(x_t\), \(H_{t-1}\) is provided as input. According to the author of [33], the four components and their equations are at time t
From the above equations, we see, the current input and previous hidden layers information are reflected in the latest layers. We will propose a GRU model in the experimental setup chapter relevant to the above-denoted equations.
4.7 Activation Functions
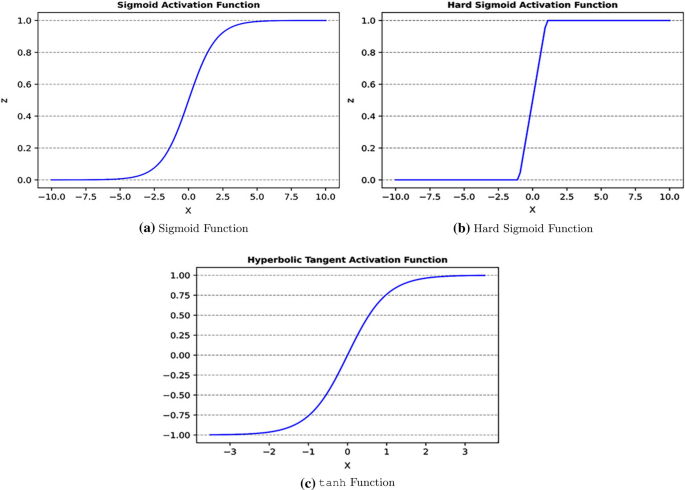
In our model, we used activation function denoted as \(\sigma :{\mathrm{I\!R}}\rightarrow {\mathrm{I\!R}}\) which is sigmoid function of Fig. 5a. Sigmoid function takes the sum of weighted inputs and bias as input, and gives output as 0 and 1. The function looks like
For hard sigmoid, we denote as
The hard sigmoid of Fig. 5b is used for the recurrent activation function of LSTM and GRU model instead of soft version, since hard sigmoid produces less computational complexity [36].
The model also uses \(\tanh\) as the activation function as shown in Fig. 5c. The hyperbolic tangent function can be denoted as
4.8 Machine Learning Classifier
Popular Python scikit-learn library is imported to implement the following machine learning models.
SVM: In SVM, the data points are linearly separated into two vector classes by a hyperplane. The apparent goal of SVM is to find the hyperplane where margins are the furthest apart. Samples that define the margins are called support vectors.
Since our dataset is a binary classification problem, the set of possible values that the model can predict is also binary. In the practical instance, there are ‘0’ and ‘1’, i.e., the dataset label {‘Attack’: ‘1’, ‘Normal’: ‘0’}, implies that there would be positive support vectors and negative support vectors we denote them by \(\{+1, -1\}\). We consider the predictor of the form
Now, let us derive the hyperplane and the margin [37, 38]. Let x be an feature of data space \({\mathrm{I\!R}}^D\) where \({\mathrm{I\!R}}^D \subseteq {\mathrm{I\!R}}\)
In a general sense, the hyperplane contains no support vectors, i.e., the distance between \(+1\) elements and \(-1\) elements would be zero on the hyperplane. When Eq. 19 is zero, it falls on hyperplane, and therefore if Eq. 19 is greater than or equal to zero, the result would be \(+1\) otherwise \(-1.\) Thus, mathematically, Eq. 19 can be written as follows:
where \(y_{{\mathrm{prediction}}}\) is predicted label considering \(x_{{\mathrm{test}}}\) as input instances. Separating hyperplane can be defined using kernel tricks. Kernel can be introduced as similarity function [37] between a pair of instances say \(x_i\) and \(x_j\). For our work, we have followed radial basis function (rbf) kernel, Gaussian kernel is as follows:
where \(\Vert x_i-y_j\Vert\) implies Euclidean Norm between two points. The resulting rbf score will fall into range of \(\{-1, +1\}\).
Boosting: XGBoost is a boosting learning algorithm also known as Extreme Gradient Boosting, implemented in this work. There is a difference between Ensemble Random Forest and XGBoost. Random Forest works as bagging and aggregation [39]. In contrast, boosting learns from the errors of the previous tree computing residual errors.
XGBoost can transform a weak predictor into a stronger predictor by summing up the residual errors of all trees. With some mathematical indications, we would conclude this section. The loss function for XGBoost [39] is denoted by
where \(l(\delta )\) = loss in mean squared error is computed for tth tree, and \({\hat{y}}\) is the predicted label.
Another distinguishing factor of XGBoost and ensemble trees is the usage of penalty regularization in XGBoost. The regularization function is as
where \(\gamma\) , \(\beta\) are penalty constants to reduce overfitting, L = number of leaves, and \(\varphi\)= vector space of leaves. Therefore, from Eqs. 22 and 23, the objective function of XGBoost is denoted as-
Decision Tree: The decision tree supervised learning algorithm is question answer-based model, simply put divide and conquer approach. Question answering model is nothing but tree model, where dataset breaks into several subsets. At the end, it contains leaf node which classifies 0 or 1. Moreover, functionality of decision tree as follows:
-
Dividing the mid-point for each set of consecutive unique responses [40].
-
Scoring Criteria to evaluate decision tree partitions such as Entropy and Gini Impurity [6].
-
Stopping rule to prevent overfitting problem.
For this experiment, Gini Impurity is considered, based on that decision tree creates a set of rules considering training dataset. If there is any test input or new input is given, the model will predict the label according to the rule base. Finally, we obtain a tree, where final result is the leaf node classifies the decision as ‘0’ or ‘1’.
Ensemble Random Forest:To improve the performance and remove a classifier’s drawback, developers and scientists usually look for the ensemble method. Random Forest is a Bootstrap aggregation and bagging ensemble method. Ensemble machine learning is a technique that groups several base models to build a powerful prediction model. For our work, to implement the random forest algorithm python sklearn library is used, sklearn implements the algorithm using Gini Impurity on binary tree [41, 42], and provide output with probabilistic prediction. Therefore, the steps of Random Forest is as follows:
-
1.
Randomly choosing a sample randomly from the dataset with M instances and D features.
-
2.
Subset of D features is selected randomly and finding the best splitter to split the node iteratively.
-
3.
Growing the tree, and the above steps are repeated until the prediction is given based on the Random Forest feature importance formula.
KNN: KNN is a distance-based classifier, and it classifies samples based on the closest training examples in the data space. KNN is called lazy learning because it does not learn discriminative functions. Rather it stores all the training data. Lazy learning is instance-based learning, with no cost during the training process [43]. The KNN algorithm is straightforward and can be summarized as
-
Choose K and a distance metric
-
Find theK nearest neighbors of a sample that we want to classify in training data.
-
Based on the larger number of a class, assign the label.
Therefore, the predictor equation of the KNN Classifier [44] can be denoted as-
There are several distance metrics for finding the closest point. Euclidean, Cityblock, Chebyshev, and Minkowski are mostly famous distance metrics.
5 Experimental Setup
In this section, we describe the settings of our experiment. We illustrate how the class imbalance problem is handled and demonstrate the proposed neural network architecture.
5.1 Dataset Splitting
We have performed preprocessing, exploratory data analysis, and feature selection on the dataset. After feature selection, we have rechecked for the duplicate. Since some of the features have been removed, it is no wonder to find a small number of duplicate values. Thus, we removed the copies from the dataset. We have chosen a sample from the population data. We divided the dataset into ten equal shapes, depending on df[‘label’].value_counts() of data, we chose a chunk to perform the experiment where ‘0’ is the maximum among ten fragments. Then, the dataset is partitioned into train, test, and validation datasets. First, the sampled data are split up with 70% train data and 30% test data. Then, the test data are further divided into two parts—test set and validation set with a 50% ratio.
5.2 Handling Class Imbalance Problem
To solve the class imbalance problem, we usually apply the undersampling and oversampling technique. The undersampling approach reduces actual data size; thus, we lost a lot of data. TOMEK is one of the popular under-sampling algorithms [45]. On the contrary, oversampling creates more instances which may lead to overfitting; SMOTE performs significantly in oversampling [45]. For our imbalanced dataset, we are applying the SMOTETomek resampling algorithm [46], which combines the under sampling and oversampling technique to reduce the disadvantage of undersampling and oversampling. Using the Python library, the algorithm is implemented to resample our dataset.
5.3 Proposed Neural Network Models
After completing initial computations like dataset preprocessing, feature selections, and class imbalance handling with the appropriate method, the models are trained with the training dataset. Then, the test dataset is fed to predict the built model. In this segment, we will present the proposed model architecture to develop an intrusion detection system.
As shown in Fig. 6, there are five layers, one input layer as dense, and the output layer as dense_2. There is a dropout layer between two dense layers. The model has 32 nodes at each layer except the output layer. The dropout value is 20% for the proposed model. We recall Eqs. 1–4 to describe the figure. First, the model receives input instances as batch and passes the instances to the first hidden dense layer similar to the Eq. 1. Second, the instances propagate through the neurons of dropout layer before feeding into the second dense layer. Finally, the model predicts ‘Attack’ or ‘Normal’ class in output layer as the Eq. 4.
In Fig. 7, we observe eight layers for both LSTM and GRU architecture. There is batch normalization layer, dense layers, input and output layer. The input shape and output shape are identical for both models. To understand the data flow through the model we have to recall from Eqs. 5 to 10 for LSTM and Eqs. 11–14 for GRU model. The first layer is input layers which takes instances as input in batch and passes it to the cells of LSTM or GRU layers. The output from previous LSTM or GRU enabled layer propagates through rigorous normalization layer before feeding to the next LSTM or GRU layer. The layer detailing has been already described in Sect. 4.3 of Proposed Methodological Framework chapter. For the deep learning model, we have implemented FFNN, LSTM, and GRU with the help of tensorflow.keras. The following paragraph details some of the important parameters we have used with deep learning models.
Regularization, Optimizer, and Loss Function The goal of regularizers is to prevent overfitting and underfitting. Choosing an appropriate epoch number for NN is difficult since too many epochs may lead to overfitting. In contrast, a lower number of epochs may not give us good accuracy. Since we expect good accuracy without any overfitting, we define early stopping callbacks. So, the model will train until the accuracy of the train split and validation split is satisfactory.
The binary cross-entropy loss function is used in our experiment. The GRU RNN uses the same loss function, optimizer. We have a binary class dataset; therefore, we would consider sparse categorical cross-entropy as our loss function. We used Adam optimizer for our model, which keeps a history of the previous gradients. Adam optimizer stores exponentially moving average gradients to take momentum like Stochastic Gradient Descent with momentum and squared gradients to scale learning rate like RMSprop [47].
5.4 Evaluation Metrics
The performance of the experiment is measured using the formulas from Eqs. 26 to 29 [43],
where TP, TN, FP, and FN are True Positive, True Negative, False Positive, and False Negative. Accuracy measures the number of correct classifications penalized by the number of wrong classifications. Precision assesses the quality of a classifier. Recall measures the detection rate that is accurate classifiers penalized by the missed entries while F1 Score measures model performance considering Recall and Precision.
When the dataset is imbalanced, Matthews Correlation Coefficient (MCC) overcomes the class unbalanced raised accuracy bias issue of the classifier [48]. MCC value close to \(+1\) implies a strong classifier, and close to \(-1\) defines the worst classifier. MCC can be denoted as follows:
MCC measures the quality of the classifiers, which is considered to describe our models. Recall, precision would be drawn where it is necessary. Accuracy score is considered for comparative study with existing works on the Kyoto dataset.
6 Results Analysis
The experimental results and comparative study are presented and discussed in the following sub sections.
6.1 Performance Significance on Epoch Number
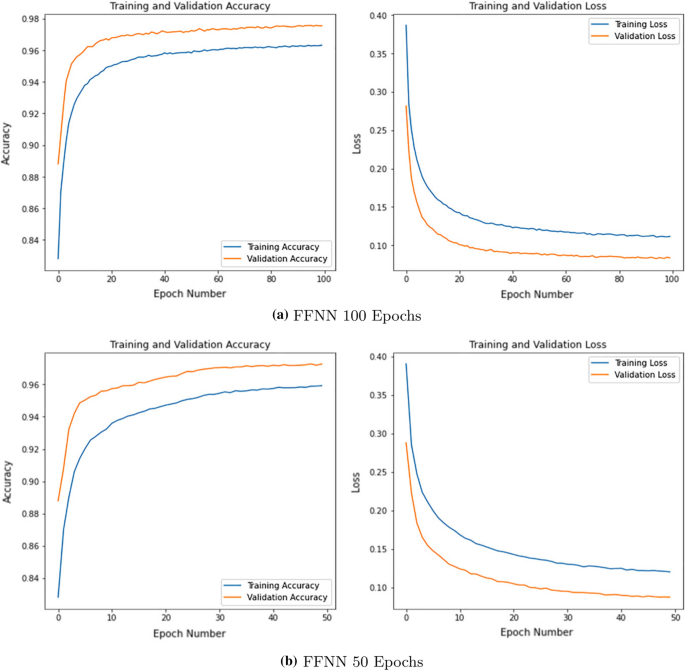
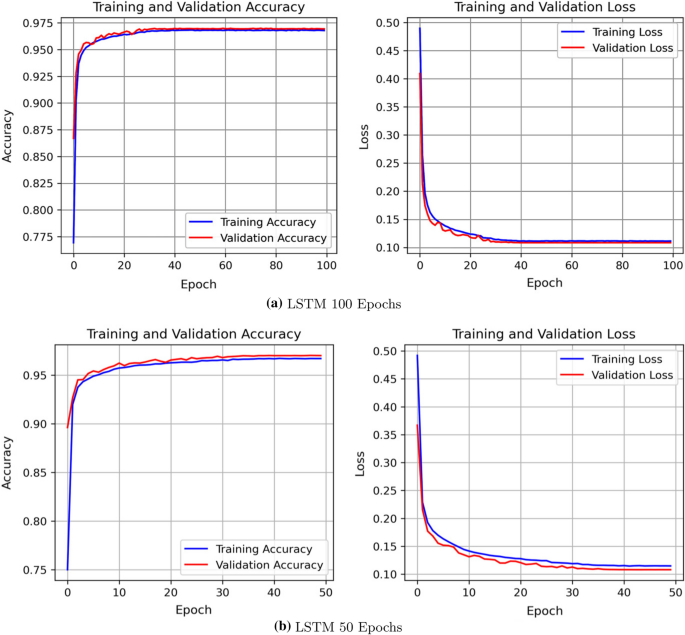
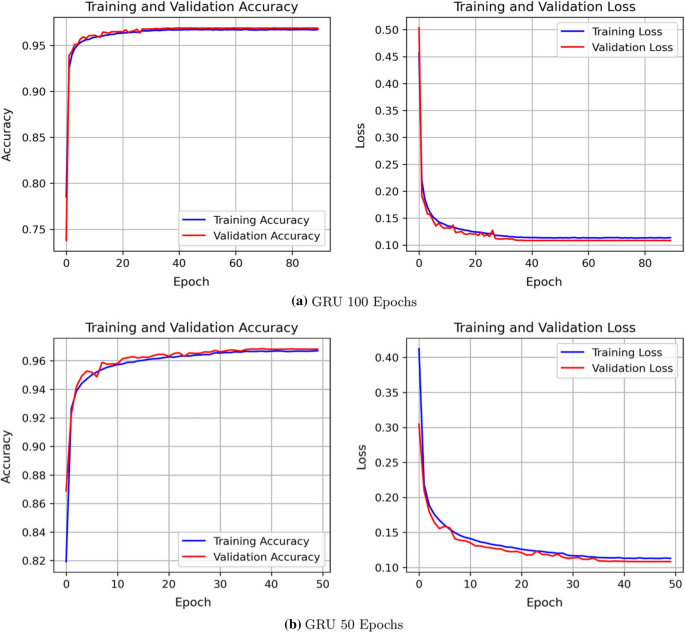
We describe the validity of the proposed neural network models through required evaluation metrics. A set of hyperparameters is manually tuned during LSTM and GRU training, where the learning rate and lambda of L2 regularizers are 0.001 and 0.003, respectively. The Table 3 illustrates the findings of the neural network IDS models. The MCC score is considered for 100 and 50 epochs to demonstrate the quality of neural network IDS models. For 100 epochs, the FFNN presents the MCC score as 94.40%, where LSTM and GRU IDS models achieve 93.62 and 93.65%, respectively. In terms of 50 epochs, the FFNN, LSTM, and GRU MCC scores are, respectively, 0.68, 0.54, and 0.21% lower than 100 epoch models. Thus, the models surely possess strong MCC scores.
Furthermore, from Table 3, the FFNN train and test accuracies are 96.23 and 96.99% for 100 epochs and 95.78 and 96.66% for 50 epochs. For LSTM, the IDS models provide test accuracy of 96.78% for 100 epochs and 96.51% for 50 epochs. The GRU IDS models provide improved performance recording test accuracies as 96.80 and 96.69% for 100 epochs and 50 epochs, respectively. The credibility of such accuracies is further justified by the F1 Score being the same for all IDS models 96.61%. The significance of epoch numbers on getting better accuracy can be narrated based on the recorded results, leading us to denote that models are providing better accuracies as the number of epochs is increasing.
Figures 8, 9, and 10 are demonstrated to validate the fitness of the model, which contains Epoch vs Accuracy and Epoch vs Loss curve for 100 epochs and 50 epochs.
These graphs demonstrate no abnormal fluctuation between the training validation curves; the training stops where loss is not entirely 0 either. If the validation loss becomes close to 0, only then the model becomes overfitting. On the other hand, the curve is not even underfitting yet since curves demonstrate no overlapping intersection, which eventually approves perfect fitness.
Early stopping prevents overfitting by keeping an eye on epoch numbers and respective accuracy. For both LSTM and GRU models, the early stopping call back function is provided in the training process. The LSTM of Fig. 9a provides a perfect fit model for 100 epochs, whereas GRU in Fig. 10a performs by preventing overfitting. We observe that the epoch does not reach the 100th epoch due to early stopping; rather, it stops at the 90th epoch. Now observe the accuracy and validation curve for 50 epochs of Figs. 8b, 9b, and 10b. There is satisfactory accuracy and loss, and corresponding plots approve the perfect fitness of the model.
We can observe that recall and precision of neural network models is identical. The recall is the portion of correct intrusion detection among the existing true positives and false negatives. The recall implies that models correctly detect the intrusion at a rate of 97% among the existing accurate class. The precision of our proposed neural network models suggests that 97% times the predicted class is relevant concerning the actual class.
6.2 Machine Learning Model Performances
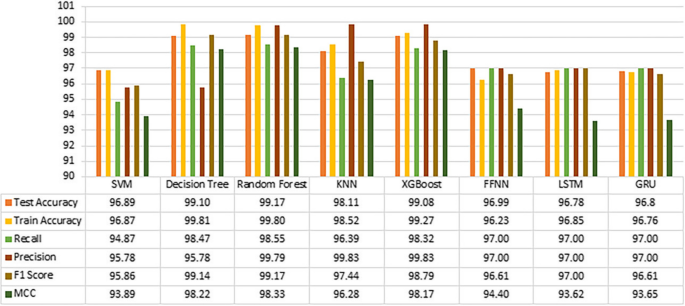
SVM rbf: From Table 4, the MCC score is 93.89%, defining the quality of the model. The test accuracy is 96.89%, with the predictive power of 95.86%. The accuracy and F1 Score are further verified with the precision, which is 0.91% higher than the recall of the model.
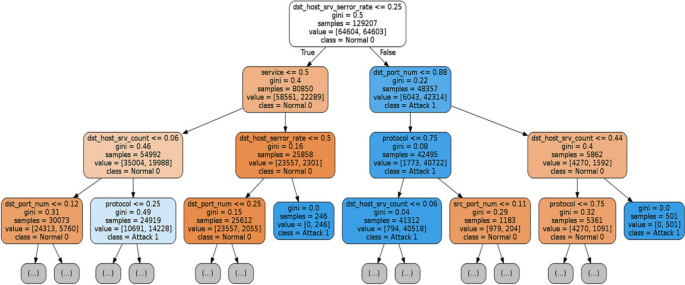
Decision Tree: For the decision tree classifier, 98.47% times the classifier detects the actual class concerning true positives and false negatives. The precision of 99.70% with 99.10% accuracy justifies the quality of the model. The 99.14% F1 Score is also significant. The classifier is strong enough, holding the MCC score is 98.22%. In the Fig. 11, we present the decision tree levels generated from our experiment.
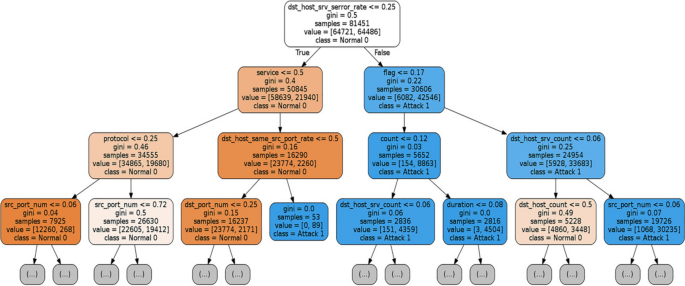
Ensemble Random Forest: In Fig. 12, it is a three-level 20th decision tree of ensemble random forest IDS. The random forest classifier provides 99.17% accuracy with significantly high recall and precision. The predictive power of the model is 99.17% with a significant MCC score of 0.9833.
KNN: We have considered K = 5 through manual tuning for the KNN classifier. We got 98.11% accuracy with a precision of 99.80% and recall is 3.44% lesser than precision. The MCC score is 0.9628, which is satisfactory with the predictive power of 97.44%.
Boosting: We have implemented the XGBoost classifier along with optimization with the help of RandomizedSearchCV. The best hyperparameters are estimated using 5 cross validation and 25 fitting. XGBoost optimum hyperparameters are: ‘min_child_weight’: 3, ‘max_depth’: 15, ‘colsample_bytree’: 0.5, ‘learning_rate’: 0.25, and ‘gamma’: 0.2. XGBoost classifier has generated significant accuracy, recall, and precision. The F1 Score defining the predictive power of the model is recorded as 98.79%. The MCC score is very close to +1, which implies it as a strong classifier.
6.3 Performance Assessment
We are considering 100 epochs neural network IDS models for the assessment since these models are performing better than 50 epochs. As shown in Fig. 13, the decision tree works perfectly with the dataset, and random forest performs significantly as well. The KNN algorithm runs a bit slower but faster than SVM producing a significant MCC Score. In terms of the XGBoost classifier, the MCC score is verifying it as a robust classifier. We can evaluate the Random Forest as the best IDS system providing 98.33% among the ML models. FFNN neural network model is providing higher accuracy than LSTM and GRU. Based on the MCC score, we must say that all models are performing significantly.
6.4 Evaluation with Existing Works
We have developed three traditional machine learning classifiers, two state-of-the-art machine learning models, and three deep learning models. It is high time to evaluate how the models are performing with respect to the existing works. Similar models of other existing works are considered for this evaluation as shown in Table 5.
Zaman et al. [19] denoted the accuracies of 94.26, 97.56, and 96.72% for SVM, KNN, and Ensemble of six models, respectively.
In another work, Vinayakumar et al. [21] implemented a neural network model on Kyoto 2015 dataset and found the accuracy of 88.15%. The authors listed the accuracy of KNN, SVM rbf, Random Forest, and Decision Tree as 85.61, 89.50, 88.20, and 96.30%, respectively.
Agarap [20] experimented on the Kyoto 2013 dataset with GRU Softmax and GRU SVM model. The author listed the accuracies as 70.75% for GRU Softmax, and 84.15% for GRU SVM.
The performances of our proposed neural network models are significant in comparison with existing works. We have improved the accuracies of the neural network model compared with the existing neural network models. In terms of machine learning models, our proposed methods are more effective than the listed works in Table 5. Our best accuracy is 99.17% for Random Forest, and the lowest accuracy is 96.36% for SVM rbf, which is also greater than other listed SVM rbf models. The model with GRU Softmax provided less accuracy than GRU Sigmoid, and because softmax is best fit for multinomial classification [20]. Based on our experimental analysis, we denote that for binary classification GRU Sigmoid performs better than Softmax activated GRU.
6.5 Machine Learning Black Box Interpretation with LIME
We have imported LIME to discover what is inside the machine learning black box. In this section, we briefly introduce LIME, and later on, we implement the package with one of our models.
6.5.1 LIME-Explainable AI
Usually, we present the model outcome with some graphical visualizations and tables to explain what we have done. There should be a proper authentication process for the model so that stakeholders can trust the model to deploy in a particular system. Therefore, LIME takes the responsibility to prove the trustworthiness and reliability of the model [49]. LIME stands for Local Interpretable Model-agnostic Explanations. LIME helps explain a model whose inner logic is obtuse; in a sentence, LIME explains a machine learning model black box.
The authors of [50] discussed the functionality of LIME in detail. The excerptions are as follows: (1) Selecting instances for which explanation of black box prediction will be demonstrated. In our case, we used lime_tabular class which takes the training dataset as input, (2) The training dataset is converted to np.array to get the black box prediction for new samples, (3) LIME uses Gaussian Kernel to give weights to the new points. LIME creates new points from multivariate distribution of features, (4) LIME assigns weights, depending on the proximity between the newly generated points and the data to be explained, (5) The weighted dataset is then trained using interpretable model, (6) Based on the interpretable model, we obtain the explanation of the prediction made on the test instances. We have implemented the LIME to validate one of the proposed machine learning models.
6.5.2 LIME Implementation
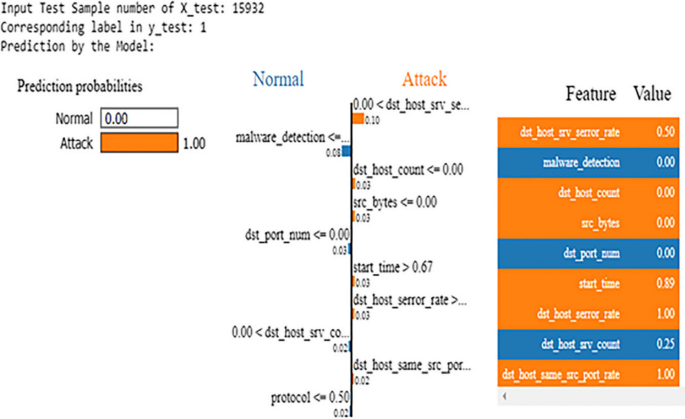
Here, we are considering Decision Tree as our model to be used as a predictor through LIME interpreter. We provide prediction function as predict_fn = decisionTree.predict_proba.
Here, we provide input of ten random instances from the test dataset as X_test.iloc[k], the LIME explainer displays the explanation with the predicted label for the respective input instance as shown in Fig. 14. For X_test.iloc[23898], the corresponding label is y_test.iloc[23898] is 1, and the LIME prediction is ‘Attack’. In Table 6, the actual label and LIME interpretation of the Decision Tree has been reported.
It is proven that our experimented model is working flawlessly to detect the Attack and the Normal intrusion. Thus, if anyone uses this model and gives the input, it would predict accordingly. Let us consider KNN or SVM instead of tree-based classifier or boosting classifier. It will provide the probabilistic explanation in LIME either 56% to Attack or 44% to Normal. Hence, it will detect the input as Attack. Therefore, this is how the machine learning algorithm functions in our network intrusion detection model and assures the reliability of network intrusion detection.
7 Conclusions
A deep learning-based method is presented in this paper to improve the performance of network intrusion detection. The machine learning models experimented here achieve a considerable improved performance than the peers. Boosting technique is added to SVM, KNN, and DT to conduct the experiment. XGBoost model provides better accuracy than that of the compared models. On the other hand, Ensemble Random Forest achieves the best accuracy, precision, and recall values compared to other models. In addition, both the neural network models, LSTM and GRU, also achieve improved performance while comparing with the state of the arts. However, FFNN shows the best performance among all three deep neural network models. Matthews Correlation Coefficient (MCC) is used to qualify our results, and all the MCC values to close to 1, indicating the higher quality of the experimental results. LIME is also used to make the work explainable. Due to the lack of a high configured computing facility, the experiments are conducted using a part of the dataset. It is our plan to take to the whole dataset for the experiment to get deeper insight of the problem. In addition, as in [12] the experiment can be conducted on other datasets that will allow us to compare the effectiveness of the proposed method on various datasets. Boosting techniques have been applied in this paper; however, optimization technique, such as PSO-based voting ensemble, can also be applied.
References
Talele, N., Teutsch, J., Jaeger, T., Erbacher, R.F.: Using security policies to automate placement of network intrusion prevention. In: Jürjens, J., Livshits, B., Scandariato, R. (eds.) Engineering Secure Software and Systems, pp. 17–32. Springer, Berlin (2013). https://doi.org/10.1007/978-3-642-36563-8_2
Bul’ajoul, W., James, A., Pannu, M.: Improving network intrusion detection system performance through quality of service configuration and parallel technology. J. Comput. Syst. Sci. Spec. Issue Optim. Secur. Priv. Trust E-Bus. Syst. 81(6), 981–999 (2015). https://doi.org/10.1016/j.jcss.2014.12.012
Wang, W., Liu, J., Pitsilis, G., Zhang, X.: Abstracting massive data for lightweight intrusion detection in computer networks. Inf. Sci. 433–434, 417–430 (2018). https://doi.org/10.1016/j.ins.2016.10.023
Belavagi, M.C., Muniyal, B.: Performance evaluation of supervised machine learning algorithms for intrusion detection. Procedia Comput. Sci. 89, 117–123 (2016). https://doi.org/10.1016/j.procs.2016.06.016
Powers, S.T., He, J.: A hybrid artificial immune system and Self Organising Map for network intrusion detection. Inf. Sci. Nat. Inspir Probl. Solving 178(15), 3024–3042 (2008). https://doi.org/10.1016/j.ins.2007.11.028
Suman, C., Tripathy, S., Saha, S.: Building an effective intrusion detection system using unsupervised feature selection in multi-objective optimization framework. (2019) CoRR. http://arxiv.org/abs/1905.06562
Purwins, H., Li, B., Virtanen, T., Schlüter, J., Chang, S.-Y., Sainath, T.: Deep learning for audio signal processing. IEEE J. Sel. Top. Signal Process. 13(2), 206–219 (2019). https://doi.org/10.1109/JSTSP.2019.2908700
Gal, Y., Islam, R., Ghahramani, Z.: Deep Bayesian active learning with image data. In: Proceedings of the 34th International Conference on Machine Learning, vol. 70, pp. 1183–1192. PMLR (2017). https://doi.org/10.5555/3305381.3305504
Deng, L., Li, J., Huang, J.-T., Yao, K., Yu, D., Seide, F., Seltzer, M., Zweig, G., He, X., Williams, J., et al.: Recent advances in deep learning for speech research at microsoft. In: 2013 IEEE International Conference on Acoustics, Speech and Signal Processing (ICASSP), pp. 8604–8608. IEEE (2013). https://www.microsoft.com/en-us/research/publication/recent-advances-in-deep-learning-for-speech-research-at-microsoft/
Rhodes, B.C., Mahaffey, J.A., Cannady, J.D.: Multiple self-organizing maps for intrusion detection. In: Proceedings of the 23rd National Information Systems Security Conference, pp. 16–19. MD Press (2000). https://csrc.nist.rip/nissc/2000/proceedings/papers/045.pdf
Fisch, D., Hofmann, A., Sick, B.: On the versatility of radial basis function neural networks: a case study in the field of intrusion detection. Inf. Sci. 180(12), 2421–2439 (2010). https://doi.org/10.1016/j.ins.2010.02.023
Ring, M., Wunderlich, S., Scheuring, D., Landes, D., Hotho, A.: A survey of network-based intrusion detection data sets. Comput. Secur. 86, 147–167 (2019). https://doi.org/10.1016/j.cose.2019.06.005
Tsai, C.-F., Hsu, Y.-F., Lin, C.-Y., Lin, W.-Y.: Intrusion detection by machine learning: a review. Expert Syst. Appl. 36(10), 11994–12000 (2009). https://doi.org/10.1016/j.eswa.2009.05.029
Emura, T., Matsui, S., Chen, H.-Y.: compound.Cox: univariate feature selection and compound covariate for predicting survival. Comput. Methods Programs Biomed. 168, 21–37 (2019). https://doi.org/10.1016/j.cmpb.2018.10.020
Chormunge, S., Jena, S.: Correlation based feature selection with clustering for high dimensional data. J. Electr. Syst. Inf. Technol. 5(3), 542–549 (2018). https://doi.org/10.1016/j.jesit.2017.06.004
Radovic, M., Ghalwash, M., Filipovic, N., Obradovic, Z.: Minimum redundancy maximum relevance feature selection approach for temporal gene expression data. BMC Bioinform. 18(1), 1–14 (2017). https://doi.org/10.1186/s12859-016-1423-9
Song, J., Takakura, H., Okabe, Y.: Description of Kyoto University benchmark data (2006). http://www.takakura.com/Kyoto_data/BenchmarkData-Description-v5.pdf. Accessed 15 Mar 2016
Rai, A.: Explainable AI: from black box to glass box. J. Acad. Mark. Sci. 48(1), 137–141 (2020). https://doi.org/10.1007/s11747-019-00710-5
Zaman, M., Lung, C.-H.: Evaluation of machine learning techniques for network intrusion detection. In: NOMS 2018–2018 IEEE/IFIP Network Operations and Management Symposium, pp. 1–5 (2018). https://doi.org/10.1109/NOMS.2018.8406212
Agarap, A.F.M.: A neural network architecture combining gated recurrent unit (GRU) and support vector machine (SVM) for intrusion detection in network traffic data. In: Proceedings of the 2018 10th International Conference on Machine Learning and Computing. ICMLC 2018, pp. 26–30. Association for Computing Machinery, New York (2018). https://doi.org/10.1145/3195106.3195117
Vinayakumar, R., Alazab, M., Soman, K.P., Poornachandran, P., Al-Nemrat, A., Venkatraman, S.: Deep learning approach for intelligent intrusion detection system. IEEE Access 7, 41525–41550 (2019). https://doi.org/10.1109/ACCESS.2019.2895334
Javaid, A., Niyaz, Q., Sun, W., Alam, M.: A deep learning approach for network intrusion detection system. In: Proceedings of the 9th EAI International Conference on Bio-Inspired Information and Communications Technologies (Formerly BIONETICS). BICT’15, pp. 21–26. ICST (Institute for Computer Sciences, Social-Informatics and Telecommunications Engineering), Brussels (2016). https://doi.org/10.4108/eai.3-12-2015.2262516
Almseidin, M., Alzubi, M., Kovacs, S., Alkasassbeh, M.: Evaluation of machine learning algorithms for intrusion detection system. In: 2017 IEEE 15th International Symposium on Intelligent Systems and Informatics (SISY), pp. 000277–000282 (2017). https://doi.org/10.1109/SISY.2017.8080566
Costa, K.A.P., Pereira, L.A.M., Nakamura, R.Y.M., Pereira, C.R., Papa, J.P., Xavier Falcão, A.: A nature-inspired approach to speed up optimum-path forest clustering and its application to intrusion detection in computer networks. Inf. Sci. Innov. Appl. Artif. Neural Netw. Eng. 294, 95–108 (2015). https://doi.org/10.1016/j.ins.2014.09.025
Song, J., Takakura, H., Okabe, Y.: Cooperation of intelligent honeypots to detect unknown malicious codes. In: 2008 WOMBAT Workshop on Information Security Threats Data Collection and Sharing, pp. 31–39 (2008). https://doi.org/10.1109/WISTDCS.2008.10
García, S., Luengo, J., Herrera, F.: Data Preparation Basic Models, pp. 39–57. Springer, Cham (2015). https://doi.org/10.1007/978-3-319-10247-4_3
Al-Imran, M., Rahaman, K.J., Rasel, M., Ripon, S.H.: An analytical evaluation of a deep learning model to detect network intrusion. In: Chomphuwiset, P., Kim, J., Pawara, P. (eds.) Multi-disciplinary Trends in Artificial Intelligence, pp. 129–140. Springer, Cham (2021). https://doi.org/10.1007/978-3-030-80253-0_12
Liu, Y., Mu, Y., Chen, K., Li, Y., Guo, J.: Daily activity feature selection in smart homes based on Pearson correlation coefficient. Neural Process. Lett. 51(2), 1771–1787 (2020). https://doi.org/10.1007/s11063-019-10185-8
Hinton, G.E., Srivastava, N., Krizhevsky, A., Sutskever, I., Salakhutdinov, R.: Improving neural networks by preventing co-adaptation of feature detectors (2012). CoRR. arXiv:1207.0580
Phaisangittisagul, E.: An analysis of the regularization between L2 and dropout in single hidden layer neural network. In: 2016 7th International Conference on Intelligent Systems, Modelling and Simulation (ISMS), pp. 174–179 (2016). https://doi.org/10.1109/ISMS.2016.14
van Laarhoven, T.: L2 regularization versus batch and weight normalization (2017). CoRR. arXiv:1706.05350
Dawani, J.: Hands-On Mathematics for Deep Learning. Packt Publishing Ltd., Birmingham. https://www.packtpub.com/product/hands-on-mathematics-for-deep-learning/9781838647292. Accessed 1 Feb 2021
Gumaei, A., Hassan, M.M., Alelaiwi, A., Alsalman, H.: A hybrid deep learning model for human activity recognition using multimodal body sensing data. IEEE Access 7, 99152–99160 (2019). https://doi.org/10.1109/ACCESS.2019.2927134
Hochreiter, S., Schmidhuber, J.: Long short-term memory. Neural Comput. 9(8), 1735–1780 (1997). https://doi.org/10.1162/neco.1997.9.8.1735
Dey, R., Salem, F.M.: Gate-variants of Gated Recurrent Unit (GRU) neural networks. In: 2017 IEEE 60th International Midwest Symposium on Circuits and Systems (MWSCAS), pp. 1597–1600 (2017). https://doi.org/10.1109/MWSCAS.2017.8053243
Courbariaux, M., Bengio, Y., David, J.-P.: BinaryConnect: training deep neural networks with binary weights during propagations. In: Proceedings of the 28th International Conference on Neural Information Processing Systems, vol. 2. NIPS’15, pp. 3123–3131. MIT Press, Cambridge (2015). https://doi.org/10.5555/2969442.2969588
Raschka, S.: Python Machine Learning. Packt Publishing Ltd., Birmingham. https://www.packtpub.com/product/python-machine-learning-third-edition/9781789955750. Accessed 1 Feb 2021
Nguyen Duc, H., Kamwa, I., Dessaint, L.-A., Cao-Duc, H.: A novel approach for early detection of impending voltage collapse events based on the support vector machine. Int. Trans. Electr. Energy Syst. 27(9), 2375 (2017). https://doi.org/10.1002/etep.2375
Louppe, G.: Understanding random forests: from theory to practice. PhD thesis (2014). https://doi.org/10.13140/2.1.1570.5928
Myles, A.J., Feudale, R.N., Liu, Y., Woody, N.A., Brown, S.D.: An introduction to decision tree modeling. J. Chemom. 18(6), 275–285 (2004). https://doi.org/10.1002/cem.873
Pedregosa, F., Varoquaux, G., Gramfort, A., Michel, V., Thirion, B., Grisel, O., Blondel, M., Prettenhofer, P., Weiss, R., Dubourg, V., Vanderplas, J., Passos, A., Cournapeau, D., Brucher, M., Perrot, M., Duchesnay, É.: Scikit-learn: machine learning in Python. J. Mach. Learn. Res. 12(85), 2825–2830 (2011). http://jmlr.org/papers/v12/pedregosa11a.html
Buitinck, L., Louppe, G., Blondel, M., Pedregosa, F., Mueller, A., Grisel, O., Niculae, V., Prettenhofer, P., Gramfort, A., Grobler, J., Layton, R., Vanderplas, J., Joly, A., Holt, B., Varoquaux, G.: API design for machine learning software: experiences from the scikit-learn project. In: European Conference on Machine Learning and Principles and Practices of Knowledge Discovery in Databases, Prague, Czech Republic (2013). https://hal.inria.fr/hal-00856511
Rezvi, M.A., Moontaha, S., Trisha, K.A., Cynthia, S.T., Ripon, S.: Data mining approach to analyzing intrusion detection of wireless sensor network. Indones. J. Electr. Eng. Comput. Sci. 21(1), 516–523 (2021). https://doi.org/10.1016/j.ins.2007.11.028
Sébastien, L.: Machine learning: An applied mathematics introduction. Quant. Fin. 20(3), 359–360 (2020). https://doi.org/10.1080/14697688.2020.1725610
Thabtah, F., Hammoud, S., Kamalov, F., Gonsalves, A.: Data imbalance in classification: experimental evaluation. Inf. Sci. 513, 429–441 (2020). https://doi.org/10.1016/j.ins.2019.11.004
Wang, Z., Wu, C., Zheng, K., Niu, X., Wang, X.: SMOTETomek-based resampling for personality recognition. IEEE Access 7, 129678–129689 (2019). https://doi.org/10.1109/ACCESS.2019.2940061
Kingma, D.P., Ba, J.: Adam: A method for stochastic optimization. In: Bengio, Y., LeCun, Y. (eds.) 3rd International Conference on Learning Representations, ICLR 2015, San Diego, CA, USA, May 7–9, 2015, Conference Track Proceedings (2015). arXiv:1412.6980
Chicco, D., Jurman, G.: The advantages of the Matthews correlation coefficient (MCC) over F1 score and accuracy in binary classification evaluation. BMC Genom. 21 (2020). https://doi.org/10.1186/s12864-019-6413-7
Ribeiro, M.T., Singh, S., Guestrin, C.: “Why should I trust you?”: explaining the predictions of any classifier. In: Proceedings of the 22nd ACM SIGKDD International Conference on Knowledge Discovery and Data Mining. KDD ’16, pp. 1135–1144. Association for Computing Machinery, New York (2016). https://doi.org/10.1145/2939672.2939778
Visani, G., Bagli, E., Chesani, F., Poluzzi, A., Capuzzo, D.: Statistical stability indices for lime: obtaining reliable explanations for machine learning models. J. Oper. Res. Soc. 1–11 (2021). https://doi.org/10.1080/01605682.2020.1865846
Author information
Authors and Affiliations
Corresponding author
Ethics declarations
Conflict of interest
The authors report no conflict of interest. The authors alone are responsible for the content and writing of this article.
Additional information
Publisher's Note
Springer Nature remains neutral with regard to jurisdictional claims in published maps and institutional affiliations.
Rights and permissions
Open Access This article is licensed under a Creative Commons Attribution 4.0 International License, which permits use, sharing, adaptation, distribution and reproduction in any medium or format, as long as you give appropriate credit to the original author(s) and the source, provide a link to the Creative Commons licence, and indicate if changes were made. The images or other third party material in this article are included in the article's Creative Commons licence, unless indicated otherwise in a credit line to the material. If material is not included in the article's Creative Commons licence and your intended use is not permitted by statutory regulation or exceeds the permitted use, you will need to obtain permission directly from the copyright holder. To view a copy of this licence, visit http://creativecommons.org/licenses/by/4.0/.
About this article
Cite this article
Al-Imran, M., Ripon, S.H. Network Intrusion Detection: An Analytical Assessment Using Deep Learning and State-of-the-Art Machine Learning Models. Int J Comput Intell Syst 14, 200 (2021). https://doi.org/10.1007/s44196-021-00047-4
Received:
Accepted:
Published:
DOI: https://doi.org/10.1007/s44196-021-00047-4


