
Abstract
Arabica coffee is one of the most important products in the world market. As a perennial crop, conventional breeding of Arabica coffee is challenged by its long reproductive cycle and narrow genetic base. In vitro tissue culture in combination with mutation induction techniques provides an attractive alternative approach for the genetic improvement of coffee. In this chapter we describe a simple and robust method to rapidly establish in vitro Arabica coffee plantlets from cut seed explants. The method streamlines the germination process under in vitro environmentally controlled conditions and overcomes microbial contamination, often associated with coffee seed lots harvested from the field or greenhouse. Using this protocol, disease-free in vitro coffee plantlets can be generated within 5–6 weeks, useful for downstream tissue culture manipulations such as the production of friable embryogenic callus and cell suspension cultures or induced chemical or physical mutagenesis.
You have full access to this open access chapter, Download chapter PDF
Keywords
1 Introduction
World coffee production relies mostly on two species: Coffea arabica and Coffea canephora, of which Arabica is the most widely cultivated, primarily because of its superior quality. Somatic embryogenesis in coffee has been used for mass propagation, genetic engineering and, more recently, also for induced mutagenesis studies (Los Santos-Briones and Hernández-Sotomayor 2006; Menéndez-Yufá et al. 2010; Bolívar-González et al. 2018). Since the 1990s, somatic embryogenesis (SE) techniques have enabled clonal propagation of both Coffea arabica and Coffea canephora (Etienne et al. 2018). In coffee, indirect SE through an intermediate callus phase using semi-solid and liquid media is well established while direct somatic embryogenesis methods have also been described but to a lesser extent (Quiroz-Figueroa et al. 2006; Murvanidze et al. 2021). In combination with techniques for induced mutagenesis, in vitro cell and tissue culture methods can provide an alternative strategy for enhancing genetic diversity and improvement of Arabica coffee.
Coffee seeds have limited viability. When stored at ambient temperature viability decreases rapidly; after two months for Coffea canephora and after six months in case of Coffea arabica (Wintgens 2012). In addition, the germination of coffee seeds is a slow process, taking 30–60 days under the most favourable conditions. In practice, favourable conditions may not always be available, hence the need for standardized conditions for coffee seed germination. This is particularly relevant for induced mutagenesis studies and related radiosensitivity testing where lethal doses or growth reduction values need to be determined. Coffee cell and tissue culture applications require that starting explants, frequently leaves, are free from microbial contamination. Depending on the environment and conditions of storage, however, coffee seed can become contaminated with fungi or other microbes. Due to the shape and morphology of the coffee seed, such microbial contamination can be challenging to remove through classical sterilization procedures.
Here we present a simple and robust in vitro protocol that streamlines the germination of coffee seed using cut seed explants. This method is effective for overcoming potential fungal/microbial contamination often associated with coffee seed batches. Germination proceeds under stable environmental conditions. Under in vitro conditions the coffee cut seed explants germinated, i.e., the radicle breaking through the endosperm, within 14 days. Overall, the procedure generated in vitro plantlets within 5–6 weeks, useful for downstream in vitro experiments such as somatic embryogenesis or induced mutagenesis studies.
2 Materials
2.1 Plant Material
-
1.
Seed from three Arabica coffee varieties; Venecia, Caturra, and Catuai.
2.2 Chemicals
-
1.
Murashige and Skoog Basal Salts with minimal organics (Sigma Alrich, M6899).
-
2.
Sucrose (household grade).
-
3.
1 mM Stock solution S1-Naphthaleneacetic acid (NAA).
-
4.
1 mM Stock solution 6-Benzylaminopurine (BAP).
-
5.
L-Cysteine.
-
6.
Gelling agent (Agar or Gelrite).
-
7.
Distilled Water.
-
8.
NaOCl 14% (Stock concentration).
-
9.
Tween 20.
2.3 Tools and Labware
-
1.
Forceps.
-
2.
Surgical blades.
-
3.
Sieves.
-
4.
Beakers for solvent.
-
5.
Beaker for waste.
-
6.
Magnet stir bar.
-
7.
Aluminium foil.
-
8.
Sterile paper.
-
9.
Sterile petri dish.
-
10.
In vitro 50 ml culture test tubes and vessels.
2.4 Lab Equipment
-
1.
Autoclave.
-
2.
Stirring/hot plate.
-
3.
Flow bench.
-
4.
Analytical balance.
-
5.
Balance.
-
6.
pH meter.
-
7.
In vitro growth room.
3 Methods
3.1 Media Preparation
-
1.
Prepare growth regulator and chemical stock solutions according to common procedures.
-
2.
Prepare the M5 medium as described in Table 1.
Table 1 Composition of M5 medium (modified from Quiroz-Figueroa et al. 2006) -
3.
Take the desired amount of solutions and chemicals and mix well before autoclaving.
-
4.
Adjust the pH to 5.7 as described.
-
5.
Dispense the M5 medium in sterile culture test tubes after autoclaving.
-
6.
Always prepare fresh media shortly before use.
3.2 Seed Preparation
-
1.
Seeds shall not be older than 2 months and shall be processed as soon as possible after ripening.
-
2.
Discard seeds with visible microbial contamination e.g. growth of fungi, or with visible damage (Fig. 1a).
Fig. 1 
Coffea arabica seed preparation for the isolation of cut seed explants
-
3.
Remove the outer parchment (seed coat) (Fig. 1b) and integument (silver skin) by hand (Fig. 1c, d).
-
4.
Collect cleaned seeds (Fig. 1e, f).

3.3 Explant Isolation
-
1.
Place the seed on a clean surface suitable for cutting.
-
2.
The embryo (3–4 mm) is located near the endosperm cap (Fig. 2a, and Note 1).
Fig. 2 
Cut seed explant isolation from coffee seed; arrows indicate cuts; crosses indicate seed parts to be discarded
-
3.
Hypocotyl and/or cotyledons are visible through the endosperm.
-
4.
Carefully make 3 cuts with a surgical blade around the zygotic embryo (Fig. 2b), avoid damaging the embryo (see Note 2).
-
5.
Isolate the cut explant measuring approximately 12 × 5 mm (Fig. 2c).
-
6.
Remove the integument (silver skin) at the back of the explant, discard the remainder (endosperm) of the seed (Fig. 2d, e).
-
7.
Collect the explant containing the zygotic embryo for surface sterilization (Fig. 2f).

3.4 Surface Sterilization of the Cut Seed
-
1.
Place a 1 L beaker, a stirring/hot plate, 4 L autoclaved water and a waste beaker in the laminar air flow.
-
2.
Calculate the concentration of NaOCl to reach a final concentration of 2.1% active chlorine.
-
3.
Prepare 1 L of a 2.1% active-chlorine solution and add 0.2 mL Tween 20.
-
4.
Place 10–15 explants in the sieve (Fig. 3).
Fig. 3 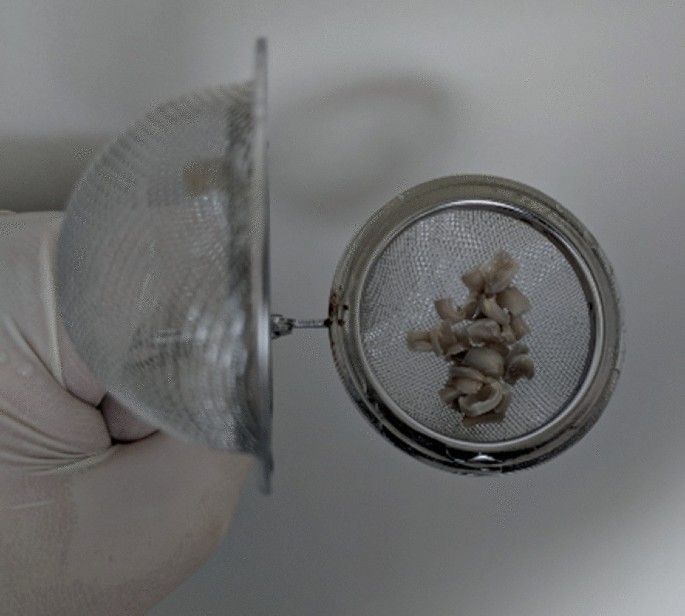
Cut seed explants in the sieve
-
5.
Rinse the explants in the sieve under running tap-water for 5 min.
-
6.
Place a magnetic stir bar and a maximun of two sieves containing the explants in a 1 L beaker.
-
7.
Pour 1 L of 2.1% active chlorine solution into the 1 L beaker.
-
8.
Remove any air bubbles in the sieves by gently lifting and putting down the beaker.
-
9.
Cover the beaker with aluminium foil.
-
10.
Gently swirl the beaker to wet the inner walls.
-
11.
Spray the outer walls and top of the beaker with 70% EtOH.
-
12.
Place the beaker on a stirring/hot plate in a laminar air flow.
-
13.
Turn on the stirring/hot plate at approximately 200 rpm for 15 min.
-
14.
Turn off the stirring/hot plate and partly open the cover.
-
15.
Gently pour the solution into the waste beaker.
-
16.
Refill the beaker with 1 L autoclaved water.
-
17.
Gently stir and remove the water immediately.
-
18.
Refill the beaker with autoclaved water.
-
19.
Close the cover and place the beaker on the stirring/hot plate.
-
20.
Turn on the stirring/hot plate at 200 rpm for 20 min.
-
21.
Repeat the rinsing steps 18–20 twice.
-
22.
Remove the water and leave the beaker inside the laminar air flow.
-
23.
Take out the stirring/hot plate, waste beaker and water flasks.
-
24.
Clean the laminar air flow surface with 70% EtOH.
-
25.
Prepare the laminar for in vitro work (see below).

3.5 Transfer of Explants and Culture Conditions
-
1.
Gently transfer the explants from the sieve onto a sterile working paper or petri dish in a laminar air flow (Fig. 4a).
Fig. 4 
Transfer of the cut seed explant to culture tubes
-
2.
Locate the embryo in the explant (Fig. 4b).
-
3.
Insert the explant in the medium with the embryo facing upward, approximately halfway, one explant per culture tube (Fig. 4c).
-
4.
Place the tubes on a suitable tray and move to the growth chamber (Fig. 4d).
-
5.
Set the light conditions in the growth chamber to 16/8 light/dark photoperiod under fluorescent light, provided by SYLVANIA GRO-LUX 36 W (60 µM m−2 s−1) at 26 ± 2 °C.

3.6 Germination and Plantlet Development
-
1.
Monitor cultures daily for contamination, discard infected tubes (Fig. 5a).
Fig. 5 
Germination and plantlet development
-
2.
After 1–2 weeks the radicle emerges (Fig. 5b).
-
3.
After 2–3 weeks roots are developing, and the explant is lifted above the medium (Fig. 5c).
-
4.
After 3–4 weeks the cotyledons break through the remaining endosperm (Fig. 5d).
-
5.
After 5–6 weeks, when foliage leaves are formed, the germination process is complete.
-
6.
Cut explant at hypocotyl, remove remaining endosperm and transfer plantlet to multiplication media (Fig. 5d, e).
-
7.
Transfer plantlets into the growth chamber with 16/8 light/dark photoperiod under fluorescent light, provided by SYLVANIA GRO-LUX 36 W (60 µM m−2 s−1) at 26 ± 2 °C (Fig. 5e).

4 Notes
-
1.
The orientation of the embryo may differ, polyembryony might also occur.
-
2.
In case of polyembryony extend the size of the cut area.
References
Bolívar-González A, Valdez-Melara M, Gatíca-Arias A (2018) Responses of Arabica coffee (Coffea arabica L. var. Catuaí) cell suspensions to chemically induced mutagenesis and salinity stress under in vitro culture conditions. In Vitro Cell Dev Biol Plant 54(6). https://doi.org/10.1007/s11627-018-9918-x
Etienne H, Breton D, Breitler J-C, Bertrand B, Déchamp E, Awada R, Marraccini P, Léran S, Alpizar E, Campa C, Courtel P, Georget F, Ducos J-P (2018) Coffee somatic embryogenesis: how did research, experience gained and innovations promote the commercial propagation of elite clones from the two cultivated species? Front Plant Sci 9:1630
Los Santos-Briones D, Hernández-Sotomayor SM (2006) Coffee biotechnology. Braz J Plant Physiol 18(1):217–227
Menéndez-Yufá A, Barry-Etienne D, Bertrand B, Georget F, Etienne H (2010) A comparative analysis of the development and quality of nursery plants derived from somatic embryogenesis and from seedlings for large-scale propagation of coffee (Coffea arabica L.). Plant Cell Tiss Organ Cult 102(3):297–307
Murvanidze N, Nisler J, Leroux O, Werbrouck SPO (2021) Cytokinin oxidase/dehydrogenase inhibitors stimulate 2iP to induce direct somatic embryogenesis in Coffea arabica. Plant Growth Regul 94:195–200. https://doi.org/10.1007/s10725-021-00708-6
Quiroz-Figueroa F, Monforte-González M, Galaz-Ávalos RM, Loyola-Vargas VM (2006) Direct somatic embryogenesis in Coffea canephora. In: Loyola-Vargas VM, Vázquez-Flota F (eds) Plant Cell Culture Protocols. Methods in Molecular Biology™, vol 318. Humana Press. https://doi.org/10.1385/1-59259-959-1:111
Wintgens JN (2012) Coffee: growing, processing, sustainable production. A guidebook for growers, processors, traders, and researchers. Ed. Wiley-VCH Verlag GmbH & Co.
Acknowledgements
The authors would like to thank Plant Breeding and Genetics Laboratory colleagues and participants of the Coordinated Research Project (CRP) D22005 ‘Efficient Screening Techniques to Identify Mutants with Disease Resistance for Coffee and Banana’ for stimulating discussions. We would like to thank Dr Noel Arrieta Espinoza, Instituto del Café de Costa Rica (ICafe), Costa Rica for providing seed of Arabica coffee used in these experiments. This work was supported by the FAO and IAEA through the CRP D22005.
Author information
Authors and Affiliations
Corresponding authors
Editor information
Editors and Affiliations
Rights and permissions
Open Access This chapter is licensed under the terms of the Creative Commons Attribution 4.0 International License (http://creativecommons.org/licenses/by/4.0/), which permits use, sharing, adaptation, distribution and reproduction in any medium or format, as long as you give appropriate credit to the original author(s) and the source, provide a link to the Creative Commons license and indicate if changes were made.
The images or other third party material in this chapter are included in the chapter's Creative Commons license, unless indicated otherwise in a credit line to the material. If material is not included in the chapter's Creative Commons license and your intended use is not permitted by statutory regulation or exceeds the permitted use, you will need to obtain permission directly from the copyright holder.
Copyright information
© 2023 The Author(s)
About this chapter

Cite this chapter
Goessnitzer, F., Jankowicz-Cieslak, J., Ingelbrecht, I.L.W. (2023). In Vitro Plantlet Establishment of Coffea arabica from Cut Seed Explants. In: Ingelbrecht, I.L., Silva, M.d.C.L.d., Jankowicz-Cieslak, J. (eds) Mutation Breeding in Coffee with Special Reference to Leaf Rust. Springer, Berlin, Heidelberg. https://doi.org/10.1007/978-3-662-67273-0_3
Download citation
DOI: https://doi.org/10.1007/978-3-662-67273-0_3
Published:
Publisher Name: Springer, Berlin, Heidelberg
Print ISBN: 978-3-662-67272-3
Online ISBN: 978-3-662-67273-0
eBook Packages: Biomedical and Life SciencesBiomedical and Life Sciences (R0)