
Abstract
With the improvement of social material conditions, children’s education has drawn increasing attention. Children’s toys enter the field of vision as an important medium for children’s education, while the advent of a variety of scientific and technological achievements gave birth to the intelligent trend of children’s toys. At the same time, traditional children’s music education has many inconveniences, application of scientific and technological achievements is also needed in this education process. It provides a perfect opportunity for children’s musical education to be the perfect application scenarios for children’s smart toys.
With related market research and targeted user research, a new design idea of interactive smart music toy for children is put forward. The musical instrument type music toy is selected for product design, and designed from three parts: design research, product scheme design and program test. Using the hand wearable product solution, an interactive way was designed that conforms to the natural behavior and psychological cognition of the children, to let children feel the charm of music and enhance children’s visual perception and coordination of hand movements ability.
This article uses the methods of desktop research, user interviews and tangible user interfaces design principles to sort out the design characteristics of children’s music toys in the market, and draw our design opportunities after analyzing its advantages and disadvantages. Then the target user’s needs and product design were taken. Under the theoretical guidance of the tangible user interface, the product’s design ideas are improved and the system design of the product is carried out. Finally, the feasibility of the design scheme is verified through user test. The analysis and experimental results show that the design of the interactive children’s smart music toy scheme is reasonable and feasible, which can stimulate children’s interest in use and enhance the user experience to a certain degree when they carry out music education.
You have full access to this open access chapter, Download conference paper PDF
1 Introduction
Childhood is the window of hope in one’s life, the best time to build a positive character and develop intelligence [1]. Children’s toys have played an important role in the growth of children during their childhood. Toys attract the curiosity and attention of children, bring them joy, and also subtly help enhance their intelligence, physical and social skills. With the rapid development of technology, the functions and forms of children’s toys are undergoing tremendous changes, more intelligent toys appear than past times. It can promote two-way interaction between children and toys to accomplish certain tasks better [2, 3]. Moreover, Applications such as speech recognition, human-computer interaction and other technology in smart toys will significantly improve products’ market imagination.
With the public demand for spiritual culture gradually growing. More and more people realize that early music education is of great importance to the future development of children. People generally believe that early musical enlightenment education for children can cultivate their musical interests, artistic accomplishments, and even intelligence levels. However, there are many drawbacks in music education nowadays, such as time-laden courses, tedious repetitive exercises, incomprehensible music scores, which can easily destroy children’s natural intimacy toward music. Only when children live in beauty, games, conversation, music, fantasy, creative world, can they have enough spiritual life. Without these, he is a withered flower [4, 5].When we are educating our children with music, we should also pay attention to the spirit of entertaining.
This article studies a better interactive smart music toy program for children compared with the traditional instruments program. It based on tangible user interface, through fun interactive design to help children enjoy music and learning happily. Let children be able to perform their musical activities in a free, independent, happy way and full of aesthetic imagination and creativity.
2 Method
2.1 Target Population Analysis and User Interviews
User Interview.
The subject of the proposed target population for children aged 4 to 8 years. During the user research phase, the single-person interview method was used to gain insight into the target population.
Identify the Target Respondent.
The target population was children aged 4 to 8 years old. Since their thinking and presentation skills were not yet mature, we defined the interviewees as their parents.
Confirm the Interview Form.
There are two types of interviews, structured interview and unstructured interview [6]. Considering each child’s specific situation, this interview will use unstructured forms of interviews.
Respondents Basic Information.
The interview invited 4 parents, and all of them have musical instruments at home. The basic information can be seen in Table 1.
Interview Design.
We invited four parents and arranged four one-on-one in-depth interviews, each lasting 45 min, using notes and recordings. The contents and purpose of the interview outline are shown in Table 2.
Interview Results.
Through interviews, we learned a few key points:
-
1.
Limited musical interaction between parents and children.
-
2.
Basically idled musical instruments.
-
3.
High difficulty of playing instrument type music toys.
-
4.
Children soon lose their interest in difficult musical instrument toys.
-
5.
Parents without musical background cannot guide children to play musical toys.
-
6.
Some musical toys are too large.
-
7.
The purpose of parents to buy musical toys is music enlightenment.
-
8.
The factors Parents concerned: safety, informative, playability (how long children will play) and the price factor.
-
9.
Parents most likely to accept the price lower than instruments for musical toys.
User Needs Summary.
By studying the relevant children’s cognitive and physiological development characteristics, combined with the content of this interview, we summarize the design needs of children’s musical toys essentials:
-
1.
Cultivate musical literacy for children.
-
2.
To enhance the fine hand movement, capacity especially for 4–8 ages children.
-
3.
Safe for children. Use soft fabrics or nontoxic materials, such as rubber toys.
-
4.
Good music interaction between parents and children.
-
5.
Easy to learn, even for those without the knowledge of music.
-
6.
A playable toy, have more novelty to play, to attract the curiosity of children.
-
7.
The size of the toy has to be considered, since the request of more living space.
2.2 Tangible User Interface Theory of Product Design
Applications in the Program Design.
According to the tangible user interface, we will start from the four levels of their corresponding children’s music toys design; they are the physical layer, the behavior layer, the indication layer, and the information layer (see Fig. 1).

The relationship between the four layers under the tangible interaction theory
The physical layer refers to the interactive physical interface designed for children; Behavioral layer refers to the interaction between children and products; Instructional layer refers to the need for information guidance and feedback in children’s interactions with toys; Information layer refers to the data hidden behind the product information.
Behavior Layer Design.
We start with the interaction of people when using instruments and then map their abstraction to the tangible user interface system. Figure 2 shows the hand movements when playing a variety of instruments. We can find that almost all the interaction involves the tap action. In addition, when using the instrument, each finger of a person has a fixed position where it is placed, which shows that while playing the instrument, each human finger has a different but distinct division of labor.

Hand movements when playing musical instruments
In this subject, we mainly extract that the “tap” is equal to this behavior pattern, mapping to play a musical instrument, and the meaning of each finger should be different, corresponding to a specific pitch, see Fig. 3.

Tangible user interface behavior mapping and meaning analysis
This means that a child’s ten fingers correspond to ten specific tones. Research found that most of the children’s songs do not exceed ten scales. As shown in the musical notation of “The Two Tigers” in Fig. 4, the whole song only requires eight scales of G3 to G4 when playing on the piano. Table 3 shows the pitch of each note in this design.

“The two tigers” notation
As for the feasibility analysis of the behavioral layer, we will come to a conclusion by testing the usability of the product after the prototype is completed.
Physical Layer Design.
Design of the physical layer needs to consider user survey obtained, including toys to play with greater freedom and occupies less space. Toy manufacturers are trapped in the original shape of the instrument, imitating real instruments for product design. However, if wearable thinking is adopted, the shape of the product can be detached from the traditional form of the instrument.
Indicator Layer Design.
Through research, we learn that due to the laciness of children’s experiments or parents’ weak music theory knowledge, more explicit information is needed.
Beautiful music must include rhythm and melody. We disassemble a song. Each note corresponds to a light signal. The rhythmic changes and the length of the note are translated into flashing and the continuous lighting of small lights. Each finger corresponds to a small light; tap of each finger controls a note. When the corresponding light is on, children tap their fingers; the toy senses the signal and emits the corresponding pitch of the finger.
We numbered the small light from the little finger to the thumb of the left hand to Led1–Led5, and the thumbs to the little finger of the right hand numbered Led6–Led10 respectively. Figure 5 shows the changes of the small light signals corresponding to the second and third beats of the children’s song “two tigers”.

LED signals corresponding to “two tigers”
In order to ensure sufficient freedom, the user can also choose to turn off the small light indicator mode, enter the free play mode.
Information Layer Design.
The information layer includes: information data of the related melody stored in the system; sound signals generated; and an intelligent system. There are two main requirements for the information layer: (1) More song storage than hard disk does. (2) Parents’ needs to record children’s performance.
The entire music toy contains a hardware system, the physical layer. A fixed number of songs are loaded on the hardware system. The hardware system has its own playback module that can still sound without connecting the phone. And a software system, parents can use the online music library to download music on their phones and update to the hardware system through Bluetooth. The system also has a special song-recording page. When the phone and the hardware are connected, the song-recording page can be opened, sound can be received and played on phone. Some animation effects will also accompany the phone’s recording page.
Product System Design Framework and Functional Requirements.
The design points corresponding to the four levels described above can be integrated into a complete system design, as shown in Fig. 6.

System design framework of product
The system is mainly divided into two parts of hardware system and software system, including hardware functions are:
-
1.
Express melody by light signals, guide children use the corresponding fingers.
-
2.
Each finger corresponds to a note, different notes correspond to different colors.
-
3.
The sensor detects the action of pressing the finger of the child and the sounding module outputs the corresponding note.
-
4.
Light indication mode or free play mode can be chosen on hardware.
The main function of the software system is:
-
1.
Change hardware built-in music library.
-
2.
Download music from the Internet to the phone.
-
3.
After connection, music can be played and recorded through the phone.
-
4.
Stores the recorded song.
The whole system is designed to allow children to integrate into the game through simple, natural interactions. At the same time, the entire toy design adopts the wearable form to break the inherent shape of the musical instrument music toy and enhance the portability and openness of the toy.
3 The Experimental Description
3.1 Hardware System Concept Design
The design of the hardware part of the product adopts the wearable solution of the hand, which has the characteristics of large degree of freedom under the scene, small size of the product and easy to use. Children wear a glove shape toy, which can physically emit notes of ten different pitches by fingers tapping to create a complete piece of children’s music, and the toy can also indicate the child to use the corresponding finger through a light signal of ten LEDs (Fig. 7).

Hardware concept design (front view) (Color figure online)
Figure 7 is the main view of the concept of toy design, corresponding to the back part of the hand. From the figure we can see the back of the glove, the back of the hand installed ten LED small lights, and the color of LED lights using audio-visual synesthesia design principle, each corresponding to the LED lights emitted by different colors, respectively corresponding to ten colors from deep blue to deep red.
Figure 8 is the rear view of the toy, which corresponds to the palm position. The pressure sensor is installed on the corresponding fingertip part of the toy. When the sensor detects the pressure signal, it will be transmitted to the motherboard to receive the signal and then control the sound-emitting module to issue the corresponding note.

Hardware concept design (rear view)
Hardware Prototype System Principle.
Through previous research, we started developing product prototypes with original capabilities based on previous design concepts for the first phase of product testing.
The basic working principle of the hardware system (Fig. 9):
-
1.
Both hand prototypes are connected by Bluetooth and share one sound module.
-
2.
Light up and light up time written in advance according to a specific track, the length of time a light is lit is related to the beat length of a note.
-
3.
Pressure film sensor continuously detects pressure changes between the fingers. When the SCM found that the pressure value is greater than the critical value, it controls the voice playback module to play the corresponding note and make a sound through the speaker.

The hardware system working principle diagram
Motherboard and Sensor Selection
-
(1)
Motherboard
We choose the Blunonano controller (model DFR0296) as the master for this prototyping, which compatible with the Arduino development platform. Motherboard’s small size, only 53 × 19 × 12 mm, comes with integrated Bluetooth 4.0 module, which can achieve the interconnection between the two controllers, and has a strong Bluetooth communication capabilities, ideal for the current prototype development needs.
-
(2)
Pressure sensor
Since we are using a hand-wearable product solution, we consider a flexible pressure sensor. The RFP603 Flexible Film Pressure Sensor is a resistive pressure sensor that measures both static and dynamic pressure at any contact surface and converts the pressure applied to the sensor’s sensing area into a resistive signal. Then according to the calibration curve of the force and resistance to obtain the change of pressure exerted by the external force, the greater the pressure, the smaller the resistance of the sensor output. For the hand press estimation, we selected the range of 100 g to 2 kg.
-
(3)
Broadcast module
The YS-M3D5 voice-playing module can support up to 32 kinds of voice playing. The user can copy the voice to be played back to the TF card in advance and rename the file according to certain naming rules, and then correspondingly play port grounding, which can complete the playback. The module’s maximum supply voltage is 5 V, speaker power up to 3 W, impedance 4 to 8 Ω.
Hardware Prototype Design and Implementation.
The entire hardware prototype is divided into four areas, namely: motherboard area, LED light area, pressure sensing area and sounding area.
Motherboard area: This area is programmed Blunonano controller, it includes four main functions: 1. control the light and dark of the small light in a set time sequence; 2. judge the analog input signals of several pressure sensors and identify them; 3. Transform the analog input signal into a digital output signal and transmit it to the playback module; 4. achieve the motherboard signal interconnection of left and right gloves through the built-in Bluetooth 4.0 module.
Led small light area: Motherboard control small lights light and dark in rhythmic order, as a guide. This area is composed of LED chip light and 220 Ω resistor.
Pressure Sensing Area: This area incorporates the RFP603 flexible membrane pressure sensor, 1 MΩ resistor, and a current-stabilizing diode. Logic Flow: When the pressure sensor receives the pressure signal, the structure will generate a voltage pulse signal of about 4.5 V. The signal is input to the motherboard’s external interrupt judgment port D2. The motherboard judges whether it enters the interrupt function or not, and also ensures that the signal. It is accepted by the different analog input pins of the motherboard for the logic judgment of the motherboard (Fig. 10).

Hardware prototype design circuit
Sound area: Sounding area: the YS-M3D5 voice playback module accepts low-level signals from the motherboard output, play the corresponding notes stored in TF card, through a speaker or headset to be sound.
Figure 11 shows the status of the right half of the hardware integrated into the breadboard, including the Blunonano controller (Appendix 1) which records the sensor control program and the song indication program, the light emitting diode, the pressure Film sensor and playback module. Since the speaker is not soldered to the playback module, the headset is temporarily used as the note output.

Hardware prototypes built on breadboard
We then integrated the pressure sensor with a cotton child glove and replaced the small light with a patch LED light, sewn to the back of the glove (Fig. 12). This is the final build of the prototype hardware prototype; the prototype will be used for user testing.

Hardware prototype (right hand) integrated into children’s gloves
3.2 Software System Design Analysis and Design Implementation
Considering the software and toys versatility, the software part of the system will be developed based on the mobile phone side (mainly IOS and Android). Unlike hardware systems, users of software systems are parents. Its main function is to provide background support to hardware systems so that parents can change tracks in hardware through software systems or record songs played by children.
The entire software system design process can be divided into four steps: software requirements analysis; task flow design; page layout design; page visual design.
Software System Requirements Analysis and Information Architecture.
Before entering the page design, we need to first clear the page needs. Specifically, the main functions of the page need to be designed according to requirements, so as to classify the functions of the software and form the information architecture of the software. Information architecture can make the structure of the software becomes clear, allowing users to find the information they want in a certain information planning more easily.
According to the user needs for software systems in previous study, we finished the product information architecture. The main structure of the entire APP can be divided into three parts: online music library, music library management, and personal center.
The main function of the online music library is to allow users to browse songs on the Internet and download them to their mobile phones. Music library management includes two major functions: track management and software song recording. Track Management: The user can delete, add, etc. to the music list, and then synchronize the list to the hardware device. Software Song Recording: The user can select songs in the list and perform song recording. The personal center features mainly include user personal information management, download music and recording music management and device connection management.
Software System Page Interaction Design
-
1.
Device connection process and page design
It’s the design instructions for the device Bluetooth connectivity page.
There are two entrances to the device connection. One is that when first time use, the software will remind the user to make a Bluetooth connection; the other is to enter the Bluetooth connection page from the device management of the personal center.
Here is the final Bluetooth connection process interactive wireframe (Fig. 13) after the software system and hardware flow chart of Bluetooth connection.

Bluetooth connection interactive wire diagram
-
2.
Discover music page design
According to the Fig. 14, the design of the entire APP uses the bottom-tabbed navigation. In the bottom of the APP integrated “Discover Music”, “Music Management” and “I” three labels. The advantage of this navigation mode is that the entrance is flattened and the navigation control occupies a large area, so can be easily clicked. The page structure is suitable for switching frequently between functions.

Found music page wireframe
The Discover Music page corresponds to the online library section of the information architecture. The main function of this page is to allow the user to find the desired song within the software (Fig. 14).
Under the “Discover Music” tab, users can download songs in three ways. The first is to search by the search box at the top of the page for accurate searches; the second is to view the system’s selection of popular children’s songs through the Top Songs module; and the third is to recommend songs to users based on their preferences.
After the user clicks the song, it will enter the detail page of the song, which shows information such as author, difficulty of playing, notation and so on. The user can click the download button on the bottom to download the song to mobile phone.
-
3.
Music management page design (Fig. 15)
Fig. 15. 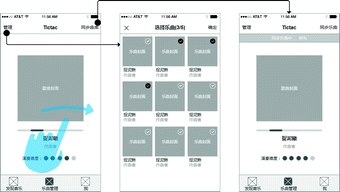
Music management page design

The middle label at the bottom is song management. When switching to this tab, a song list shows the list of songs that will be synchronized to the hardware device, different from the song downloaded by the user. The user can swipe left and right with his finger to switch between the songs in the song list. Users can also enter the new page through the “Manage” button in the upper left corner and delete or add tracks from the song list. After returning to the main interface, click on the synchronization library button in the upper right corner, to complete the software and hardware synchronization of music.
-
4.
Song recording page (Fig. 16)
Fig. 16. 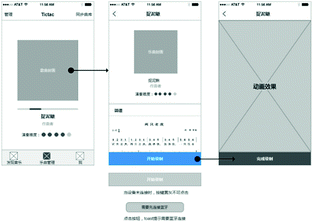
Song recording process and page design

In the music management page, tap the song to enter the song details page. There is a “start recording” button at the bottom of the page. If the software and hardware have been completed Bluetooth connectivity, the button is activated. Click to enter the recording page, once started recording, the page will play animation to match the children’s play, enhance the interaction. If the Bluetooth is not connected, the button is grayed out. When the user clicks, “toast” will prompt to complete the Bluetooth connection before recording.
-
5.
Software system page visual design
After completing the design of the interactive page, we started to visualize the software system. Since our system targeted at young parents now, the whole page is designed in a flat style, making the page look simple and bright in color choice, showing youthful vigor. The overall effect of the page is shown in Fig. 17.

System interface design
3.3 Product Design System Testing
Target Hardware Prototype Test.
In this prototype test, we will invite children aged 4 to 6 years to use the hardware prototypes we developed to find out product design deficiencies in order to improve the hardware design. This test will use observation to collect test information.
The main purpose of the test is to invite children of the target age to use prototypes of the products, observe and collect the problems encountered by the children during the testing process, and find out the optimization direction of the products.
The testing process focuses on two dimensions:
-
1.
Observe the children’s interest in the prototype function during the game.
-
2.
The availability of problems encountered in the process of children’s games.
Subjects’ Basic Situation.
The prototype test invited four children to be tested, and the basic information can be seen in Table 4.
Experimental Design.
Before the start of the experiment, teach the children how to use the music gloves and let them put on gloves to adapt for a moment. After the test starts, tell them the specific game task is: When the small light is on, press the corresponding finger.
The test set three procedures:
Program 1: Control the small light on the prototype glove, starting from the little finger on the left hand to the little finger on the right hand turn on, and each lamp illuminates for one second;
Program 2: Performing according to the notation of “Two Tigers,” but slowing down the overall rhythm and controlling the duration of one note per second;
Program 3: Speed up the “two tigers” music notes playback speed; each note playback time is shortened to 0.5 s;
Each of the above three programs requires the subject to perform three times.
Test Results.
Figure 18 shows the scene of the game after children wear the prototype toy.

Children wear a toy prototype to play the game
By observing the test of the four subjects, the author recorded the test cases. In this test, we obviously found that girls are very concerned about the shape of the product; boys are more concerned about the novelty of playing. Due to the rough prototype and the low degree of freedom in space, children have a greater impediment to carrying out their tasks. However, we still find some product usability problems, such as:
-
1.
The current toy light instruction is punctate, at the root of the finger. This has a certain degree of difficulty for children, it means easy to press the wrong finger. In later product enhancements, increasing the light cue area may be considered and the location requires some closer to the fingertips.
-
2.
In addition, the current use of the membrane pressure sensor range is 100 g–2 kg. Sometimes there will be miscarriage of justice when young children press. We should consider using a more accurate pressure sensor.
-
3.
In order to minimize the interference of children on the gloves, the product finger part of the material should be used more lightly and soft material.
However, the children under test and their parents endorsed the product concept and interaction of this test, so we will continue to improve the product design based on the test results.
Software System Usability Testing.
We used Axure to make the previous interactive interface prototyped as an interactive interface and recruited users for page usability testing. Process of the test: task setting, user recruiting, user test, and problem analysis.
Task Design.
We designed two usability-testing tasks:
-
1.
Instruct the user to complete the software and hardware system device connection through the app.
-
2.
After completing the device connection, instruct the user to manage the song and synchronize the song to the hardware device.
User Recruitment.
The test recruited 4 young parents for usability testing, all of whom have extensive experience in smart product use and are proficient in using smart phones and computers. During the test, we will use the observation method to record the user’s operation, for some improper operation, we will ask them the reason after the test.
Test Result Analysis.
In this test, the user could independently complete the task, and the task duration of the two tasks was between 1 and 3 min, indicating that the product basically achieves the level of availability. However, some ease-of-use problems were still found in the testing process and need to be iteratively improved in later designs. See Table 5 for details.
Software System Page Optimization
-
(1)
Equipment connection process optimization
At the top of the music management page, a description of the connection status of the device is added. The user can connect and disconnect the device on the music management page without having to switch to the personal center (Fig. 19).
Fig. 19. 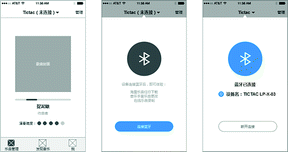
Device connection flow optimization
-
(2)
Merging music management and song synchronization process
After the merging process, the user can click the Synchronize to Hardware to complete the song update after finishing the management of the music list. If the device is not connected, the management button cannot be clicked (Fig. 20).
Fig. 20. 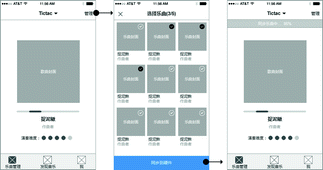
Music management process optimization
-
(3)
The bottom tab bar changes
With the “Find Music” tab position to be replaced, “Music Management” tab has been moved to the first tab position. On the home page of the app, the style is shown in the tab bar at the bottom of the page shown in Fig. 21.
Fig. 21. 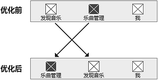
Bottom tab label position change


4 Discussions
This article introduces a smart music educational toy designed for children, conducted scene analysis and system design research, analyzed and summarized the impact mechanism and potential contradiction of children’s music learning. According to the theory of tangible user interface, this paper constructs a smart prototype, implements the hardware prototype of each module, and illustrates the key technologies of the software modules used. Finally, the prototype of mobile terminal is introduced and tested. The results are summarized and analyzed.
The subject has achieved three research goals: combining the research and analysis of products and users, refining the design features and principles of children’s music toys; summarizing the design methods and principles of tangible user interface theory to guide the design of children’s smart toys. The design of toys provides new ideas and methods. Based on the theoretical guidance, the design and development of children’s musical toys are designed to design a musical toy that accords with children’s habits, enhances the interest of children’s games, cultivates musical qualities and promotes children’s cognitive development.
In this paper, the stability of the sensor and the circuit has great room for improvement, which can continually to be studied in depth.
There is no quantitative and qualitative research on the relationship between musical instrument learning experience and musical toy familiarity. This analysis needs to learn the correlation between operating data and the error rate from a large number of children with or without musical instrument learning experience, thus providing guidance for children’s music learning behavior.
References
Pangelinan, M.M., Zhang, G., Vanmeter, J.W., et al.: Beyond age and gender: relationships between cortical and subcortical brain volume and cognitive-motor abilities in school-age children. Neuroimage 54(4), 3093–3100 (2010)
Hornecker, E., Buur, J.: Getting a grip on tangible interaction: a framework on physical space and social interaction. In: Conference on Human Factors in Computing Systems, CHI 2006, Montréal, Québec, Canada, pp. 437–446. DBLP, April 2006
Cagiltay, K., Kara, N., Aydin, C.C.: Smart toy based learning. In: Spector, J., Merrill, M., Elen, J., Bishop, M. (eds.) Handbook of Research on Educational Communications and Technology, pp. 703–711. Springer, New York (2014). https://doi.org/10.1007/978-1-4614-3185-5_56
Piper, B., Ishii, H.: PegBlocks: a learning aid for the elementary classroom. In: CHI 2002 Extended Abstracts on Human Factors in Computing Systems, pp. 686–687. ACM (2002)
Grissmer, D., Grimm, K.J., Aiyer, S.M., et al.: Fine motor skills and early comprehension of the world: two new school readiness indicators. Dev. Psychol. 46(5), 1008–1017 (2010)
Cameron, C.E., Brock, L.L., Murrah, W.M., et al.: Fine motor skills and executive function both contribute to kindergarten achievement. Child Dev. 83(4), 1229–1244 (2012)
Acknowledgement
This research was supported by the Zhejiang Key Laboratory of Healthy Smart Kitchen Integrating System Project (No. 2014E10014).
Author information
Authors and Affiliations
Corresponding author
Editor information
Editors and Affiliations
Rights and permissions
Copyright information
© 2018 Springer International Publishing AG, part of Springer Nature
About this paper

Cite this paper
Luo, S., Wang, Y., Xiong, N., Shan, P., Zhou, Y. (2018). An Interactive Smart Music Toy Design for Children. In: Streitz, N., Konomi, S. (eds) Distributed, Ambient and Pervasive Interactions: Understanding Humans. DAPI 2018. Lecture Notes in Computer Science(), vol 10921. Springer, Cham. https://doi.org/10.1007/978-3-319-91125-0_31
Download citation
DOI: https://doi.org/10.1007/978-3-319-91125-0_31
Published:
Publisher Name: Springer, Cham
Print ISBN: 978-3-319-91124-3
Online ISBN: 978-3-319-91125-0
eBook Packages: Computer ScienceComputer Science (R0)