Abstract
Torsion bars are some of the most important elements used in projectile weaving machines. In this study, the fracture of a torsion bar for weaving machine produced from spring steel is investigated. Specimens prepared from the damaged torsion bars were subjected to visual inspection, hardness testing, chemical analysis, and metallurgical evaluations. The failed torsion bars had been fabricated from spring steel, and the calculated stress on the bars suggested that the steel did not have sufficient torsional strength. Examination of fractured parts showed that all fractures started at a shoulder radius due to high stress concentrations.
Introduction
Projectile weaving machines use a projectile equipped with a gripper to insert the filling yarn across the machine. The unique principle of projectile filling insertion allows the insertion of practically any yarn such as cotton, wool, and polypropylene ribbon into the cloth being produced. The torsion bar is one of the most important elements of the projectile weaving machines. A torsion bar system is used for picking and transfers strain energy to the projectile before it separates from the picker shoe. The torsion bar can be adjusted to deliver the energy required to propel the projectile through the guide teeth to the shuttle brake [1, 2].
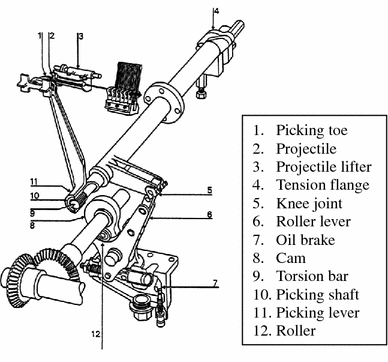
The torsion bar mechanism is shown in Fig. 1. Before picking, the torsion bar (9) is twisted via the cam (8), roller lever (6), and picking shaft (10) until the knee joint (5) tilts slightly beyond dead point. The front end of the torsion bar fits in the picking shaft, which is clamped on the picking lever (11) so that it performs the rotary movement of the picking shaft and torsion bar. When the projectile (2) is ready for picking, the rollers (12) to the left and right of the cam run up on to the ribs of the roller lever and cause the knee joint to yield. After picking, the picking lever jerks forward quickly, accelerating the projectile through the picking shoe (1). The unloading movement of the torsion bar is cushioned by an oil brake (7) [2].
Schematic of mechanism [1]
The investigated failed bars are made of spring steel. The spring steel (50CrV4, EN10132-4) is a heat-treatable alloy material. Two bars are damaged virtually every month in textile factory and the damage and resulting machine downtime resulted in significant loss of production. Therefore, the damaged torsion bars were evaluated and the cause of fracture of a bar manufactured was determined. The main dimensions of the torsion bars are shown in Fig. 2. A number of mechanical and microstructure analyses are carried out to determine the causes of fracture.
Techniques Used in Fracture Analysis
The cause(s) of the continuing failure of torsion bars may include a design error, an application error, or a manufacturing error. The design errors include factors such as improper shoulder geometry and improper materials selection. Application errors can be caused by a number of problems, including mounting, installation, and maintenance. Manufacturing errors may show up in the field as errors in machining or heat treatment processes.
In this analysis, the three damaged torsion bars were subjected to various tests. The following experimental investigations and stress calculations were performed:
-
visual inspection and fractography,
-
hardness tests,
-
chemical analysis,
-
metallographic analysis, and
-
torsional stress calculation.
Analysis and Results
Visual Inspection and Fractography
The investigated bars are shown in Fig. 3. The failed bars showed similar failure features and did show indications of fatigue crack growth when the fracture surface was examined. The fractures were macroscopically brittle and appeared consistent with torsional overload fracture. The fracture occurrence and the fractured surfaces of bars are shown in Fig. 4. According to the fractured surfaces, it was concluded that the failure was due to overload and that the overload probably resulted from an improper shoulder radius.
Hardness Analysis
Hardness analysis of fractured bar materials was carried out using a Rockwell hardness test machine. The measurements were carried out on three different surface areas. The core and surface hardness values are given in Table 1. The hardness of bars was observed as 44–46 HRC which are suitable values for the projectile system according to the literature [3, 4].
Chemical Analysis
Chemical composition of 50CrV4 spring steel according to EN10132-4 is shown in Table 2. The chemical composition of the bar material was determined by spectroscopic analysis and are listed in Table 3. It was understood from the chemical composition that the material was spring steel. The bar material contains C, Cr, V, and Mn, which cause the quenched and tempered structure to be quite tough. The C and V additions improve the hardenability of the steel. Chromium improves the corrosion resistance, while manganese is added to deoxidize the melt and improve machinability.
Metallographic Analysis
The metallographic specimens were first ground, polished, and etched using standard techniques in order to examine the inner structure. A light optical microscope was used in the investigations. The microstructures of the failed bar materials show similar structure characteristics (Fig. 5). The existence of alloy carbides is due to the 0.95% chromium present in the alloy. Very thin carbide particles can be seen in the tempered martensitic matrix in the microstructure. From these observations, it was concluded that the heat-treatment process was properly done.
Torsional Stress Calculation
Since visual inspection suggested that the fracture was caused by torsion, the torsional stress τ t on the bar was calculated. The torsion bar operating conditions and the terms used in equations are given in Table 4. The torsion stress on the bar can be calculated using the equation,
The maximum torsion moment M tmax can be calculated using the equation,
From Eq. 2, the maximum torsion moment M tmax was calculated to be 905.5 Nm. Using Eq. 1 and Table 4, the torsion stress τ t was calculated to be 671.4 MPa. According to the literature [5], the torsion fatigue strength, τ tf, of the material is 570 MPa. This value is lower than the calculated value suggesting that torsional fatigue should be anticipated. In this case, bars have a safety factor which is less than one, about 0.84, and the bars did not have the required torsional strength. Also, fatigue analysis usually requires a number of fatigue strength factors to be taken into consideration such, as surface conditions, size, and stress concentration. When these factors are taken into consideration, the safety factor will be decreased. Thus, the fractures were observed on bar surface.
Conclusion
In this research, the influences of shoulder geometry, chemical composition, and hardness of the bars were investigated and torsional stress was calculated. From the experimental observations and calculations, the following conclusions may be made.
The chemical composition of bar material and the heat treatment technique are proper. The torsion fatigue strength of the design is not adequate because the bars have about 0.84 safety factors. Thus, the working torsion angle must be decreased. The fracture occurrence and the fractured surfaces of bars are observed on shoulder zone. It was said that the failure was due to improper shoulder radius. In order to decrease the stress concentration, the bar shoulder geometry should be changed, and the shoulder radius should be increased.
References
Horrocks, A.R., Anand, S.: Handbook of Technical Textiles. CRC Press Inc (2000)
Adanur, S.: Handbook of Weaving. A Technomic Publishing, Pennsylvania (2001)
Nieman, G., Winter, H., Höhn, B.R.: Maschinenelemente Band I, 4. Auflage. Springer Verlag, Berlin (2005)
Hamrock, B.J., Schmid, S.R., Jacobson, O.B.: Fundamentals of Machine Elements, 2nd edn. McGraw-Hill, New York (2005)
Muhs, D., Wittel, H., Jannasch, D., Vobiek, J.: Rolof/Matek Maschinenelemente, 18. Auflage. Friedr. Vieweg & Sohn Verlag, Wiesbaden (2007)
Acknowledgments
The author gratefully acknowledges the support received from Mehmet Toprak and AR Dokum Co. for this study.
Open Access
This article is distributed under the terms of the Creative Commons Attribution Noncommercial License which permits any noncommercial use, distribution, and reproduction in any medium, provided the original author(s) and source are credited.
Author information
Authors and Affiliations
Corresponding author
Rights and permissions
Open Access This is an open access article distributed under the terms of the Creative Commons Attribution Noncommercial License (https://creativecommons.org/licenses/by-nc/2.0), which permits any noncommercial use, distribution, and reproduction in any medium, provided the original author(s) and source are credited.
About this article
Cite this article
Sekercioglu, T. Failure Analysis of Torsion Bar of Projectile Weaving Machine. J Fail. Anal. and Preven. 10, 363–366 (2010). https://doi.org/10.1007/s11668-010-9372-5
Received:
Revised:
Published:
Issue Date:
DOI: https://doi.org/10.1007/s11668-010-9372-5


